VIP3
™
Accessory Kit (AC820-blk) for Kinesis
®
Freestyle2
™
Convertible Keyboard
Online User’s Manual and instructional videos. This mini-manual for your new Freestyle
®
-family product will
get you started, but if you have questions that aren’t answered here, check for updates and view the instructional
videos at http://www.kinesis.com/support/manuals.htm.
Introduction
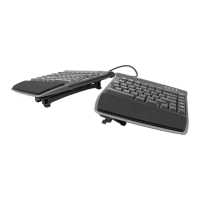
The Freestyle2 VIP3 Accessory kit provides a pair
of 3-angle V-lifters™ and integrated palm rests
that clip onto the Freestyle2 convertible keyboard,
creating the Freestyle2 VIP3 keyboard. Three
levels of tenting* (5, 10, or 15 degrees) can be
selected. Each keying module can be adjusted
independently and V-lifters are equally effective
whether the keying modules are splayed (using the
pivot tether
™
which came with your keyboard) or
completely separated by up to 9 inches with the
Pivot Tether removed (see page 2).
*Tenting is the elevation of the center portion of a split keyboard. By raising your thumbs, your forearm muscles
become relaxed, resulting in significantly improved comfort and blood flow. The included palm rests further
improve relaxation of forearms and as well as that of neck and shoulder muscles.
Contents of kit
The Freestyle2 VIP3 Accessory Kit includes a pair of
palm rests with replaceable, self-adhesive palm pads. Also
included are a pair of 3-angle V-lifters which mount to the
underside of the keyboard after the palm rests have been
installed.
Installing palm rests (disconnect from or shut down your
computer before beginning). Install palm rests first, before
installing 3-angle V-lifters. The palm rests will only insert
into their correct
keying module,
with the wider end
of the support area
towards the middle
of the keyboard.
Lay the keyboard
on a flat surface and place palm rests in front of the appropriate keying
module. Slide each palm rest towards its keying module to engage the three
mounting tabs in their respective slots.
To remove the palm rests, hold a keying module in one hand and its palm
rest in the other hand. Pull the palm rest straight away from the keying
module. For easier removal, lift up gently on the palm rest while pulling it
away from the keyboard.
Note: Don’t remove one corner before the other–pull the palm rest straight
away from the keyboard.
VIP3 kit installed on Freestyle2 keyboard, 10 degree tenting
VIP3 kit contents
Installing palm rest