2
1. Choose from the following table the corresponding program of your cabinet.
2. Unlock the keyboard by pressing at the same time and the countdown starts for 3 seconds.
3. Press to display the first parameter SPo. Press 4 times and the parameter Cod is displayed.
4. Press to display its value and press
to enter the cabinet’s program. Press to store the cabinet’s program to parameter Cod.
5. Press again to exit the parameter menu. The indication “YES” is displayed and all appropriate settings are now stored.
6. Toggle cabinet’s power supply in order to work properly and based on the registered settings.
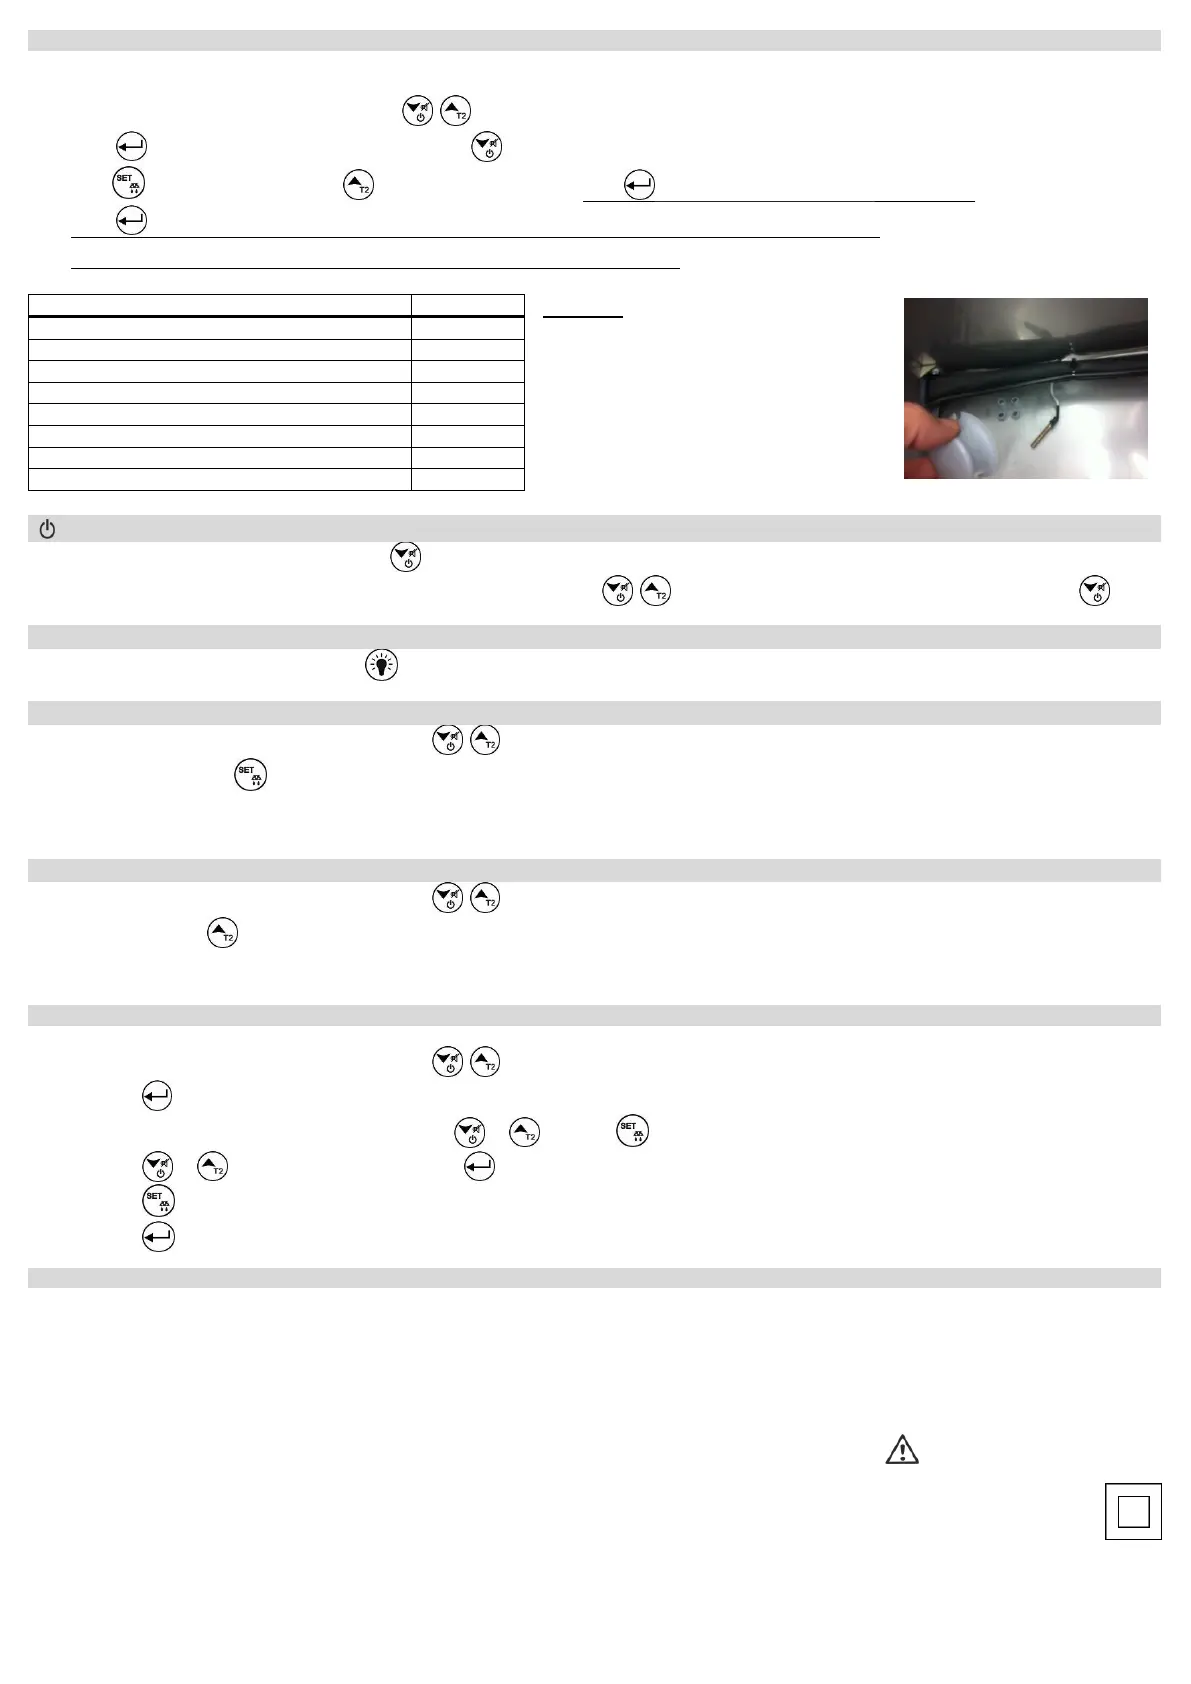
CAUTION!
When the temperature probe is PTC, parameter 27
must be changed to SEn = 0
PTC probes are as shown in the image:
1. To activate the cabinet, press for 3 seconds .
2. To deactivate the cabinet, unlock the keyboard by pressing at the same time and the countdown starts for 3 seconds. Press for 3 seconds .
1. If the cabinet has a light, press and hold to turn it ON or OFF.
1. Unlock the keyboard by pressing at the same time and the countdown starts for 3 seconds.
2. Press for 3 seconds to start a manual defrost with duration based on the parameter dd2 (table page 3).
For more information regarding the defrost check the description of parameter dt6 (table at page 4 - parameter Νο 11).
1. Unlock the keyboard by pressing at the same time and the countdown starts for 3 seconds.
2. Press and hold
to display the evaporator’s temperature for 2 seconds and then the cabinet’s temperature (if parameter diP is adjusted to constantly display
the Set Point and not the room’s temperature).
3. If the evaporator’s temperature is deactivated from the parameter OS2, it is displayed “- - -”.
ATTENTION: to gain full access to the parameter’s menu, the 5
th
parameter Cod must be adjusted to 22 (see parameter table page 4).
1. Unlock the keyboard by pressing at the same time and the countdown starts for 3 seconds.
2. Press to enter the parameter menu.
3. Choose the parameter you want to adjust by pressing or and press to display its value.
4. Press or to change its value and then press to store the new value.
Press if you want to cancel the new value and the parameter’s name is displayed.
5. Press to exit the parameter menu.
Model RN+ power supply: 230VAC 50/60Hz / Maximum power consumption: 3W. Model RNW+ switching power supply 100-264VAC 50/60Hz 5W
It is recommended using a power supply safety fuse: 0.5Α (not included)
Room and evaporator temperature sensors NTC 10K 1% 25°C ΙΡ68 with rubber tube and temperature range -50÷+112°C (-58÷+230°F) or PTC 1Κ 25
o
C with metal tube
and temperature range -50÷+150°C (-58÷+302°F) / Accuracy: ±0.5°C
Alarm buzzer / Serial input with 5pin connector / Digital input door
5 anti-explosive relays: compressor relay 30A res. 250VAC normally open contact / fan relay 10A res. normally open contact / defrost relay 10A res. normally open contact /
lamp relay 10A res. normally open contact / door resistance relay or drainage resistance 10A res. normally open contact / Max current load 16Α.
Connections: cable cross section 2.5 mm² for all relays / cable cross section from 0.25 to 1.0 mm² for the sensors and door switch / Use cable with appropriate
temperature ratings – terminal block temperature possible rise above 60°C
Connections with terminal blocks 18A using cable with cable cross section up to 2.5 mm² / It is recommended using a torque wrench with maximum torque 0.4Nm
Operating temperature: -15÷+55°C / Storage temperature: -20÷+80°C
No plastic enclosure / Protection IP 00 / Device Class: 2
The device is mounted on appropriate panel holes and secured with 3 screws (Φ=3mm). The holes are created only for button and display access. An appropriate membrane
with protection IP65 must be placed over the panel to secure the device from liquid leakage and human interference.
Firmware: V4.0
 Loading...