V 4.0
AIR LINK DW 20BR
Controls
(EN)
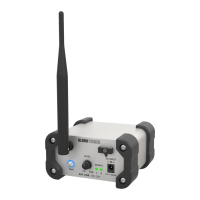
Step 1: Controls
(1) PAIR button – enables the unit to become available for pairing by pressing
and holding the button for 4 seconds. The LED ring will indicate the current
status. See the Getting Started section for details.
(2) LEVEL knob – adjusts the volume of the signal sent to the output jacks.
(3) DC INPUT – accepts the included power adapter.
(4) OUTPUTS – connect to an amp, powered speakers, or mixer via balanced
XLR or unbalanced ¼" TS cables.
(ES)
Paso 1: Controles
(1) PAIR button – permite que la unidad esté disponible para emparejar
presionando y manteniendo presionado el botón durante 4 segundos. El
anillo LED indicará el estado actual. Consulte la sección Introducción para
obtener más detalles.
(2) LEVEL knob – ajusta el volumen de la señal enviada a las tomas de salida.
(3) DC INPUT – acepta el adaptador de corriente incluido.
(4) OUTPUTS – conéctelo a un amplicador, altavoces autoamplicados o
mezclador mediante cables XLR balanceados o TS de ¼ "no balanceados.
(FR)
Etape 1: Réglages
(1) PAIR button - permet à l'appareil de devenir disponible pour l'appairage
en appuyant sur le bouton et en le maintenant enfoncé pendant 4
secondes. L'anneau LED indiquera l'état actuel. Consultez la section Mise
en route pour plus de détails.
(2) LEVEL knob - règle le volume du signal envoyé aux prises de sortie.
(3) DC INPUT - accepte l'adaptateur secteur inclus.
(4) OUTPUTS - se connecter à un ampli, des enceintes ampliées ou une table
de mixage via des câbles XLR symétriques ou TS asymétriques ¼ ".
(DE)
Schritt 1: Bedienelemente
(1) PAIR button - Ermöglicht die Kopplung des Geräts, indem die Taste 4
Sekunden lang gedrückt gehalten wird. Der LED-Ring zeigt den aktuellen
Status an. Weitere Informationen nden Sie im Abschnitt Erste Schritte.
(2) LEVEL knob - Stellt die Lautstärke des an die Ausgangsbuchsen
gesendeten Signals ein.
(3) DC INPUT - akzeptiert das mitgelieferte Netzteil.
(4) OUTPUTS - Über symmetrische XLR- oder unsymmetrische ¼ "TS-Kabel an
einen Verstärker, Aktivlautsprecher oder Mixer anschließen.
(PT)
Passo 1: Controles
(1) PAIR button - permite que a unidade que disponível para
emparelhamento pressionando e segurando o botão por 4 segundos. O
anel de LED indicará o status atual. Consulte a seção Introdução para obter
detalhes.
(2) LEVEL knob - ajusta o volume do sinal enviado para os conectores de saída.
(3) DC INPUT - aceita o adaptador de alimentação incluído.
(4) OUTPUTS - conecte a um amplicador, alto-falantes amplicados ou
mixer via cabos XLR balanceados ou TS não balanceados de ¼ ".
(IT)
Passo 1: Controlli
(1) PAIR button - consente all'unità di rendersi disponibile per l'associazione
premendo e tenendo premuto il pulsante per 4 secondi. L'anello LED
indicherà lo stato corrente. Vedere la sezione Guida introduttiva
per i dettagli.
(2) LEVEL knob - regola il volume del segnale inviato ai jack di uscita.
(3) DC INPUT - accetta l'adattatore di alimentazione incluso.
(4) OUTPUTS - collegare a un amplicatore, altoparlanti amplicati o mixer
tramite cavi XLR bilanciati o cavi TS da ¼ "non bilanciati.
(1) (2) (3) (4)