ENGLISH
450 Bond Street Lincolnshire, IL 60069 1-800-553-4676
customerservice@kleintools.com
www.kleintools.com/warranty
Use only on wood frames / structures of low or medium density. Hard woods may cause malfunction or partial staple penetration. Always ensure proper staple size is
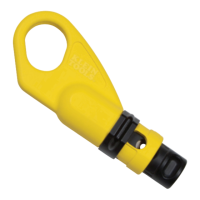
STAPLE SELECTION (FIG. 1, FIG. 2):
USE ONLY WITH KLEIN
®
STAPLES
Determine appropriate staple size for cable type (see staple size guide on side of stapler):
- 1/4" for: CAT3, CAT5e, or speaker wire
- 5/16" for: CAT3, CAT5e, or CAT6/6A, Coax
- 19/32" for: NM: 14/3, 14/3G, 12/3, Qty 1 or 2 Coax, or Qty 1 to 3 CAT3/5e/6/6A
31/64" for: NM: 14/2, 14/2G, 10/2, 10/2G, or Qty 1 or 2 speaker wires
For use with 450-001 or 450-002:
Staple / Cable Size Selector
is in the down position (
. 1). If it is in the up position, grasp staple guide firmly and pull down
Staple / Cable Size Selector
is locked in the down position when the Locking Buttons
is locked in the down position when the Locking Buttons
is locked in the down position when the Locking Buttons
is locked in the down position when the Locking Buttons
. 1). If it is in the up position, grasp staple guide firmly and pull down
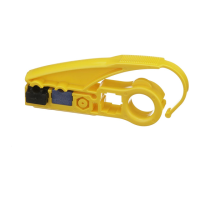
For use with 450-003 or 450-004:
Staple / Cable Size Selector
. 2). If it is in the down position, depress both Locking Buttons
sides of stapler), and slide the
Staple / Cable Size Selector
Staple / Cable Size Selector
to the up position. Ensure that the cable opening is fully exposed.
STAPLE TENSION ADJUSTMENT:
For use with 450-001 and 450-002:
should be in the lower tension, down position.
should be in the lower tension, down position.
For use with 450-003 and 450-004:
should be in the higher tension, up position.
should be in the higher tension, up position.
To change between positions, push in and turn gently. For reference, the higher tension setting may be necessary when using the 450-001 and 450-002 with harder woods, and the
lower tension may be necessary when using 450-003 and 450-004 on softer materials, such as drywall. Perform a test setting determination on a non-visible surface.
Hold staple gun upside down, depress
Insert appropriate staple, with the legs pointing up (FIG. 3).
DO NOT mix staples of different sizes. Partial strips, damaged strips or mixing of different sized staples may jam the stapler.
Locate stapler over cable, ensuring cable is contained within the
for entire length of stapler, front to back.
firmly downward to release staple.
If staples jam, ensure that you are using the proper staple size and tension setting. Also ensure that you are not attempting to staple into a surface that cannot be penetrated by a
staple. In the event of a jam, clear jammed staple gently, wearing gloves to prevent injury to hands.
Read all instructions thoroughly prior to use. Failure to read, understand, and follow all instructions may result in serious injury.
Never work on or near live electric circuits.
Always wear approved eye protection and hearing protection.
Keep fingers clear of staple discharge area when operating or clearing a jam.
Only direct staple discharge towards surface intended to be stapled; never point towards any body part.
Ensure correct staple size is selected before discharging.
Use proper positioning of the cable guide to prevent staples from piercing the cable
Always be cautious of potential hazards such as electrical wiring, damp or wet conditions, unstable surfaces.
For professional use only.
The Klein Tools Cable Stapler features a forward action for greater stability. It is designed to allow user to push the handle, rather than squeeze, delivering easy, consistent
performance. The staples are released from the front end of stapler, nearest to where the handle is pressed down. A cable guide along the entire bottom surface protects the cable
from being crushed during the stapling process.
WARNING SYMBOLS ON PRODUCT
Always wear approved eye protection
Do not use on live electric circuits
Always wear approved hearing protection
Read instructions before using
BASED ON: 1390250 Rev 04/20 C

 Loading...