EasyManua.ls Logo

Klein Tools 450-100 User Manual

Klein Tools 450-100
4 pages
To Next Page IconTo Next Page
Page #1 background imageLoading...
Page #1 background image
Cable Stapler Instructions
케이블 스테이플러 지침
ー取扱説明書
11
BASED ON: 1390250 Rev 04/20 C
450-100
FEATURE DETAILS /
기능 세부사항
各部の名称
ENGLISH
7
Staple Discharge Area
8
Locking Buttons
9
Cable Guides
10
Actuation Force
11
Belt Clip Mounting Recess* (×2)
1
Cushioned handle
2
Tension Setting Lever
3
Staple Push Rod
4
Push Rod Release Latch
5
Belt Clip*
6
Staple / Cable Size Selector
*Belt clip can be mounted on either side of stapler. To switch sides, remove #2
Phillips screw, lift clip and bracket, and move to mounting recess on opposite side.
Place clip and bracket and screw into place and secure by firmly tightening the
screw into place. Use manual screwdriver only; do not overtighten.
FIG. 1 FIG. 2
FIG. 3
9
1
5
8
7
10
4
4
4
3
3
3
6
2
2
2
그림 1 그림 2
한국어
7
스테이플
배출
영역
8
잠금
버튼
9
케이블
가이드
10
동작
압력
11
벨트
클립
장착
*
(×2)
1
쿠션
핸들
2
장력
설정
레버
3
스테이플
푸시
로드
4
푸시
로드
해제
래치
5
벨트
클립
*
6
스테이플
/
케이블
크기
선택기
*벨트 클립은 스테이플러의 쪽에 장착할 있습니다. 장착면을 전환하려면,
#2 Phillips 나사를 제거하고 클립과 브래킷을 들어 올려서 반대쪽의 장착 홈으로
옮깁니다. 클립과 브래킷을 제자리에 장착하고 나사로 단단히 조여 고정합니다.
수동 스크루드라이버만 사용하십시오. 과도하게 조이지 마십시오.
그림 3
1 2
3
日本語
7
ル射出口
8
ロックタン
9
イド
10
作動力
11
ベルプ取け用凹
*
(×2)
1
クッション ンド
2
張力設定バー
3
ッド
4
ッド
5
リッ
*
6
ープ
/
ーブイズ
イッ
*トクステプラどちり付ことができます
右を入れ替えには、#2 ィリッ リッ ット
上げ反対側の取付け凹部に移動所定の位
置に置きネジ締めて固定手動バーのみ使用
てく
Question and Answer IconNeed help?

Do you have a question about the Klein Tools 450-100 and is the answer not in the manual?

Klein Tools 450-100 Specifications

General IconGeneral
BrandKlein Tools
Model450-100
CategoryPower Tool
LanguageEnglish

Summary

Feature Details

Cushioned Handle

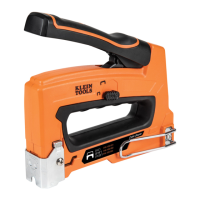
Soft grip for comfortable operation and reduced user fatigue.

Tension Setting Lever

Adjusts the force applied to drive staples, impacting penetration depth.

Staple Push Rod

Component that pushes staples into the firing chamber for ejection.

Push Rod Release Latch

Mechanism to release the push rod for staple loading.

Belt Clip

Attachable clip for securing the stapler to a belt or tool pouch.

Staple Cable Size Selector

Adjusts the stapler for different staple sizes and cable diameters.

Staple Discharge Area

The point from which staples are ejected from the stapler.

Locking Buttons

Buttons used in conjunction with the Staple/Cable Size Selector.

Cable Guides

Guides that hold and protect the cable during the stapling process.

Actuation Force

Refers to the force required to activate the stapler.

Belt Clip Mounting Recess

Recessed areas on the stapler body for mounting the belt clip.

Warnings

General Safety Warnings

Important safety precautions to follow before and during use to prevent injury.

Warning Symbols on Product

Explanation of warning symbols found on the stapler itself.

Operating Instructions

Staple Selection and Cable Compatibility

Guidance on choosing the right staple size and compatibility with cable types.

Staple Tension Adjustment

How to adjust the stapler's tension for different materials and staple sizes.

Loading Staples

Step-by-step instructions for properly loading staples into the stapler.

Stapling Cable

Instructions on how to correctly staple cables, including positioning and activation.

Related product manuals