Step 1 - Ensure that all parts are washed before first use. Place the egg
steamer stem up through the centre hole of the egg Steamer Tray.
Turn the egg stem clockwise to lock into place.
Step 2 - The egg steamer tray can hold up to 4 eggs, carefully place
your eggs wide-side down into the tray.
Step 3 - Add 1 cup of room temperature water into the Non Stick
Cooking Pot and gently place your steamer tray with eggs in the pot.
Place the Lid onto the Kleva® 1 ButtonCooker Plus Cooker and lock the
Lid in place with the Locking Tabs.
Step 4 - Press down on the switch button to proceed to COOK mode.
Step 5 - When you have reached your set cooking time, switch to
Warm mode and turn the Power Button of the Kleva® 1 Button Cooker
Plus to OFF and unplug the power cord.
Note: If you are cooking batches of eggs, ensure you always add a new
batch of 1/2 cup of room temp water, no matter if you are cooking 1 or
4 eggs. Suggested Cooking Time: Hard-boiled - 15min /
Jammy-boiled -13 min / Soft-boiled - 11 min
Egg Steamer Tray
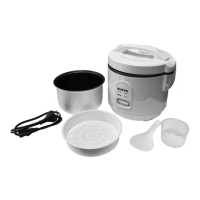
Step 1 - Measure rice with the enclosed Measuring Cup (Measuring cup
provided is based on 160ml). For best results, rinse measured rice
until the water becomes relatively clear (see the “Helpful Hints” on
page 5).
Step 2 - Place rinsed rice in the Cooking Pot. For 4 cups of uncooked
rice (yields 8 cups of cooked rice), measure 4 full scoops of rice using
the Measuring Cup included with your unit. Add to the Cooking Pot.
Step 3 - Add water to the 4 level mark on the inside of the
Cooking Pot. Always add the rice to the Cooking Pot BEFORE adding
the water. The water level marked on the inside of
the Cooking Pot is based upon having rice added already.
Step 4 - Follow steps 4-8 of How To use your Kleva® 1 ButtonCooker
Plus Cooker found on page 6-7.
How to set up the cooking Rice process
 Loading...