Do you have a question about the Klipsch R-14M and is the answer not in the manual?
Step-by-step instructions for removing the tweeter component from the R-14M speaker, including tools needed.
Procedure for safely removing the woofer from the R-14M speaker, detailing necessary tools and steps.
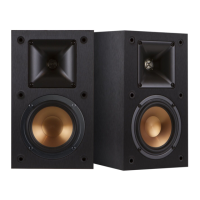
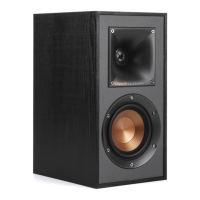
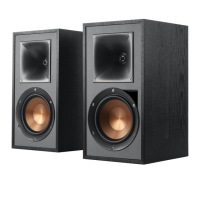
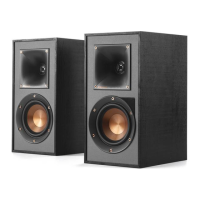
The Klipsch R-14M Monitor Speaker is a high-performance audio device designed for exceptional sound reproduction within a home audio system. This service manual provides comprehensive instructions for maintaining and repairing the speaker, ensuring its longevity and optimal performance. The R-14M is engineered to deliver a rich and dynamic listening experience, making it suitable for a variety of audio applications, from casual music listening to critical home theater setups. Its design focuses on clarity, detail, and a wide soundstage, characteristic of Klipsch's commitment to audio excellence.
The R-14M monitor speaker is designed for straightforward integration into existing audio systems. It functions as a passive speaker, meaning it requires an external amplifier or receiver to operate. Users connect the speaker to their amplifier using standard speaker wire, attaching the wires to the binding posts located on the rear of the speaker. These binding posts are designed for secure connections, ensuring a stable signal transfer. The speaker is intended for placement on shelves, stands, or other suitable surfaces, with careful consideration given to room acoustics and listening position to maximize its performance. Its compact size allows for versatile placement options in various room environments. The speaker's robust construction ensures durability, allowing it to withstand regular use in a home setting. While the manual primarily focuses on service, understanding the basic operational requirements is key to appreciating its design. The R-14M is part of the Reference Premiere line, indicating its position as a high-quality component within Klipsch's product offerings, aimed at delivering a premium audio experience.
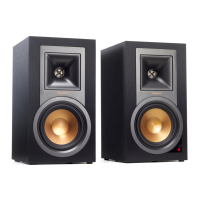
The service manual outlines specific procedures for maintaining and repairing key components of the R-14M monitor speaker, primarily focusing on the replacement of the tweeter and woofer. These instructions are crucial for extending the life of the speaker and restoring its performance should a driver become damaged.
The process for replacing the tweeter is detailed with step-by-step instructions. To begin, users will need a #2 Philips Head Screwdriver and a Small Flat Blade Screwdriver. The first step involves removing four screws located at the corners of the tweeter assembly. Once these screws are removed, the tweeter unit can be carefully lifted from its housing. The manual emphasizes that the tweeter should come free easily after the screws are out. With the tweeter removed from the cabinet, the next step involves disconnecting the wiring. This is achieved by sliding back the silicone covers that protect the terminals and then using a small flat blade screwdriver to gently release the wire clips holding the positive and negative terminals. This careful disconnection prevents damage to the wires or the new tweeter. After the old tweeter is disconnected, the new tweeter can be installed. The wires are plugged onto the new tweeter's terminals, and the silicone covers are slid back into place to secure and insulate the connections. Finally, the new tweeter is positioned back into the speaker cabinet, and the four screws are reinserted and tightened to secure it. This process ensures that the high-frequency reproduction of the speaker remains accurate and clear.
Similar to the tweeter, the manual provides clear instructions for replacing the woofer, requiring the same tools: a #2 Philips Head Screwdriver and a Small Flat Blade Screwdriver. The initial step involves removing four screws located around the perimeter of the woofer. Once these screws are removed, the woofer unit can be carefully extracted from its enclosure. The manual indicates that the woofer should come free once the screws are out. With the woofer removed from the cabinet, the wiring needs to be disconnected. This involves sliding back the silicone covers on the terminals and using a small flat blade screwdriver to release the wire clips holding the positive and negative terminals. This ensures a safe and clean disconnection. After the old woofer is disconnected, the new woofer can be installed. The wires are plugged onto the new woofer's terminals, and the silicone covers are slid back over the terminals to protect them. The new woofer is then placed back into its position in the speaker cabinet, and the screws are reinserted to secure it. A crucial final step for woofer replacement is to replace the trim ring. This is done by setting the trim ring into position and gently pressing it around the edge, ensuring that the clips on the back lock into place. Once properly installed, the trim ring should sit flush with the front of the speaker, completing the aesthetic and functional integrity of the unit. These detailed maintenance procedures empower users or service technicians to perform necessary repairs, ensuring the R-14M continues to deliver high-quality audio performance for years to come.
| Bass reflex | Yes |
|---|---|
| Product color | Black |
| Housing material | MDF |
| Recommended usage | Universal |
| Suitable for outdoor use | - |
| Speaker type | 5-way |
| Woofer diameter | 102 mm |
| Tweeter diameter | 25.4 mm |
| Number of drivers | 2 |
| Speaker placement | Floor, Tabletop/bookshelf |
| Audio output channels | 2.0 channels |
| Number of tweeter drivers | 1 |
| Woofer diameter (imperial) | 4 \ |
| Tweeter diameter (imperial) | 1 \ |
| Impedance | 8 Ω |
| Sensitivity | 90 dB |
| Frequency range | 64 - 24000 Hz |
| RMS rated power | 50 W |
| Crossover frequency | 2250 Hz |
| Peak Music Power Output (PMPO) | 200 W |
| Package weight | 7160 g |
| Connectivity technology | Wired |
| Depth | 191 mm |
|---|---|
| Width | 149 mm |
| Height | 248 mm |
| Weight | 6400 g |