EasyManua.ls Logo

KneeRover Jr. All Terrain User Manual

KneeRover Jr. All Terrain
4 pages
To Next Page IconTo Next Page
Page #1 background imageLoading...
Page #1 background image
Who we are:
We are committed to providing innovative and affordable mobility
solutions to get you moving as soon as possible after injury or
surgery and for the duration of your recovery free to go about
your busy, active life and have a little fun doing it. We are all
about leaving the painful crutches behind and giving you the
Freedom to Move.
The KneeRover
®
Team is Driven to Change Your Outcome!
Your Satisfaction is Our Top Priority.
Need Parts or Accessories?
Add an accessory like a cup holder or headlight to enhance your
experience on your new KneeRover
®
All Terrain scooter. Keep
your scooter operating in top shape with original manufacturer
parts. Visit our exclusive online partner: kneewalkershop.com, to
explore our full range of parts and accessories.
Need Help Contact Us:
Phone: 1- 877-737-9877
Web: www.kneerover.com
KneeRover® Jr. - All Terrain
User Manual
KneeRover
®
is a registered trademark of Capital Grade Imports LLC.
Question and Answer IconNeed help?

Do you have a question about the KneeRover Jr. All Terrain and is the answer not in the manual?

KneeRover Jr. All Terrain Specifications

General IconGeneral
Product TypeKnee Walker
Model NameKneeRover Jr. All Terrain
Weight Capacity150 lbs
Overall Length33 inches
Frame MaterialAluminum
WheelsAll-terrain
SteeringSteerable
Braking SystemDual handbrakes
FoldingYes
Additional FeaturesBasket

Summary

About KneeRover

Parts and Accessories

Customer Support

Product Overview

Operating Instructions

Initial Setup for Operation

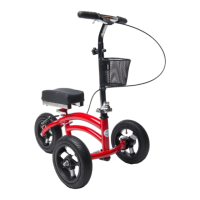
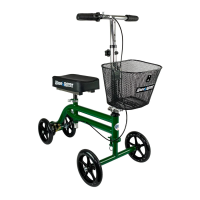
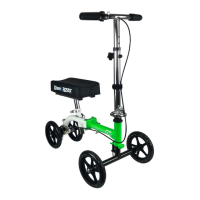
Adjust handlebar to waist height and knee platform to 90 degrees for comfortable and stable operation.

Moving the Scooter

Push forward or backward with your good foot to move. Allow the scooter to glide and push again as it slows.

Safety Precautions

Safe Steering and Speed

Use for slow, controlled speeds. Apply brake when turning to prevent tipping.

Periodic Maintenance Checks

Regularly check and tighten nuts and bolts on steering and brake mechanisms for safe operation.

Warranty Information

Assembly and Setup

Brake Adjustment

Adjust brake lever and cable for proper function, ensuring pads do not rub the wheel when disengaged.

Ongoing Maintenance

Periodically inspect and tighten fasteners. Check tire pressure (22-28 psi) for optimal performance.

Setup Instructions

Install Front Axle

Attach the front axle using provided bolts, ensuring tie rods are correctly assembled.

Install Steering Column

Raise and secure the steering column using the clamp lever and push the security pin.

Install Knee Platform

Attach the knee platform by inserting the post, securing with the locking pin and tightening the clamp.

Attach Basket & Inflate Tires

Attach the basket and inflate all three tires to the correct pressure (22-28 psi).

Related product manuals