This document provides installation and maintenance instructions for the Knightsbridge DC002 and DC003 door chime kits.
Function Description
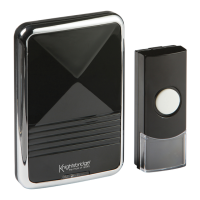
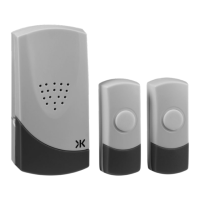
The Knightsbridge DC002/DC003 is a wireless door chime kit consisting of a receiver unit and a bell push. When the bell push is activated, it sends a wireless signal to the receiver, which then emits a chosen melody and/or flashes an LED indicator. This system is designed to alert occupants to visitors at their door.
Important Technical Specifications
Bell Push:
- Power: 3V CR2032 battery (included)
- IP Rating: IP44 (Ingress Protection rating, indicating it is protected against solid objects larger than 1mm and against splashing water from any direction).
Receiver Unit:
- Power: 230V AC-50Hz
- Operating Temperature: -30°C to 40°C
- Operating Range: 80m (This range is dependent on the environment and may vary).
- Selectable Tones: 36 melodies available.
Usage Features
Kit Components:
Each door chime kit includes:
- 1 x Receiver
- 1 x Bell push
- 1 x CR2032 battery for the bell push
- 1 x Double-sided adhesive pad
- 1 x Instruction manual
Bell Push Features:
- LED Indicator (1): Provides visual feedback.
- Push Button (8): The primary button to activate the chime.
- Nameplate Cover (9): Allows for personalization or identification.
- Opening Slot (10): Used for opening the bell push for battery replacement or mounting.
- Standby Holes for Screws (11): For screw-mounting the bell push.
- Front and Back Cover Hook (12): Secures the bell push casing.
Receiver Unit Features:
- Speaker (2): Emits the selected melody.
- Sound and Flash Switch (3): Allows users to select the desired alert mode:
- Left position: Sound only.
- Middle position: LED flash only.
- Right position: Sound and LED flash.
- Volume Button (4): Adjusts the sound volume to high, medium, or low.
- Melody Selector (5): Used to choose from the 36 available melodies.
- Auto Learning Code Button (6): Facilitates pairing the bell push with the receiver.
- Plug (7): For connecting the receiver to a standard socket outlet.
Installation:
Battery Installation (Bell Push):
- Remove the nameplate cover.
- Remove the small rubber screw cover in the lower right-hand corner using thin-tipped tweezers or a needle.
- Unscrew the retaining screw.
- Insert a flat-head screwdriver into the slot at the bottom of the bell push and gently turn to open the front cover.
- Install the CR2032 battery, ensuring correct polarity (+ side up).
- Replace the front cover, retaining screw, rubber cover, and nameplate cover.
Wall Mounting (Bell Push):
- Important Precaution: Before drilling, ensure no cables or pipes will be damaged.
- Screw Mounting:
- Open the bell push as described for battery installation.
- Pierce the fixing holes on the rear of the bell push.
- Mark locations for drilling on the surface.
- Screw the backplate to the surface.
- Replace the cover.
- Adhesive Pad Mounting:
- Ensure the surface is clean and dry.
- Peel back one side of the double-sided adhesive pad and attach it to the bell push.
- Peel back the other side of the pad and attach the bell push to the desired surface.
Receiver Unit Installation:
- Plug the receiver unit into a socket outlet.
- Ensure the receiver is within the recommended operating range of the bell push.
Operation:
- Melody Selection: Press the selector to choose a different melody, then press the bell push once to store the selection.
- Sound and Flash: Slide the switch to the left for sound only, to the middle for LED flash only, or to the right for both sound and LED flash.
- Volume Adjustment: Press the volume button to cycle through high, medium, or low volume settings.
Maintenance Features
User Hints for Troubleshooting:
If the receiver does not sound, check the following:
- Flat Batteries: Replace batteries in the bell push.
- Wrong Battery Polarity: Re-insert batteries correctly in the bell push.
- Out of Range: Operate the receiver within the recommended operational range.
- Interference: If interference occurs, remove the battery from the bell push, unplug the receiver, wait 10 seconds, then replace the battery. Repeat this procedure to generate a new auto learning code.
General Maintenance:
- Cleaning: Clean the device with a soft, dry cloth only. Avoid using aggressive cleaning products or solvents, as they may damage the product.
- Disposal: The product and its batteries should be recycled in the correct manner at the end of their life. Check with local authorities for available facilities.
Warranty:
- This product comes with a 1-year warranty from the date of purchase.
- The warranty is invalidated by failure to install in accordance with IEE Wiring Regulations (BS7671), improper use, or removal of the batch code.
- If the product fails within the warranty period, it should be returned to the place of purchase for a free replacement.
- ML Accessories is not responsible for installation costs associated with replacement products.
- Statutory rights are not affected.
- ML Accessories reserves the right to alter product specifications without prior notice.
Notes Prior to Installation:
- If not using the double-sided adhesive pad, fixing screws and wall plugs (not included) will be required.
- Avoid positioning the bell push on metal door frames, as this may affect the signal.
- Avoid positioning the bell push above or near heat sources (e.g., radiators) or in damp areas (e.g., kitchens and bathrooms).
- Consider the IP44 rating of the bell push when deciding its installation location.