Do you have a question about the Knightsbridge OS001 and is the answer not in the manual?
Explains how to manually override the auto mode, including reverting back to auto mode.
Read and retain these instructions for future reference and maintenance.
Essential safety measures before installation and during use.
How to detach the sensor base and select a suitable fixing location.
Lists unsuitable locations to prevent interference or damage.
Details wiring, connection diagrams, and sensor head attachment.
Describes testing the motion sensor's detection range and head adjustment.
How to set the duration light stays on and sensitivity to ambient light.
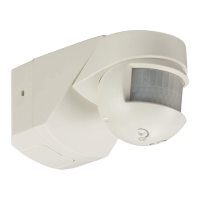
This document describes the installation and maintenance of an outdoor motion sensor, specifically models OS001 and OS001B, manufactured by Knightsbridge. The device is designed to automatically control lighting based on detected motion and ambient light levels, offering both automatic and manual override functionalities.
The primary function of the Knightsbridge outdoor motion sensor is to detect movement within its specified range and angle, and consequently activate a connected light source. This automation helps in energy saving by ensuring lights are only on when needed. The sensor integrates a Passive Infrared (PIR) detector to sense motion and a Lux control to measure ambient light, allowing the user to define the conditions under which the light should activate.
When operating in "Auto Mode," the sensor functions according to the settings configured via its Lux and Time controls. The Lux control determines the ambient light level at which the sensor becomes active, ranging from low light (5 lux) to full daylight. This means the light will only turn on if motion is detected and the ambient light is below the set Lux threshold. The Time control dictates how long the connected light remains on after motion is detected and the sensor is triggered. This duration can be adjusted from a minimum of 3 seconds up to a maximum of 30 minutes. Turning the knob clockwise increases the length of time the light stays on.
The device also features a "Manual Override" function, which allows the user to bypass the automatic operation and keep the light permanently on. This is achieved by a specific sequence of switching the power off and on twice within 3 seconds from "Auto Mode." Once activated, the light will remain on for 6 hours, after which it automatically reverts to "Auto Mode." Alternatively, the user can manually switch the unit back to "Auto Mode" at any time by switching the power off and on once.
The sensor is designed for outdoor use, indicated by its IP55 rating, making it suitable for various external applications. It is a Class I rated product, meaning it must be earthed for safety. The device operates on a standard 220-240V 50Hz mains supply.
The installation process begins with removing the sensor's base. This is done by inserting a slotted screwdriver into the slots on either side of the base and pushing on the locking tabs, which allows the sensor to be pulled forward and released from the base. The base is designed for versatile mounting options; it can be fixed onto a flat surface, a ceiling, or even a corner by removing specific "breakable areas" on the base. Once the base is securely screwed onto the chosen surface, installation cables are routed through the entry holes/grommets at the back of the base. It is crucial to maintain the unit's IP rating during this step, which may require the application of silicone sealant.
For electrical connections, the manual provides two diagrams: Diagram A for "automatic override" using a standard 10A 1-way switch, and Diagram B for "manual override" using a standard 10A 2-way switch. It is essential to ensure correct polarity during wiring. After the base is wired, the sensor head is aligned with the base and pushed back until it locks into position.
The sensor offers flexibility in its detection capabilities. The sensor head itself can be adjusted from side to side and up and down. Adjusting the head upwards generally increases the detection range. The device has a detection range of 12 meters to the front and 8 meters to the side, with a 200-degree detection angle.
A "Walk Test" procedure is recommended for initial setup and calibration. To perform this, the time control should be turned fully anti-clockwise to its minimum setting, and the Lux control should be turned fully clockwise. After power is supplied, the unit will take approximately 30 seconds to enter "Auto Mode." Once in "Auto Mode," the user can walk in front of the sensor at various positions within the required field of view to verify that the light activates at each point. This test helps in fine-tuning the sensor head's position for optimal coverage. It's noted that the unit is more sensitive when motion occurs across its field of view and less so when walking directly towards it. After the walk test and initial setup are complete, the time and Lux settings can be adjusted to the desired operational levels.
The device also comes with "Blanking Inserts." These inserts are supplied as cuttable pieces that can be attached to the lens. Their purpose is to block out specific areas within the sensor's field of view that might cause interference, such as automatic heat sources or public pathways, thereby preventing unwanted activations.
The manual emphasizes the importance of safety during any installation or maintenance work. Before beginning, the mains supply to both the luminaire and the sensor must be switched off, and the circuit fuses removed or circuit breakers switched off. Installation should only be performed by a qualified electrician in accordance with current IEE Wiring and Building Regulations.
For cleaning, the device should only be wiped with a soft, dry cloth. The use of other materials or solutions is discouraged as they may damage the fitting. This simple cleaning routine helps maintain the sensor's appearance and functionality without causing harm to its components.
The product is designed to be recyclable, and users are encouraged to recycle the unit at the end of its lifespan. This aligns with environmental responsibility and sustainable practices.
| Maximum Current | 13A |
|---|---|
| Frequency | 50Hz |
| Number of Gangs | 1 |
| Voltage | 230V |
| Maximum Power | 3kW |