EasyManua.ls Logo

Knightsbridge OS009 - User Manual

Knightsbridge OS009
2 pages
Print Icon
To Next Page IconTo Next Page
Loading...
ML Accessories Limited
LU5 5TA
www.mlaccessories.co.uk
SBJULY16_V2
116
INSTALLATION & MAINTENANCE MANUAL
OS009
IP
20
230V
50 Hz
Question and Answer IconNeed help?

Do you have a question about the Knightsbridge OS009 and is the answer not in the manual?

Summary

General Instructions

Safety

Installation

General Information

Warranty Information

Overview

This document is an installation and maintenance manual for the Knightsbridge OS009 PIR (Passive Infrared) detector.

Function Description

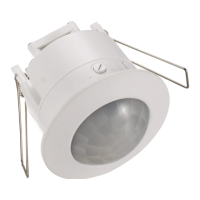
The OS009 is a PIR detector designed to automatically switch on a connected load when movement is detected within its range. It incorporates both time and lux (light level) settings to control its operation. The device is intended for indoor use, specifically for ceiling mounting.

Important Technical Specifications

  • Voltage: 230V
  • Frequency: 50Hz
  • IP Rating: IP20 (indicating protection against solid objects greater than 12.5mm, but no protection against liquids)
  • Class: Class II, double insulated (does not require an earth connection)
  • Cut-out Diameter: 62mm (as per Fig 1)
  • Time Setting Range: Minimum 10 seconds (± 3 seconds) to Maximum 8 minutes (± 2 minutes)
  • Lux Setting Range: Approximately 2000lx (daylight) to 3lx (low light/moon)
  • Compatibility: Not suitable for fluorescent lighting that requires a time delay of at least 30 minutes.

Usage Features

Installation:

  1. Safety First: Installation must be carried out by a qualified electrician or competent person in accordance with current IEE Wiring Regulations (BS7671).
  2. Power Disconnection: Before any installation or maintenance, ensure the mains supply to the fitting is switched off, and circuit fuses are removed or switched off.
  3. Load Check: Verify that the total load on the circuit, including the PIR, does not exceed the rating of the circuit cable, fuse, or circuit breaker.
  4. Location: Choose a suitable location, considering the IP20 rating. Avoid placing the PIR too close to a window, as it may detect movement through the window.
  5. Cabling: Provide suitable cabling to the required location.
  6. Cut-out: Cut a 62mm diameter hole in the ceiling, ensuring it does not interfere with electrical cables, water/gas pipes, or ceiling joists.
  7. Wiring: Access the connection terminals by pinching together the sides of the transparent cover on the rear. Wire the terminals, ensuring correct polarity: Neutral (Blue) and Live (Brown) for the incoming supply, and a Load connection (as per Fig 2).
  8. Insertion: Insert the unit into the ceiling.
  9. Power On & Test: Switch on the power supply and test for correct operation.

Operation and Settings (as per Fig 3):

  • Time Adjustment: The time setting dial controls how long the connected load remains on after movement is detected. It can be adjusted from a minimum of 10 seconds (± 3 seconds) to a maximum of 8 minutes (± 2 minutes).
  • Lux Adjustment: The lux setting dial determines the ambient light level at which the PIR will activate.
    • Rotating the dial fully clockwise (towards the sun icon) sets the lux level to approximately 2000lx, meaning the PIR will operate during daylight conditions.
    • Rotating the dial fully anti-clockwise (towards the moon icon) sets the lux level to 3lx, meaning the PIR will only operate in low light conditions.
  • Default/Example Setting: If the settings are applied as shown in Fig 3 (time dial towards minimum, lux dial towards maximum), when movement is detected within range, the load will come on instantly and stay on for 10 seconds (± 3 seconds). In this configuration, the PIR will work during the day when the lux level is approximately 2000lx.

Maintenance Features

  • Cleaning: Clean the unit only with a soft, dry cloth. Do not use aggressive cleaning products or solvents, as these may damage the fitting.
  • Recycling: The unit should be recycled in the correct manner at the end of its life. Check with local authorities for available facilities.
  • Warranty: The product comes with a 1-year warranty from the date of purchase. The warranty is invalidated by failure to install in accordance with IEE Wiring Regulations, improper use, or removal of batch codes. If the product fails within the warranty period, it should be returned to the place of purchase for a free replacement. ML Accessories does not cover installation costs for replacement products and reserves the right to alter product specifications without prior notice.
  • Product Class: Being Class II, double insulated, the product does not require an earth connection, simplifying installation and potentially reducing maintenance complexity related to earthing.

Knightsbridge OS009 Specifications

General IconGeneral
BrandKnightsbridge
ModelOS009
CategoryLighting Equipment
LanguageEnglish

Related product manuals