• Slide the shoulderpadsonthe shoulderstraps
along the sliding buckles to make your child
more comfortable (see fig. 10).
Locking the 5-point safety harness:
All buckles on the 5-point safety harness are unclasped
(see fig. 11).
1. Engage the buggy's parking brake (see fig. 12).
2. Place your child in the buggy.
Attention! Make sure that the strap of the hip
belt always runs behind your child's back and is
attached at the front.
3. Place one of your child's legs on each side of the
crotch strap.
4. Place the shoulder straps over each of your
child's shoulders.
5. Push the two plastic clips (these are located
where the shoulder and hip belts meet) into the
central harness lock that can be found on the
crotch strap (see fig. 13).
6. Check that the 5-point safety harness is secure
by giving it a gentle tug.
7. Tighten the shoulder straps, hip strap and crotch
strap using the sliding buckles attached to the
belts of the harness (see fig. 14).
Unlocking the 5-point safety harness:
• Pressand hold both plastic clipsin the central
harness lock to unlock the 5-point safety harness
(see fig. 15).
2.4 Locking/unlocking the swivel wheels
Tip
• Thelockedpositionisveryhandyforpushingthe
buggy on sandy or rough ground.
• Withtheswivelwheelsunlocked,thebuggyhasa
very small turning circle, which is very handy
when shopping.
Locking the swivel wheels:
• Push the swivel wheel locks on both wheels
upwards to lock (see fig. 16).
The swivel wheels are then locked as soon as you
start pushing the buggy.
Unlocking the swivel wheels:
• Use your foot to push down the swivel wheel
lock on the left and right front wheel (see
fig. 17).
The swivel wheels can now be moved freely.
2.5 Using the parking brake
Warning!
• Neverleaveyourchildinthebuggyunsupervised,
not even if the parking brake is engaged.
•
Always keep hold of the buggy when your child is
inside.
• Alwaysengagetheparkingbrakeonthebuggy
whenever you bring the buggy to a standstill (for
example when putting your child in or taking
your child out of the buggy).
Caution!
• Aslipperyorsteepsurfacemayadverselyaect
the parking brake.
Attention!
• Always engage the parking brake when you
bring the buggy to a standstill.
• Alwayscheckthatyouhaveengagedtheparking
brake before letting go of the buggy.
• Neverusetheparkingbrakewhenthebuggyis
in motion.
Locking the parking brake:
1. Use your foot to push down the parking brake on
the left and right rear wheel (see fig. 12).
2. Give the buggy a gentle push to check that the
parking brake has been activated.
Unlocking the parking brake:
• Pushtheparkingbrakeupwardsonbothwheels
to unlock (see fig. 18).
2.6 Shopping basket
Removing the shopping basket:
Upon delivery the shopping basket is attached to the
chassis.
• Gentlypullopenallthepress-studsandremove
the shopping basket.
Attaching the shopping basket:
• Attachtheshoppingbagtothechassisusingthe
four press-studs.
Attention! Run the fastening straps along the
back of the chassis, around the metal hooks (see
fig. 19).
3 Transporting and storing the buggy
3.1 Folding up the buggy
Attention!
• Always store folded products away from
children.
• Empty the shoppingbasket beforefolding the
buggy.
Tip
• Whenthebuggyisfolded,coverthewheelswith
a cloth to prevent dirt and/or smudges from
soiling the fabric.
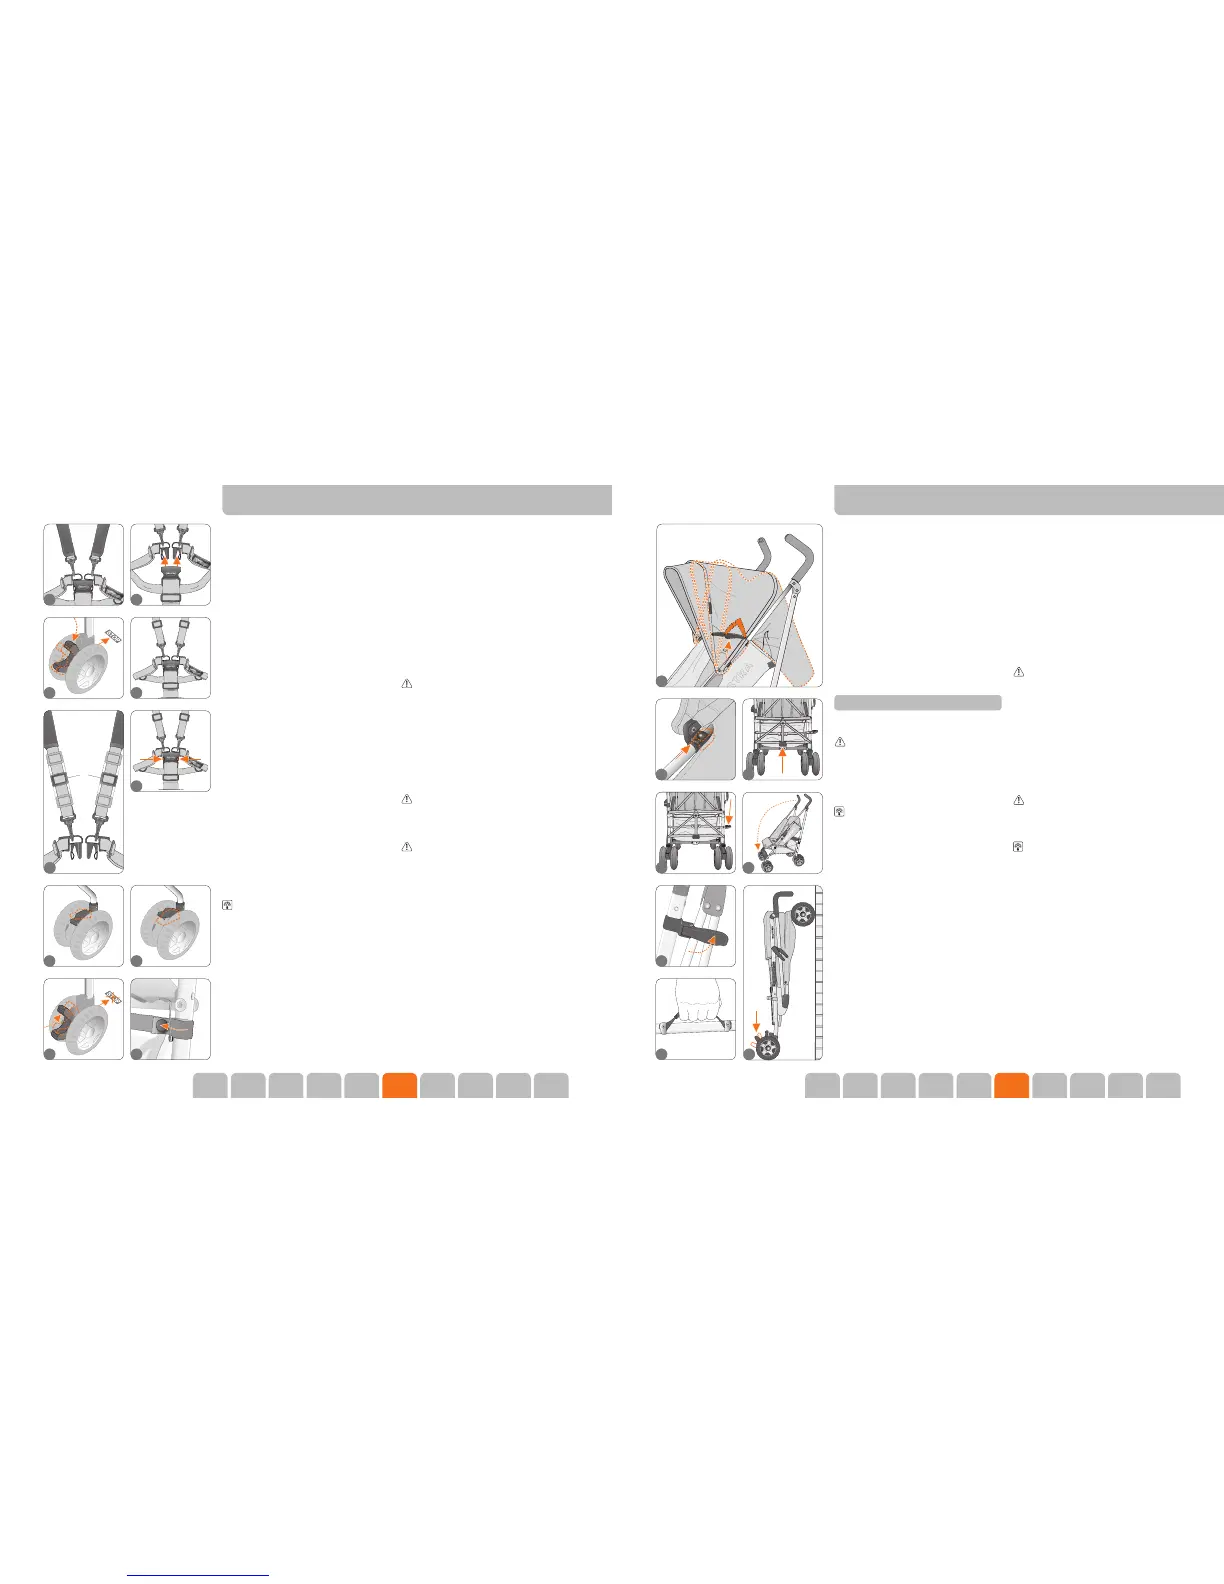
Folding the canopy:
• Pushthecanopyhingesupwardsandpressthe
canopy towards the handle grips (see fig. 20).
Removing the canopy:
The canopy is folded.
1. Gently pull the Velcro of the canopy away from
the Velcro on the buggy (see fig. 7).
2. Slide both plastic fasteners upwards on the
chassis so that the peg where the canopy is
attached is positioned in the wide part of the
keyhole (see fig. 21).
3. Gently pull away from both plastic fasteners on
the chassis.
Folding the buggy:
The canopy is folded.
1. Use your foot to push the 1st lock a little upwards
(see fig. 22).
2. Then use your foot again to push down the 2nd
lock (see fig. 23).
3. Move the handle grips towards the front wheels
to fold up the buggy (see fig. 24).
The transport lock will automatically click onto the
chassis (see fig. 25).
3.2 Transporting the buggy
Caution!
• Transportthebuggywithcare.Thechassisand
the fabric can be damaged if you bump or
scrape it.
The buggy is folded.
1. Check that the transport lock is secure.
2. Lift the folded buggy by the carry handle on the
chassis (see fig. 26).
3.3 Storing the buggy
Caution!
• Toavoidanydamage,donotplaceanyobjectson
or against the folded buggy.
Tip
• Once the wheels have been locked with the
parking brake, the buggy can be stored in a
vertical position. This will save space.
1. Engage the buggy's parking brake.
2. Fold the buggy as described in the steps in
chapter 3.1.
3. Position the buggy vertically (see fig. 27).
13
15
14
1918
20
21
23
25
26 27
22
24
10
12
11
16 17
 Loading...