24496 Speaker ceiling mount
- In the event of maintenance pay attention to possible risks (wedging, possibility of the
- product being knocked into, ladder?)
- To care for the product use a damp cloth and a non-abrasive cleaning agent.
- If the product is used at productions and events the Inspection Regulations in
- accordance with BGV C1 Sections 33 et seq apply
FAULT-FINDING (F) and REPAIR (R)
F: The ceiling mount is loose
F: B: Check to ensure the ceiling is suitable (load bearing) (use a qualified technician)
F: B: Check the screws and tighten/replace (use a qualified technician)
F: The loudspeaker is not properly placed in the mount - it sits loosely
F: B: Check and re-tighten/replace the screws
F: B: Check the loudspeaker case
F: The loudspeaker inadvertently leans forward
F: B: Screw connections 6.a i.e. screws not properly tightened, tighten the screws
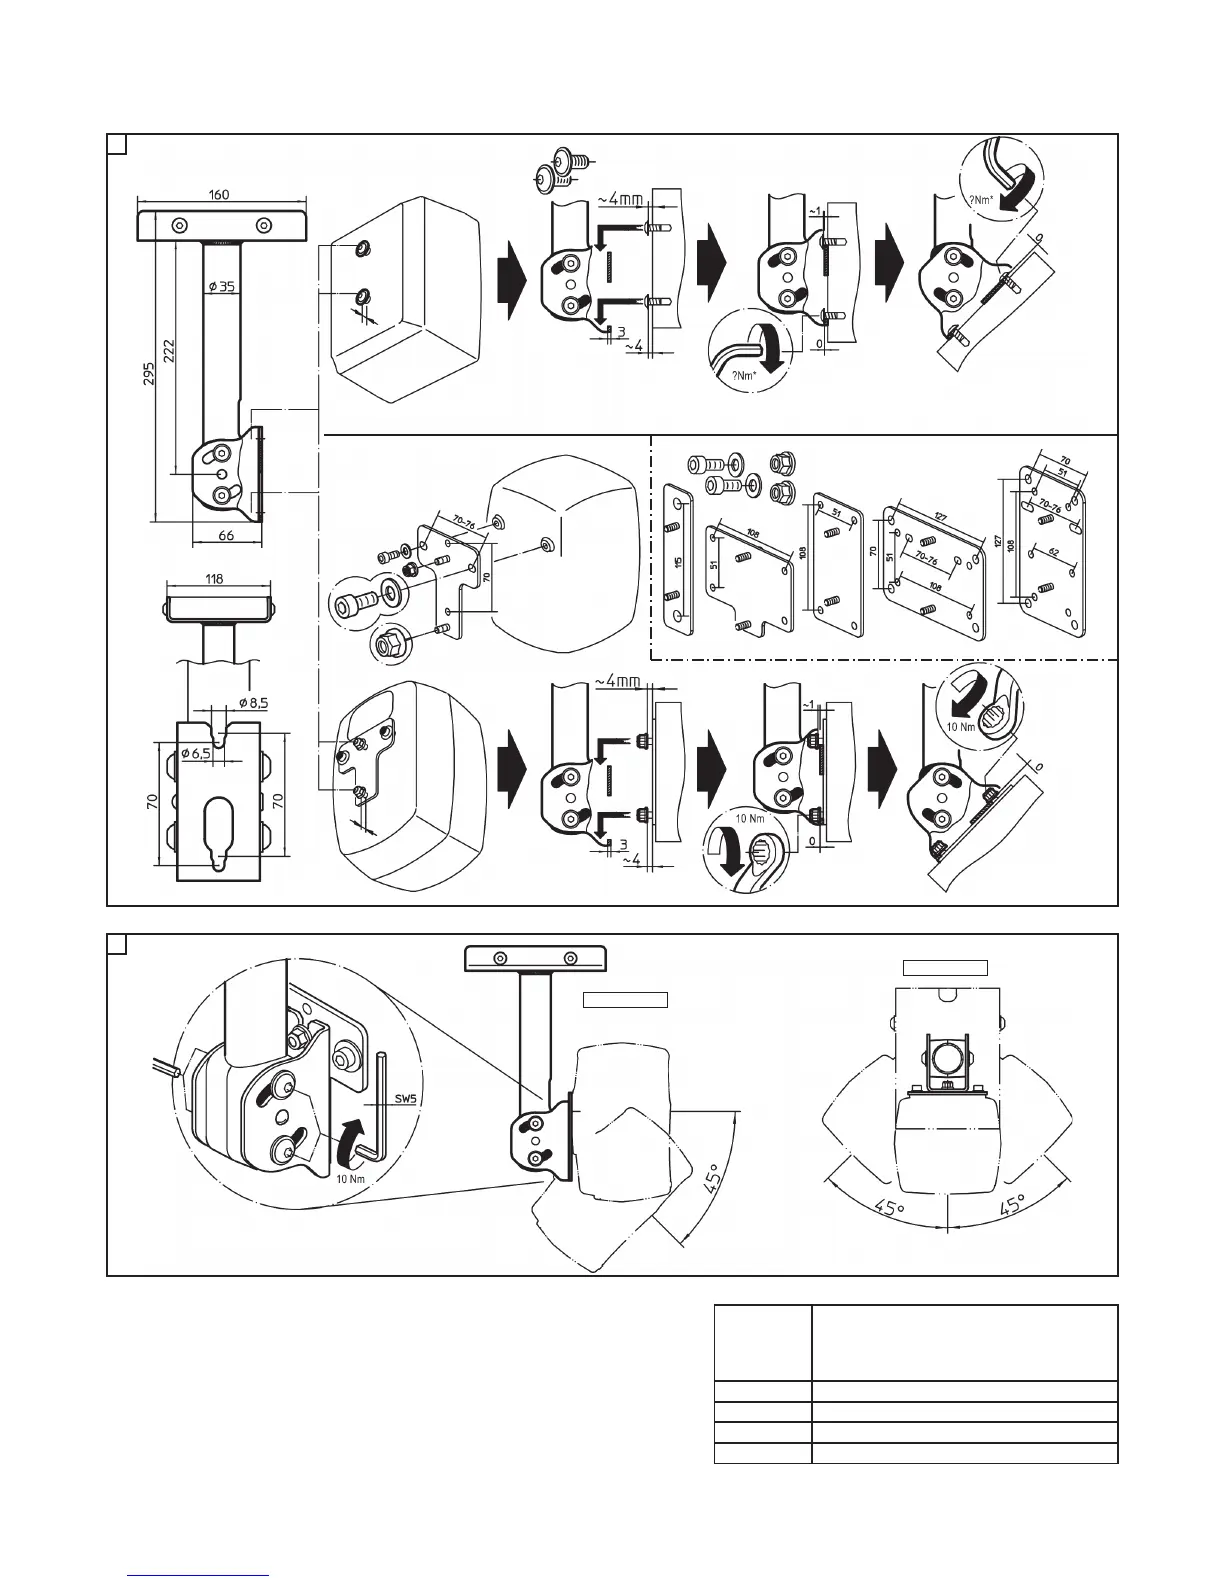
SETUP INSTRUCTIONS (1-5)
5
6
CHECK, MAINTENANCE, CLEANING TECHNISCHE DATEN
Material
Plate/bracket, tube, support arms:
Steel, powder coating, black
Screws: Steel, galvanized
Bearing shells, caps: Plastic (PE, PA)
Load Loudspeakers, max. 25 kg
Dimensions W x D x H: 295 x 160 x 118 mm
Karton W x D x H: 350 x 220 x 130 mm
Weight net: 1.8 kg; gross: 2.1 kg
KÖNIG & MEYER GmbH & Co. KG
Kiesweg 2, 97877 Wertheim, www.k-m.de
24496-000-55 Rev.10 03-80-883-00 6/15
FUNCTIONS (6)
5.a DIRECT connection:
5.b INDIRECT connection
5.b with ADAPTER PLATE
5.b (Type: 24352 -24359)
5.b.1
Place the
nuts up to approx.
4 mm distance into the
loudspeaker and hang these into the
mounting plate as far as they will go
5.a.1
Screw in screws up to approx. 4mm
distance into the loudspeaker and hang
these into the mounting plate as far as
they will go
*Nm-Note details of the loudspeaker manufacturer! -general 10 Nm
24359-Ad.6 24358-Ad.5 24357-Ad.4 24356-Ad.3 24354-Ad.2 24352-Ad.1
5.a.2
Tighten the lower screw
with the allen wrench
5.a.3
Position the holder
downwards and
tighten the upper screw
with the allen wrench
(Screws M6 or M8 - ISO 7380, ISO 4762
not included in the delivery)
(Screw M6x14, Discs ø 6,4/12 and the
safety nuts M6 are included in the
delivery of the adapter plate shown
in the illustration)
5.b.0
Screw the adapter plate
into the loudspeaker with
both allen wrenches
5.b.2
Tighten the lower nut
with the allen wrench (SW10)
5.b.3
Position the holder
downwards and tighten
the upper nut with the allen
wrench (SW10) (10 Nm)
6.a
Prior to adjusting the angle or the direction first loosen the four
half-round head screws a little, position into the desired position
and tighten all 4 screws: recommended torque (10 Nm)
direction: +/- 45°
Tilt:
0 - 45°
Connect the loudspeaker with the mounting plate
Tilt/direction settings
Side view
mounting plate
mounting
plate
mounting
plate
Front view
 Loading...