24496 Speaker ceiling mount
- Functional, robust and very versatile
- Position loudspeakers: Angle from 0 - 45° / Direction to the side +/- 45°
- Cabling: - suited for mounting to ceiling installation brackets
- Optional: a multitude of adapter plates for a variety of loudspeakers are available
SAFETY NOTES
SETUP INSTRUCTIONS (1-5)
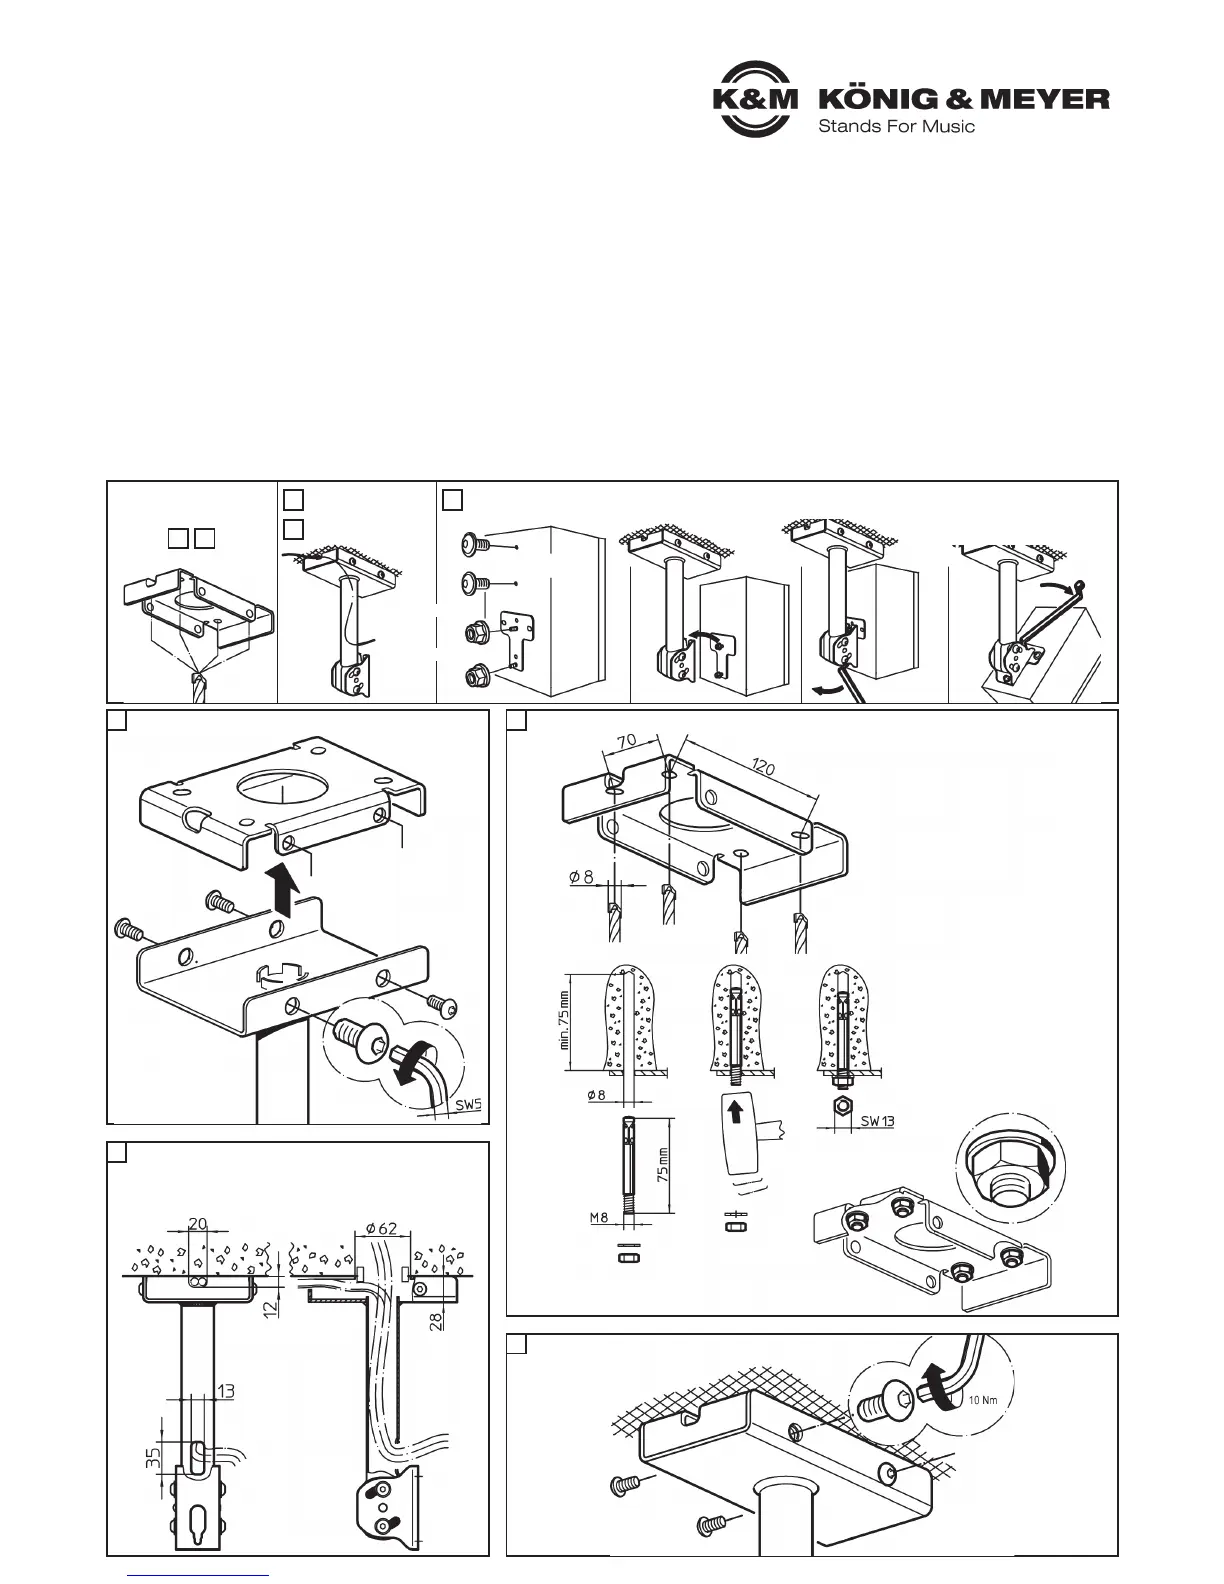
1
- Load bearing weight: max. 25 kg
- Only for indoors
- In case of damage the product may not be used.
- Only use trained technicians to install the system.
- If the product is used at productions and events the Trade Association Regulations (BGV C1) (BGI 810, Section 3.2.3) apply.
- Use 4 screws/anchors for the ceiling mount under observation of the applicable local mounting regulations (they may deviate from the examples presented here).
- Only mount on suitable ceilings with the corresponding assembly materials (not included in the delivery); Example - see Point 2. Observe the
- placement instructions provided by the anchor manufacturer
- Ceilings, that are not suited include ceiling that are not strong enough or have electrical and water conduits or similar. In case of doubt consult a
- qualified technician.
- Ensure that the screws are tight and load-bearing, in particular as regards the setting of the loudspeaker angle.
- Careful and attentive handling is required when adjusting the stand - due to the possibility of pinching or wedging your hand.
The instructions provide directions to all of the important set up and handling steps. We recommend you keep these instructions for future reference.
5.3 - Adjust the angle of the loud-
5.3 - speaker until it cannot go any
5.3 - further, then tighten the upper
5.3 - screw/nut with the allen wrench
5.2 - First tighten the lower screw/
5.2 - nut with the allen wrench
5.1 - Place the
5.1 - loudspeaker
Install the ceiling plate
Screw the holder onto
the ceiling mount
Insert cable
PREVIEW
1.b
Remove the
ceiling plate
cable
cable
bracket
cable
1.a
Unscrew and remove
the 4 (M8x12) screws
completely
3.a
Place the U cover over
the ceiling plate: the drill
holes must be lined up
3.b
Screw in and tighten all
four screws (M8x12),
recommended torque:
10 Nm
4.a
Side opening (20x12mm) for
surface installation of the
cable.
4.b
Opening in the ceiling plate (ø62mm)
for sub-surface installation of the
cable.
2.a
- Place the ceiling plate in
- the proper position,
- mark the drill holes,
- drill all 4 drill holes
- blowout the drill holes;
NOTE depending on the
characteristics of the ceiling
(concrete, wood beams etc.)
different screws etc. are
required. The installation must
be performed by qualified
installation professionals.
2.b
Installation example for
concrete ceilings:
Hammer in 4 bolt anchors
M8x75, install the ceiling plate,
place the U discs and tighten
the nuts.
5.a -direct connection
Remove the ceiling plate from the bracket
4
Cable Guide
2
21
3
Prepare and mount
the loudspeaker
5
4
Install the ceiling plate
(the example used here is for the concrete ceiling installations)
3
Screw the mounting plate into the ceiling plate
alternative
5.b -via adapter
 Loading...