PLACING INSTRUMENTS
CHARACTERISTICS
CONTROL, MAINTENANCE, CLEANING
- For maintenance work, pay attention to possible hazards
-
(squeezing, hurting).
- For cleaning it is recommended to use a slightly damp cloth and
-
non-abrasive cleaner.
(FF) FAULT FINDING and (R) REPAIR
FF: stand wobbles R: check floor
R: push stand down, frames make a
R:
small adjustment possible.
FF: frames "move" R: check that frames are engaged.
FF: inclining guitar R: change support, use cavity for electric
R:
guitars.
1
9
The guitars can be positioned in left or right order.
10
First park your instrument on the base frame
10
(see special cavitiy for electric guitar).
11 Place the guitar´s neck into the accompanying support.
12
Always position the guitar vertically.
TECHNICAL DATAS
Material
feet - PA with fiber
cushions - TP-elastomer
frames, bolting assemblies - steel, alu
»Guardian 3«
settin-up - 626 x 335 x 700 mm
folded - 626 x 173 x 670 mm
card-box - 630 x 175 x 670 mm
weight - net 3,8 kg / gross 4,4 kg
»Guardian 5«
settin-up - 996 x 335 x 700 mm
folded - 996 x 173 x 670 mm
card-box - 1000 x 175 x 670 mm
weight - net 4,7 kg / gross 5,8 kg
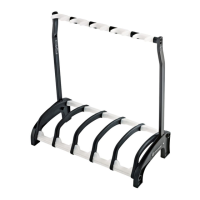
Fig. »Guardian 3«
The »Guardian« is a very comfortable place for your guitars!
- smooth cushions
- protective bars stop the guitars from rotating and prevent
-
movement or knocks and bumps
- special design (cavities) for placing electric guitars
- holds without touching the strings
- INFORMATION:
-
We use high quality materials to protect your guitar.
-
Because of the "softness" of some varnishes, particularly
-
the nitrocellulose based ones, gravitational pressure
-
indentations on the instrument are possible. However,
-
these are so minimal that they are far less conspicuous
-
than completely normal wear and tear.
PICK HOLDERS:
There are integrated pick holders available.
We recommend to remove the picks before
taking down the stand.
vertical
free strings
cavity for e-guitar
protective bars
17513 3-fach Gitarrenständer »Guardian 3«
17515 5-fach Gitarrenständer »Guardian 5«
- Flexibel und vielfach einsetzbar: für Bühne, Studio, Geschäft und Heim
für Akustik-, E-Gitarren und Bässe
- äußerst instrumentenschonend durch: hochwertige Materialauswahl
intelligentes Stativdesign (Bügel, Vertiefungen, Anlagearme)
- mit integrierten Plektrenhaltern: 9 x beim »Guardian 3«, 15 x beim »Guardian 5«
- leicht und platzsparend zu transportieren - einfaches Auf- und Zuklappen; rastet in jeder Endstellung sicher ein
- einfache Handhabung in Aufbau und Betrieb; keine Werkzeuge zur Montage notwendig
SICHERHEITSHINWEISE
- Auf geeigneten, d.h. tragfähigen und ebenen Untergrund achten.
- Boden- und Halsbügelelement des Gitarrenständers müssen immer eingerastet sein - egal ob Betriebs- oder Transportstellung.
- Die Möglichkeit das Produkt zusammenzuklappen oder zu verstellen, birgt naturgemäß Einklemmgefahren;
-
umsichtige Handhabung bei Aufbau, Betrieb und Abbau ist daher unverzichtbar.
- Beim Transport und der Lagerung ist darauf zu achten, dass die weichen Gummiauflagen nicht belastet und deformiert werden.
- Andere Lasten als Gitarren sind nicht zulässig (z.B. Kleidungsstücke).
- Stativ nicht mit eingestellten Instrumenten transportieren oder bewegen.
AUFBAUANLEITUNG
Sämtliche Bauteile des Stativs sind schon vormontiert und
müssen lediglich noch in Position gebracht werden.
BITTE BEACHTEN!
erst: ENTRIEGELN 3, 8
dann:KLAPPEN 4, 5
Das geht so:
1
Zusammengeklappten Ständer so abstellen,
1
dass sich der Gitarrenhalsbügel oben befindet.
2
Fuß auf einem Seitenteil abstellen um das Stativ
2
gegen Verrutschen zu sichern.
3
Entriegelt wird der Ständer nun indem beide
3
senkrechten Rohre gleichzeitig -gegen eine Feder-
3
ca. 5 mm nach unten gedrückt und im Anschluß...
4
...der ganze Gitarrenbügel etwas nach hinten
4
geklappt wird.
5
Jetzt den Fuß vom Seitenteil nehmen und beide
5
Bügel komplett aufklappen...
6
...bis sie in der Endstellung (=90°-Winkel) wieder
6
hörbar einrasten.
7
Den »Guardian« auf seinen Standfüßen abstellen.
Der Zusammenbau erfolgt in umgekehrter Reihenfolge.
8
Zunächst werden die beiden
8
Senkrechtrohre wieder entriegelt,
8
d.h. gegen die Feder 5mm nach unten
8
gedrückt und zusammengeklappt bis
8
beide Bügel in der platzsparenden
8
Transportstellung einrasten.
Vielen Dank, dass Sie sich für dieses Produkt entschieden haben. Diese Anleitung informiert Sie über alle wichtigen Schritte be
i Aufbau
und Handhabung. Wir empfehlen, sie auch für den späteren Gebrauch aufzubewahren.
Fig. »Guardian 5«
KÖNIG & MEYER GmbH & Co. KG
Kiesweg 2, 97877 Wertheim, www.k-m.de
17513/15-000-00/55 Rev.01 03-80-263-00 3/11