English
This document is a Quick Start Guide. In order to make full use of this prod-
uct’s functions and ensure trouble-free operation, also read the Owner’s Man-
ual (PDF), which can be the Korg website. The Owner’s
Manual provides detailed descriptions on all of the functions.
www.korg.com
Installing the battery (Fig.1)
1.
Open the battery compartment cover on the rear of the tuner.
2.
Insert
the battery, making sure to observe the correct polarity, and then close
the cover.
Attaching to the instrument (Fig.2)
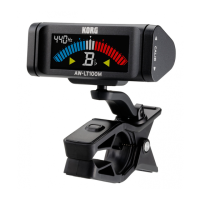
Attach the AW-OTG/OTB to the headstock of your instrument.
Please carefully attach the AW-OTG/OTB to your instrument. Leaving the
AW-OTG/OTB attached for a long time may damage or mark the instrument’s
surface. Depending on various factors such as age-related change or the sur-
face nish, there is a possibility that your instrument may be damaged by at-
taching this product.
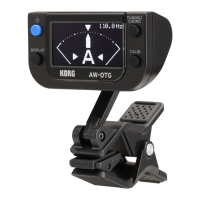
Tuning (Fig.3)
1.
Press the power button (a) to turn on the AW-OTG/OTB.
2.
Play a single
note and tune the string.
Reference pitch settings
The default setting for the reference pitch is 440 Hz. The reference pitch
can be changed. Press the CALIB button (e). While the current reference
pitch appears in the display (c), press the CALIB button to change the
setting.
Setting the display type
(
¬
Refer to the Owner’s Manual.)
Each press of the DISPLAY button (b) switches the display type so you
can tune using the desired display indication.
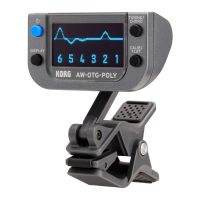
Identifying chords
(AW-OTG only)
Press the TUNING/CHORD button (d) to enter chord-identifying mode.
When you play a chord on your instrument, the chord appears in the dis-
play.
Identifying a tempo
(AW-OTB only)
Press the TUNING/TEMPO button (d) to enter tempo-identifying mode.
When you play your instrument at a steady rhythm in, for example, dou-
ble time or half time, the tempo is identied and appears in the display.
Specications (Overview)
Power Supply: One AAA Battery (alkaline or nickel-metal hydride bat-
tery)
Battery life: approximately 18 hours (tuner continuously operat-
ing, A4 continuous input, when using alkaline battery)
Auto Power-o:
Approximately 3 minutes
Dimensions: 51 mm(W) x 64 mm(D) x 71
mm(H) / 2.01” x 2.52” x 2.80”.
Weight: 35 g / 1.23 oz (including the bat-
tery)
Included items: Quick Start Guide, One AAA battery
* Specications and appearance are subject to change without notice for im-
provement.
本書はクイック・スタート・ガイドです。製品の機能を最大限に活用し、末永くご
愛用いただくためにも、すべての機能を説明した取扱説明書(PDF)をコルグ・ウェ
ブサイトからダウンロードしてお読みください。
www.korg.com
電池を入れる
(Fig. 1)
1.
本機裏側にある電池ケースの蓋を開けます。
2.
極性に注意して電池
を入れ、蓋を閉めます。
付属の電池は動作確認用のため、通常より寿命が短い場合があります。
楽器への取り付け
(Fig. 2)
ご使用になる楽器のヘッド部分に取り付けてください。
楽器への取り付け、取り外しはていねいに行ってください。また長時間取り付
けたままにすると、取り付け跡が残る場合があります。楽器の経年変化や塗装
などの状態によっては、本機の装着により損傷を与える恐れがあります。
チューニングする
(Fig. 3)
1.
電源ボタン(a)を押して電源を入れます。
2.
楽器を単音で鳴らして
チューニングします。
基準ピッチの設定
基準ピッチの初期設定は440Hzです。基準ピッチを変更することができま
す。CALIBボタン(e)を押します。ディスプレイ(c)に現在の基準ピッチが
表示されている間にCALIBボタンを押して値を変更します。
ディスプレイ・タイプの設定
(→「取扱説明書」参照)
DISPLAYボタン(b)を押すたびにディスプレイ・タイプが切り替わり、好
Español
Este documento es una Guía de inicio rápido. Para conocer todas las funciones de
este producto y que funcione correctamente, lea también el Manual del usuario
(PDF), que puede descargarse desde el sitio web de Korg. El Manual del usuario
contiene descripciones detalladas de todas las funciones.
www.korg.com
Instalación de la Pila (Fig.1)
1.
Abra la tapa del compartimiento de la pila en la parte posterior del a-
nador.
2.
Inserte la pila asegurándose de hacerlo con la polaridad correcta
y después cierre la tapa.
Colocación en el instrumento (Fig.2)
Sujete el AW-OTG/OTB a la pala del instrumento.
Por favor sujete con cuidado el AW-OTG/OTB a su instrumento. Si deja el AW-
OTG/OTB sujeto al instrumento durante un largo periodo, puede dañar la super
cie del instrumento. Dependiendo de varios factores, como el envejecimiento
del acabado de la super cie, existe la posibilidad de que su instrumento pueda
dañarse por la colocación del a nador.
Anación (Fig.3)
1.
Pulse el botón de alimentación (a) para encender el AW-OTG/OTB.
2.
To-
que una sola nota y ane la cuerda.
Cambio del tono de referencia
El ajuste predeterminado para el tono de referencia es 440 Hz. El tono de
referencia se puede cambiar. Pulse el botón CALIB (e). Mientras en la pan-
talla (c) se muestra el tono de referencia actual, pulse el botón CALIB para
cambiar el ajuste.
Ajuste de tipo de pantalla
(
¬
Consulte el Manual del usuario)
Cada pulsación del botón DISPLAY (b) cambia el ajuste de tipo de pantalla
para poder anar con las indicaciones de pantalla que preera.
Identicación de acordes
(solo para el AW-OTG)
Pulse el botón TUNING/CHORD (d) para acceder al modo de identicación
de acordes. Cuando se toca un acorde en el instrumento, el acorde apare-
ce en la pantalla.
Identicación del tempo
(solo para el AW-OTB)
Pulse el botón TUNING/TEMPO (d) para acceder al modo de identicación
de tempo. Cuando se toca el instrumento con un ritmo estable, por ejem-
plo a doble tiempo o a medio tiempo, el tempo se identica y se muestra
en la pantalla.
Especicaciones
Alimentación: Una pila AAA (pila de alcalinas o metal hidruro de níquel)
Vida útil de la pila: aproximadamente 18 horas (anador funcionando
continuamente, entrada continua de A4 (La4), si se utiliza una pila alcali-
na)
Apagado automático: aproximadamente 3 minutos Dimensiones:
51 mm(Anch.) x 64 mm(Prof.) x 71 mm(Alt.)
Peso: 35 g (incluyendo pila)
Elementos incluidos: Guía de inicio rápido, Una pila AAA
* Las especi caciones y el aspecto están sujetas a cambios sin previo aviso por
mejora.
Français
Ce document est le Guide de prise en main. Afin de pouvoir exploiter au mieux
toutes les fonctions de ce produit et de garantir une utilisation sans problème, veuil-
lez aussi lire le manuel d’utilisation (PDF) téléchargeable sur le site internet de Korg.
Le manuel d’utilisation fournit une description détaillée de toutes les fonctions du
produit.
www.korg.com
Mise en place de la pile (Fig.1)
1.
Ouvrez le couvercle du compartiment de la pile au dos de l’accordeur.
2.
In-
sérez une pile neuve dans le compartiment de la pile en respectant les indica-
tions de polarité, puis refermez le couvercle.
Fixation sur l’instrument (Fig.2)
Fixez l’AW-OTG/OTB sur la tête de votre instrument.
S’il vous plait, attachez soigneusement l’AW-OTG/OTB à votre instrument. Le laisser
attaché pendant un long moment peut rayer la surface de votre instrument. Selon di-
vers facteurs tels que la nition, l’âge et l’état de l’instrument, il se pourrait que le sys-
tème de xation à pince abîme la nition de l’instrument.
Accordage (Fig.3)
1.
Appuyez sur le bouton d’alimentation (a) pour mettre l’AW-OTG/OTB sous
tension.
2.
Jouez une seule note et accordez la corde.
Réglages de la hauteur de référence
Par défaut, la hauteur de référence est réglée sur 440 Hz. Vous pouvez changer
la hauteur de référence. Appuyez sur le bouton CALIB (e). Pendant que la hau-
teur de référence actuelle est aché à l’écran (c), appuyez sur le bouton CALIB
pour changer le réglage.
Réglage du mode d’achage
(
¬
Voyez le manuel d’utilisation.)
Chaque pression sur le bouton DISPLAY (b) change de mode d’achage. Choi-
sissez le mode d’achage voulu pour vous accorder.
Reconnaissance d’accord
(AW-OTG uniquement)
Appuyez sur le bouton TUNING/CHORD (d) pour activer le mode de reconnais-
sance d’accord. Quand vous jouez un accord sur votre instrument, le nom de
l’accord s’ache à l’écran.
Reconnaissance de tempo
(AW-OTB uniquement)
Appuyez sur le bouton TUNING/TEMPO (d) pour activer le mode de reconnais-
sance de tempo. Quand vous jouez un rythme à un tempo régulier sur votre
instrument, en demi-temps ou en double temps, par exemple, l’accordeur re-
connaît et ache le tempo à l’écran.
Spécications (Aperçu)
Alimentation: Une pile AAA (alcalines ou au nickel-métal-hydrure) Autono-
mie de la pile: Environ 18 heures (utilisation continue de l’accordeur, entrée
continue de la note A4, avec une pile alcaline)
Mise hors tension automa-
tique: Environ 3minutes
Dimensions: 51 mm(L) x 64 mm(P) x 71 mm(H)
Poids: 35 g (pile comprise)
Accessoires fournis: Guide de prise en main, une
pile AAA
* Les caractéristiques et l’aspect du produit sont susceptibles d’être modiés sans avis
préalable en vue d’une amélioration.
Deutsch
Dies ist ein Blitzstart. Um alle Funktionen des Produkts kennenzulernen und es stö-
rungsfrei zu bedienen, lesen Sie bitte auch die Bedienungsanleitung, die als PDF
auf der Korg-Website zum Download bereit steht. Hierin nden Sie genauere Be-
schreibungen aller Funktionen.
www.korg.com
Einsetzen der Batterie (Fig.1)
1.
Önen Sie den Batteriefachdeckel an der Rückseite.
2.
Legen Sie die Batterie
ein und achten Sie hierbei auf die richtige Polarität. Schließen Sie den Deckel.
Anbringen am Instrument (Fig.2)
Befestigen Sie das AW-OTG/OTB an der Kopfplatte Ihres Instruments.
Bitte befestigen sie das AW-OTG/OTB vorsichtig an ihrem Instrument. Wenn sie
das AW-OTG/OTB für längere Zeit an ihrem Instrument befestigt lassen, kann dies zu
Veränderungen an der Ober äche des Instruments führen. Abhängig von verschiede-
nen Faktoren wie z. B. altersbedingte Veränderungen der Lackierung/Ober äche Ihres
Instrumentes, kann es vorkommen dass ein Anbringen dieses Produkts zu einer Be-
schädigung führt.
Tuning (Fig.3)
1.
Drücken Sie die Einschalttaste (a), um das AW-OTG/OTB einzuschalten.
2.
Spielen Sie eine Note und stimmen Sie die Saite.
Referenztonhöhe einstellen
Die Standard-Referenztonhöhe beträgt 440 Hz (Kammerton A). Sie können die
Referenztonhöhe ändern. Drücken Sie die CALIB-Taste (e). Erscheint die aktu-
elle Referenztonhöhe im Display (c), drücken Sie die CALIB-Taste, um diese zu
ändern.
Einstellen des Displaytyps
(
¬
Siehe Bedienungsanleitung)
Mit jedem Druck auf die DISPLAY-Taste (b) ändert sich der Displaytyp, damit
Sie nach Ihrer bevorzugten Displayanzeige stimmen können.
Saiten erkennen
(nur AW-OTG)
Drücken Sie die TUNING/CHORD-Taste (d), um den Akkorderkennungsmodus
zu aktivieren. Wenn Sie einen Akkord auf Ihrem Instrument spielen, erscheint
der Akkord im Display.
Tempoerkennung
(nur AW-OTB)
Drücken Sie die TUNING/TEMPO-Taste (d), um den Tempoerkennungsmodus
zu aktivieren. Wenn Sie einen gleichmäßigen Rhythmus spielen, z.B. Achtel
oder Viertel, wird das Tempo erkannt und im Display angezeigt.
Technische Daten
Stromversorgung: Eine AAA-Batterie (Alkali-Batterie oder Nickel-Me-
tallhydrid-Akkus)
Batterielebensdauer: ca. 18 Stunden (kontinuierlicher Be-
trieb mit eingeschaltetem Stimmgerät, A4 kontinuierliche Eingabe, bei Ver-
wendung einer Alkali-Batterie)
Energiesparfunktion: Ca. 3 Minuten
Abmessungen: 51 mm(B) x 64 mm(T) x 71 mm(H)
Gewicht: 35 g (mit Batte-
rie)
Lieferumfang: Blitzstart, Eine AAA-Batterie
* Änderungen der technischen Daten und des Designs ohne vorherige Ankündigung
vorbehalten.
Fig. 1 Fig. 3
Fig. 2
みの表示でチューニングすることができます。
コードを検出する
(AW-OTGのみ)
TUNING/CHORDボタン( d)を押してコード検出モードにします。
楽器を和音で弾くと、コード名がディスプレイに表示されます。
テンポを検出する
(AW-OTBのみ)
TUNING/TEMPOボタン(d)を押してテンポ検出モードにします。4
ビートや8ビートなどの一定の間隔で楽器を弾くと、テンポが検出さ
れてディスプレイに表示されます。
仕様(概略)
■電源:単4形電池1本(アルカリ乾電池またはニッケル水素電池)■
電池寿命:約18時間(チューナー動作、A4連続入力、アルカリ乾電池
使用時)■オート・パワー・オフ:約3分■外形寸法:51mm(W)
x64mm(D)x71mm(H)■質量:35g(電池含む)■付属品:クイック・
スタート・ガイド、動作確認用単4形乾電池1本
* 仕様および外観は改良のため予告なく変更することがあります。
日本語
English
This document is a Quick Start Guide. In order to make full use of this prod-
uct’s functions and ensure trouble-free operation, also read the Owner’s Man-
ual (PDF), which can be the Korg website. The Owner’s
Manual provides detailed descriptions on all of the functions.
www.korg.com
Installing the battery (Fig.1)
1.
Open the battery compartment cover on the rear of the tuner.
2.
Insert
the battery, making sure to observe the correct polarity, and then close
the cover.
Attaching to the instrument (Fig.2)
Attach the AW-OTG/OTB to the headstock of your instrument.
Please carefully attach the AW-OTG/OTB to your instrument. Leaving the
AW-OTG/OTB attached for a long time may damage or mark the instrument’s
surface. Depending on various factors such as age-related change or the sur-
face nish, there is a possibility that your instrument may be damaged by at-
taching this product.
Tuning (Fig.3)
1.
Press the power button (a) to turn on the AW-OTG/OTB.
2.
Play a single
note and tune the string.
Reference pitch settings
The default setting for the reference pitch is 440 Hz. The reference pitch
can be changed. Press the CALIB button (e). While the current reference
pitch appears in the display (c), press the CALIB button to change the
setting.
Setting the display type
(
¬
Refer to the Owner’s Manual.)
Each press of the DISPLAY button (b) switches the display type so you
can tune using the desired display indication.
Identifying chords
(AW-OTG only)
Press the TUNING/CHORD button (d) to enter chord-identifying mode.
When you play a chord on your instrument, the chord appears in the dis-
play.
Identifying a tempo
(AW-OTB only)
Press the TUNING/TEMPO button (d) to enter tempo-identifying mode.
When you play your instrument at a steady rhythm in, for example, dou-
ble time or half time, the tempo is identied and appears in the display.
Specications (Overview)
Power Supply: One AAA Battery (alkaline or nickel-metal hydride bat-
tery)
Battery life: approximately 18 hours (tuner continuously operat-
ing, A4 continuous input, when using alkaline battery)
Auto Power-o:
Approximately 3 minutes
Dimensions: 51 mm(W) x 64 mm(D) x 71
mm(H) / 2.01” x 2.52” x 2.80”.
Weight: 35 g / 1.23 oz (including the bat-
tery)
Included items: Quick Start Guide, One AAA battery
* Specications and appearance are subject to change without notice for im-
provement.
本書はクイック・スタート・ガイドです。製品の機能を最大限に活用し、末永くご
愛用いただくためにも、すべての機能を説明した取扱説明書(PDF)をコルグ・ウェ
ブサイトからダウンロードしてお読みください。
www.korg.com
電池を入れる
(Fig. 1)
1.
本機裏側にある電池ケースの蓋を開けます。
2.
極性に注意して電池
を入れ、蓋を閉めます。
付属の電池は動作確認用のため、通常より寿命が短い場合があります。
楽器への取り付け
(Fig. 2)
ご使用になる楽器のヘッド部分に取り付けてください。
楽器への取り付け、取り外しはていねいに行ってください。また長時間取り付
けたままにすると、取り付け跡が残る場合があります。楽器の経年変化や塗装
などの状態によっては、本機の装着により損傷を与える恐れがあります。
チューニングする
(Fig. 3)
1.
電源ボタン(a)を押して電源を入れます。
2.
楽器を単音で鳴らして
チューニングします。
基準ピッチの設定
基準ピッチの初期設定は440Hzです。基準ピッチを変更することができま
す。CALIBボタン(e)を押します。ディスプレイ(c)に現在の基準ピッチが
表示されている間にCALIBボタンを押して値を変更します。
ディスプレイ・タイプの設定
(→「取扱説明書」参照)
DISPLAYボタン(b)を押すたびにディスプレイ・タイプが切り替わり、好
Español
Este documento es una Guía de inicio rápido. Para conocer todas las funciones de
este producto y que funcione correctamente, lea también el Manual del usuario
(PDF), que puede descargarse desde el sitio web de Korg. El Manual del usuario
contiene descripciones detalladas de todas las funciones.
www.korg.com
Instalación de la Pila (Fig.1)
1.
Abra la tapa del compartimiento de la pila en la parte posterior del a-
nador.
2.
Inserte la pila asegurándose de hacerlo con la polaridad correcta
y después cierre la tapa.
Colocación en el instrumento (Fig.2)
Sujete el AW-OTG/OTB a la pala del instrumento.
Por favor sujete con cuidado el AW-OTG/OTB a su instrumento. Si deja el AW-
OTG/OTB sujeto al instrumento durante un largo periodo, puede dañar la super
cie del instrumento. Dependiendo de varios factores, como el envejecimiento
del acabado de la super cie, existe la posibilidad de que su instrumento pueda
dañarse por la colocación del a nador.
Anación (Fig.3)
1.
Pulse el botón de alimentación (a) para encender el AW-OTG/OTB.
2.
To-
que una sola nota y ane la cuerda.
Cambio del tono de referencia
El ajuste predeterminado para el tono de referencia es 440 Hz. El tono de
referencia se puede cambiar. Pulse el botón CALIB (e). Mientras en la pan-
talla (c) se muestra el tono de referencia actual, pulse el botón CALIB para
cambiar el ajuste.
Ajuste de tipo de pantalla
(
¬
Consulte el Manual del usuario)
Cada pulsación del botón DISPLAY (b) cambia el ajuste de tipo de pantalla
para poder anar con las indicaciones de pantalla que preera.
Identicación de acordes
(solo para el AW-OTG)
Pulse el botón TUNING/CHORD (d) para acceder al modo de identicación
de acordes. Cuando se toca un acorde en el instrumento, el acorde apare-
ce en la pantalla.
Identicación del tempo
(solo para el AW-OTB)
Pulse el botón TUNING/TEMPO (d) para acceder al modo de identicación
de tempo. Cuando se toca el instrumento con un ritmo estable, por ejem-
plo a doble tiempo o a medio tiempo, el tempo se identica y se muestra
en la pantalla.
Especicaciones
Alimentación: Una pila AAA (pila de alcalinas o metal hidruro de níquel)
Vida útil de la pila: aproximadamente 18 horas (anador funcionando
continuamente, entrada continua de A4 (La4), si se utiliza una pila alcali-
na)
Apagado automático: aproximadamente 3 minutos Dimensiones:
51 mm(Anch.) x 64 mm(Prof.) x 71 mm(Alt.)
Peso: 35 g (incluyendo pila)
Elementos incluidos: Guía de inicio rápido, Una pila AAA
* Las especi caciones y el aspecto están sujetas a cambios sin previo aviso por
mejora.
Français
Ce document est le Guide de prise en main. Afin de pouvoir exploiter au mieux
toutes les fonctions de ce produit et de garantir une utilisation sans problème, veuil-
lez aussi lire le manuel d’utilisation (PDF) téléchargeable sur le site internet de Korg.
Le manuel d’utilisation fournit une description détaillée de toutes les fonctions du
produit.
www.korg.com
Mise en place de la pile (Fig.1)
1.
Ouvrez le couvercle du compartiment de la pile au dos de l’accordeur.
2.
In-
sérez une pile neuve dans le compartiment de la pile en respectant les indica-
tions de polarité, puis refermez le couvercle.
Fixation sur l’instrument (Fig.2)
Fixez l’AW-OTG/OTB sur la tête de votre instrument.
S’il vous plait, attachez soigneusement l’AW-OTG/OTB à votre instrument. Le laisser
attaché pendant un long moment peut rayer la surface de votre instrument. Selon di-
vers facteurs tels que la nition, l’âge et l’état de l’instrument, il se pourrait que le sys-
tème de xation à pince abîme la nition de l’instrument.
Accordage (Fig.3)
1.
Appuyez sur le bouton d’alimentation (a) pour mettre l’AW-OTG/OTB sous
tension.
2.
Jouez une seule note et accordez la corde.
Réglages de la hauteur de référence
Par défaut, la hauteur de référence est réglée sur 440 Hz. Vous pouvez changer
la hauteur de référence. Appuyez sur le bouton CALIB (e). Pendant que la hau-
teur de référence actuelle est aché à l’écran (c), appuyez sur le bouton CALIB
pour changer le réglage.
Réglage du mode d’achage
(
¬
Voyez le manuel d’utilisation.)
Chaque pression sur le bouton DISPLAY (b) change de mode d’achage. Choi-
sissez le mode d’achage voulu pour vous accorder.
Reconnaissance d’accord
(AW-OTG uniquement)
Appuyez sur le bouton TUNING/CHORD (d) pour activer le mode de reconnais-
sance d’accord. Quand vous jouez un accord sur votre instrument, le nom de
l’accord s’ache à l’écran.
Reconnaissance de tempo
(AW-OTB uniquement)
Appuyez sur le bouton TUNING/TEMPO (d) pour activer le mode de reconnais-
sance de tempo. Quand vous jouez un rythme à un tempo régulier sur votre
instrument, en demi-temps ou en double temps, par exemple, l’accordeur re-
connaît et ache le tempo à l’écran.
Spécications (Aperçu)
Alimentation: Une pile AAA (alcalines ou au nickel-métal-hydrure) Autono-
mie de la pile: Environ 18 heures (utilisation continue de l’accordeur, entrée
continue de la note A4, avec une pile alcaline)
Mise hors tension automa-
tique: Environ 3minutes
Dimensions: 51 mm(L) x 64 mm(P) x 71 mm(H)
Poids: 35 g (pile comprise)
Accessoires fournis: Guide de prise en main, une
pile AAA
* Les caractéristiques et l’aspect du produit sont susceptibles d’être modiés sans avis
préalable en vue d’une amélioration.
Deutsch
Dies ist ein Blitzstart. Um alle Funktionen des Produkts kennenzulernen und es stö-
rungsfrei zu bedienen, lesen Sie bitte auch die Bedienungsanleitung, die als PDF
auf der Korg-Website zum Download bereit steht. Hierin nden Sie genauere Be-
schreibungen aller Funktionen.
www.korg.com
Einsetzen der Batterie (Fig.1)
1.
Önen Sie den Batteriefachdeckel an der Rückseite.
2.
Legen Sie die Batterie
ein und achten Sie hierbei auf die richtige Polarität. Schließen Sie den Deckel.
Anbringen am Instrument (Fig.2)
Befestigen Sie das AW-OTG/OTB an der Kopfplatte Ihres Instruments.
Bitte befestigen sie das AW-OTG/OTB vorsichtig an ihrem Instrument. Wenn sie
das AW-OTG/OTB für längere Zeit an ihrem Instrument befestigt lassen, kann dies zu
Veränderungen an der Ober äche des Instruments führen. Abhängig von verschiede-
nen Faktoren wie z. B. altersbedingte Veränderungen der Lackierung/Ober äche Ihres
Instrumentes, kann es vorkommen dass ein Anbringen dieses Produkts zu einer Be-
schädigung führt.
Tuning (Fig.3)
1.
Drücken Sie die Einschalttaste (a), um das AW-OTG/OTB einzuschalten.
2.
Spielen Sie eine Note und stimmen Sie die Saite.
Referenztonhöhe einstellen
Die Standard-Referenztonhöhe beträgt 440 Hz (Kammerton A). Sie können die
Referenztonhöhe ändern. Drücken Sie die CALIB-Taste (e). Erscheint die aktu-
elle Referenztonhöhe im Display (c), drücken Sie die CALIB-Taste, um diese zu
ändern.
Einstellen des Displaytyps
(
¬
Siehe Bedienungsanleitung)
Mit jedem Druck auf die DISPLAY-Taste (b) ändert sich der Displaytyp, damit
Sie nach Ihrer bevorzugten Displayanzeige stimmen können.
Saiten erkennen
(nur AW-OTG)
Drücken Sie die TUNING/CHORD-Taste (d), um den Akkorderkennungsmodus
zu aktivieren. Wenn Sie einen Akkord auf Ihrem Instrument spielen, erscheint
der Akkord im Display.
Tempoerkennung
(nur AW-OTB)
Drücken Sie die TUNING/TEMPO-Taste (d), um den Tempoerkennungsmodus
zu aktivieren. Wenn Sie einen gleichmäßigen Rhythmus spielen, z.B. Achtel
oder Viertel, wird das Tempo erkannt und im Display angezeigt.
Technische Daten
Stromversorgung: Eine AAA-Batterie (Alkali-Batterie oder Nickel-Me-
tallhydrid-Akkus)
Batterielebensdauer: ca. 18 Stunden (kontinuierlicher Be-
trieb mit eingeschaltetem Stimmgerät, A4 kontinuierliche Eingabe, bei Ver-
wendung einer Alkali-Batterie)
Energiesparfunktion: Ca. 3 Minuten
Abmessungen: 51 mm(B) x 64 mm(T) x 71 mm(H)
Gewicht: 35 g (mit Batte-
rie)
Lieferumfang: Blitzstart, Eine AAA-Batterie
* Änderungen der technischen Daten und des Designs ohne vorherige Ankündigung
vorbehalten.
Fig. 1 Fig. 3
Fig. 2
みの表示でチューニングすることができます。
コードを検出する
(AW-OTGのみ)
TUNING/CHORDボタン( d)を押してコード検出モードにします。
楽器を和音で弾くと、コード名がディスプレイに表示されます。
テンポを検出する
(AW-OTBのみ)
TUNING/TEMPOボタン(d)を押してテンポ検出モードにします。4
ビートや8ビートなどの一定の間隔で楽器を弾くと、テンポが検出さ
れてディスプレイに表示されます。
仕様(概略)
■電源:単4形電池1本(アルカリ乾電池またはニッケル水素電池)■
電池寿命:約18時間(チューナー動作、A4連続入力、アルカリ乾電池
使用時)■オート・パワー・オフ:約3分■外形寸法:51mm(W)
x64mm(D)x71mm(H)■質量:35g(電池含む)■付属品:クイック・
スタート・ガイド、動作確認用単4形乾電池1本
* 仕様および外観は改良のため予告なく変更することがあります。
日本語
 Loading...