FC-18 Quick Start Guide
This guide helps you install and use your FC-18 for the first time.
Go to www.kramerav.com/downloads/FC-18 to download the latest user manual and check if firmware
upgrades are available.
Step 1: Check what’s in the box
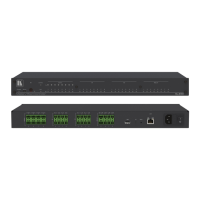
Step 2: Get to know your FC-18
Connect to update the firmware.
Connect to an HDMI source.
Lights green when a valid HDMI signal is detected. The detection is based on the presence
of 5V and a clock signal on the HDMI input.
Lights green when the HDMI acceptor on the output is on.
Press to instruct FC-18 to send a CEC or RS-232 OFF command to the display.
The display remains off (and the DISPLAY ON LED is off) even if the input conditions
dictate to turn the display on. Only after detecting no input signal for a period of over 5
minutes will the trigger-defined input conditions be able to turn the display on once again.
Press and hold for 3 seconds for full factory reset
Press to instruct FC-18 to send a CEC or RS-232 ON command to the display.
The display remains on (and the DISPLAY ON LED is on) for an interval of a minimum of 5
minutes. After that time-period, the trigger-defined input conditions will dictate to shut the
display down. Press and hold for 3 seconds to enter firmware upgrade mode via USB port.
Press both ON and OFF buttons simultaneously to show the current device IP address on the display.
Lights green when power is connected.
Connect to a PC via a LAN to control the device or to tunnel RS-232 data to the display.
Also use for firmware upgrade.
REMOTE 4-pin Terminal
Block Connector
Connect to contact closure switches (by momentary contact between the desired pin and
GND pin).
TOGGLE – one button toggles between display ON and display OFF (instead of using two
separate buttons for ON and OFF).
ON – turns the display on.
OFF – turns the display off.
RS-232 3-pin Terminal
Block Connectors
(G, Rx, Tx)
Set the function of the RS-232 port via the web pages:
Connect to the display to send RS-232 commands to the display (default) via web pages, for
example. OR,
Connect to the PC or the remote controller to control FC-18 (for example, instructing it to
send a CEC command to send turn the display on or off).
Lights red when RS-232 port transmits data.
Lights green when RS-232 Port receives data.
Connect to an CEC enabled HDMI acceptor.
Connect to the supplied power adapter.
The terms HDMI, HDMI High-Definition Multimedia Interface, and the HDMI Logo are trademarks or registered trademarks of HDMI Licensing Administrator, Inc.