VM-24H Quick Start Guide
This guide helps you install and use your VM-24H for the first time.
Go to www.kramerav.com/downloads/VM-24H to download the latest user manual and check if firmware
upgrades are available.
Step 1: Check what’s in the box
VM-24H 2 Input 1:4 HDMI Distributor
1 Null modem adapter DB9S/DP9P
Kramer RC-IR3 infrared remote control transmitter with batteries and user manual
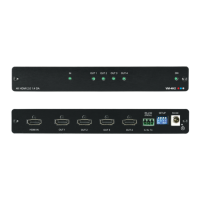
Step 2: Get to know your VM-24H
The red LED is illuminated when receiving signals from the Kramer infrared remote
control transmitter.
Illuminated switch for turning the VM-24H ON or OFF.
Press to select source 1 and distribute this signal to the outputs.
Press to select source 2 and distribute this signal to the outputs.
Press, after pressing the EDID SELECT button, to acquire the EDID (see Step 6).
Press to show the EDID status.
Press to select the EDID mode (One Output, Auto-mix or Default).
Light when an output(s) is connected and active.
Flash to indicate the type of EDID acquired or when connecting a non-HDCP display
while providing HDCP content to the VM-24H.
Connect to the HDMI source 1.
Connect to the HDMI source 2.
Connect to the HDMI acceptor (from 1 to 4).
Connect to the PC or the Remote Controller (see Step 4).
Connects to an external IR receiver unit for controlling the machine via an IR remote
controller instead of using the front panel IR receiver.
Optional. Can be used instead of the front panel (built-in) IR receiver to remotely control
the machine (only if the internal IR connection cable has been installed).
Power Connector with Fuse
AC connector enabling power supply to the unit.
The terms HDMI, HDMI High-Definition Multimedia Interface, and the HDMI Logo are trademarks or registered trademarks of HDMI Licensing Administrator, Inc.