Do you have a question about the Kraus KWD100-75 and is the answer not in the manual?
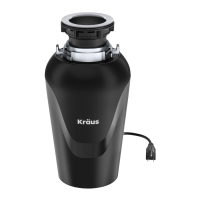
Title page identifies the product as a Food Waste Disposer, model KWD100-75, KWD100-100.
Provides Kraus customer service phone number and email address for product assistance and inquiries.
Lists essential safety rules for electric disposers, including supervision, avoiding fingers, and prohibited items.
Explains the importance of proper grounding for electrical safety and how to connect the disposer.
States the disposer operates exclusively on 110 Volt, 60 Hz for optimal performance and safety.
Advises keeping proof of purchase and recording model/batch numbers for warranty and service.
Lists common tools required for the installation and maintenance of the food waste disposer.
Reinforces critical safety rules for appliance use, emphasizing fire, shock, and injury prevention.
Details disconnecting and removing an existing disposer and sink flange, including necessary tools.
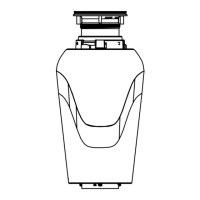
Illustrates the physical dimensions of the KWD100-75 and KWD100-100 disposer models.
Explains how to connect a dishwasher drain hose to the disposer, including knockout plug removal.
Describes the EZ Mount System components and initial steps for assembling the mounting hardware.
Provides detailed steps for assembling the mounting system, including sink flange and seal ring placement.
Guides on making electrical connections, recommending a qualified electrician for safety and proper setup.
Details the process of connecting the drain elbow to the disposer and the sink trap assembly.
Explains how to align and securely lock the disposer onto the installed mounting assembly.
Provides step-by-step guidance on how to properly use the food waste disposer for optimal performance.
Offers advice for efficient use, including dishwasher draining and preventing foreign objects from entering.
Addresses common problems like loud noises, unit not starting, leaks, and rotation issues with solutions.
Provides guidelines on cleaning the disposer, warning against chemical cleaners and noting mineral deposits.
Lists all available replacement parts with corresponding part numbers for easy ordering and identification.
Outlines the limited warranty terms for material and workmanship defects for the food waste disposer.
Lists conditions and damages, such as misuse or improper maintenance, that are not covered by the warranty.
Explains the process for submitting a warranty claim, including required proof of purchase and contact information.
Details limitations on implied warranties and consequential damages, subject to applicable state/province laws.
Encourages product registration to activate warranty, access support, and obtain product information.
This document is an installation manual for Kraus Food Waste Disposers, specifically models KWD100-75 and KWD100-100. It provides comprehensive instructions for installation, operation, troubleshooting, and maintenance, along with warranty information.
The Kraus Food Waste Disposer is an electrical appliance designed to grind food waste into small particles that can be flushed through the plumbing system. It is intended for household use and helps manage kitchen waste efficiently, preventing it from going into landfills. The disposer is equipped with Anti-Jam Swivel Impellers, which make a clicking sound during normal operation as they swing into place.
Kraus USA Plumbing, LLC offers a limited warranty to original purchasers for five (5) years from the purchase date from an authorized Kraus dealer, covering defects in material and workmanship under normal usage. The warranty is non-transferable and applies to products installed in the United States and Canada. It does not cover discontinued products, display products, free gifts, normal wear and tear (cosmetic rust, scratches, dents), or damage from neglect, misuse, abuse, carelessness, accidents, hard water, mineral deposits, corrosive materials, outdoor use, improper maintenance, alteration, leaks at specific points (sink flange, dishwasher inlet/discharge elbow), excessive torqueing of screws, or failure to follow instructions. Kraus recommends professional installation by a licensed and insured trade professional.
| Brand | Kraus |
|---|---|
| Model | KWD100-75 |
| Category | Garbage Disposal |
| Language | English |