8
USA
Thank you for choosing an appliance from the
KRUPS product line, which is intended
exclusively as a food slicer.
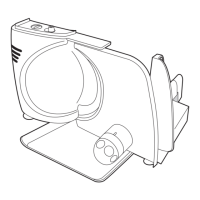
Description
a On/Off switch
b Safety switch
c Food grip
d Carriage feeder
e Base
f Control button for slice thickness
g Tray for collecting slices
h Blade
Before first use
• When it is positioned centrally, tilt the
carriage feeder (d), to remove it from the
base (1).
• Clean the casing using a damp cloth and
then dry.
• To dismantle the blade (h), turn the central
screw (2) to the right (using a coin for
example). Hold the blade with your other
hand to prevent it from falling once it has
been unscrewed. Handle the blade with
care : it is extremely sharp.
• Wash the carriage feeder (d), the food grip
(c) and the blade (h) with warm water and
washing-up liquid. Rinse and dry carefully.
• To avoid any risk, tighten back the blade
immediately on to the appliance.
Using your appliance
• Place the appliance on a clean and level
work surface.
. Setting-up the carriage feeder in
position (3)
• Tilt the carriage feeder (d) and place the
guides in the grooves of the base (e), then
lower the carriage onto the base.
• Place the food for slicing on the carriage
feeder.
. Setting up the food grip (4)
• Slide the food grip (c) on the carriage feeder.
• It is essential that you use the food grip as a
safety measure.
. Setting up the tray (5)
• Pull the tray (g) out of its housing to collect
the slices of food.
. Setting up the slices thickness (6)
• Select the desired thickness by turning the
button (f). The maximum thickness available
is 7/8’’(max on button (f)).
Please note : The figures indicated on the
button do not correspond to millimeters or
inches.
• Always reset the control button for slice
tickness (f) to “0” after use.
. Starting (7)
A cord wrap under the unit allows you to
control the length of the cord required.
• Plug in the appliance.
• Set the safety switch (b) to “I” and while
holding it in that position, press the on/off
switch (a).
• As soon as the blade starts to turn, release
the safety switch (b) and keep the on/off
switch (a) pressed in. Push the carriage
feeder (d) with your other hand to start
slicing.
• As soon as the on/off switch is released, the
appliance stops automatically. The slicer can
then only restart when the safety switch and
the on/off button (a) are activated. This
safety feature prevents any accidental use of
the appliance particularly by children.
• After use, reset the control button for slice
thickness (f) to “0” and unplug the the
appliance.
 Loading...