This document provides a comprehensive guide for the Krups Grind & Brew coffee maker, covering its functions, technical specifications, usage, and maintenance.
Function Description
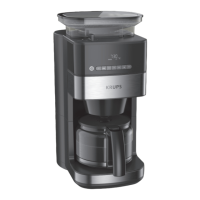
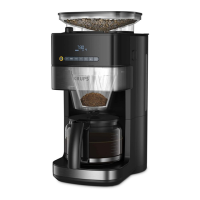
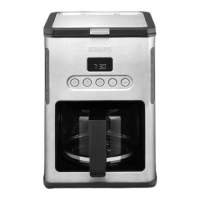
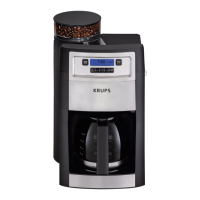
The Krups Grind & Brew coffee maker is designed for domestic use, allowing users to prepare coffee from both whole beans and pre-ground coffee. It features an integrated grinder, enabling fresh grinding of coffee beans just before brewing. The device includes a control panel with a digital display that shows the current time, selected coffee strength, number of cups, and indicators for operation, descaling, and preset brewing time.
Key functions include:
- Grinding and Brewing: The machine automatically grinds whole coffee beans to a user-selected fineness and then brews coffee.
- Pre-ground Coffee Brewing: Users can also bypass the grinder and brew coffee using pre-ground coffee.
- Time Setting: The current time can be set and displayed in a 24-hour format.
- Preset Brewing: The device allows users to program a specific time for automatic coffee preparation.
- Coffee Strength Adjustment: Users can select their desired coffee strength.
- Number of Cups Selection: The machine allows selection of the number of cups to be brewed.
- Keep Warm Function: After brewing, the coffee maker automatically enters a 30-minute keep-warm mode.
- Descaling: A dedicated descaling cycle helps maintain the appliance.
- Standby Mode: For energy saving, the appliance enters standby mode after 10 minutes of inactivity.
Important Technical Specifications
- Altitude Limit: Designed for use at altitudes below 2000m.
- Power Supply: Must correspond to the local electrical supply system and be earthed.
- Keep Warm Duration: 30 minutes.
- Display: Digital display showing time, coffee strength, ground coffee indicator, operating indicator, number of cups, descaling indicator, and preset time indicator.
- Control Panel: Includes buttons for On/Off, number of cups, coffee strength, preset time, time settings (hour/minute), ground coffee selection, and descaling.
- Components: Coffee bean box cover, coffee bean box, grind and brew basket, upper burr (grinder), water tank cover, grind adjust knob, water level indicator, carafe, and heating plate.
Usage Features
Before First Use:
- Plug in the machine. The display will show all symbols (G1-G7), and the On/Off indicator (H2) will light up and then flash for 2 seconds.
- The display will show 00:00, default 4 cups, and default coffee strength 2.
- The time display (G1) will flash 00:00, prompting the user to set the current time.
Current Time Setting:
- Press and hold the HR (H6) button for about 3 seconds to set the hour. The first two digits will flash.
- Wait 5 seconds for the hour to be memorized.
- Press and hold the MIN (H7) button for about 3 seconds to set the minutes. The last two digits will flash.
- Wait 5 seconds for the minutes to be memorized. The time is displayed in 24-hour format.
Coffee Preparation with Coffee Beans:
- Fill the coffee bean box (B) with coffee beans (Fig. 1). Avoid overly oily beans.
- Open the filter holder, insert a paper filter (Fig. 4), and close it (Fig. 6.1).
- Place the carafe (J) on the keep warm plate (Fig. 6.2).
- Set the desired grinding fineness using the grind adjust knob (F) (Fig. 3).
- Set the number of cups (H3) and coffee strength (H4) using their respective buttons.
- Press the On/Off button (H1) to start brewing. The On/Off (H2) and operation (G4) indicators will flash. The grinder will run, and hot water will flow.
- After brewing, the machine will beep 3 times, the On/Off indicator (H2) will light up steadily, the operation indicator (G4) will disappear, and the machine will enter a 30-minute keep-warm mode. The On/Off indicator (H2) will turn off after the keep-warm period.
Coffee Preparation with Pre-ground Coffee:
- Open the filter holder, insert a paper filter, and add the desired quantity of pre-ground coffee (Fig. 5). Do not put pre-ground coffee in the bean container.
- Close the filter holder and fill the water tank.
- Place the carafe (J) on the keep warm plate.
- Press the ground coffee selection button (H8). The ground coffee indicator (G3) will appear.
- Press the On/Off button (H1) to start brewing. The On/Off (H2) and operation (G4) indicators will flash, and the ground coffee indicator (G3) will light up. Hot water will flow through the ground coffee.
- After brewing, the On/Off indicator (H2) will light up steadily, the operation (G4) and ground coffee (G3) indicators will disappear, and the machine will enter a 30-minute keep-warm mode. The On/Off indicator (H2) will turn off after the keep-warm period.
Coffee Preparation with Preset Time:
- Fill the water tank, open the filter holder, insert a paper filter, and close it.
- Set grinder parameters or add pre-ground coffee.
- Place the carafe (J) on the keep warm plate.
- Press and hold the preset time button (H5) for 2 seconds. The preset time indicator (G7) will flash, and the time display (G1) will flash the preset timer.
- Set the desired hour using the HR (H6) button.
- Briefly press the preset time button (H5) to exit the setting mode. The preset time indicator (G7) will disappear, and the time display (G1) will show the current time.
- In standby, briefly press the preset time button (H5) to display the preset time for 3 seconds. The machine will then start brewing automatically at the programmed time.
- After brewing, the preset time indicator (G7) will disappear, the On/Off (H2) and operation (G4) indicators will flash, and hot water will flow.
- After brewing, the On/Off indicator (H2) will light up steadily, the operation (G4) and preset time (G7) indicators will disappear, and the machine will enter a 30-minute keep-warm mode. The On/Off indicator (H2) will turn off after the keep-warm period.
Standby Mode:
- After 10 minutes of inactivity, the appliance enters standby mode, and all displays turn off.
- Press any button on the front panel to wake up the machine. The time will be displayed, and the machine will be ready for use.
Maintenance Features
Cleaning and Care:
- Do not use toxic, corrosive, abrasive cleaning agents or scouring sponges.
- Clean the filter basket, filter insert, and carafe (J) with mild detergent and warm water after each use.
- Wipe the coffee bean box (B) and its cover (A) with a damp cloth if necessary.
- Wipe the housing with a damp cloth; use mild detergent for stubborn stains.
- Regularly check the power cord for damage.
Cleaning the Grinder Shaft:
- Remove coffee beans from the coffee bean box (B).
- Insert a paper filter into the filter insert.
- Press the On/Off button to start the grinder.
- Stop the grinder once all beans are ground (indicated by a change in grinding noise).
- Unplug the appliance.
- Remove the coffee bean box by turning it anticlockwise (Fig. 7).
- Move the grinding fineness dial to "Open."
- Pull out the upper burr (D).
- Clean the grinder shaft and burr with a cleaning brush.
- Reinsert the upper burr, ensuring it is in the correct position (arrow marking).
- Adjust the grinding fineness dial back to a grinding fineness.
- Place the coffee bean box at an angle and turn it clockwise until it engages.
- Dispose of the filter paper and clean the grind and brew basket (C).
Descaling Cycle:
- Fill the water tank with descaling solution (or vinegar).
- Press the descaling button (H9). The descaling indicator (G6) will appear.
- Press the On/Off button (H1) to start the descaling cycle. The On/Off (H2) and descaling (G6) indicators will flash, and hot descaling solution will flow through the empty filter holder.
- After the descaling cycle, the On/Off (H2) and descaling (G6) indicators will turn off.
- Note: The descaling cycle may take longer.
- After descaling, run 2 cycles with a full tank of clear water (10 cups) to rinse the machine.
Troubleshooting:
The manual includes a troubleshooting section with common problems and their solutions, such as coffee not brewing, leaks, slow brewing, bad coffee taste, and incorrect time display.