2
NETTOYAGE
– Prenez les deux lames par les extrémités non coupantes, séparez-les en extrayant
le rivet (B) de la boutonnière (fig 7).
– Lavez - les à l’eau chaude additionnée d’un produit pour la vaisselle.
– Vous pouvez également les passer au lave-vaisselle.
– Raccrochezles deux lames ensemble en glissant le rivet de l’une dans l’ouverture
de l’autre (fig.7). Les gardes de lames (A) doivent se trouver à l’extérieur.
– Remettez les lames dans l’étui de protection.
– Nettoyez l’appareil avec un chiffon humide et essuyez-le soigneusement.
– L’appareil ne doit jamais être passé sous le robinet ni trempé dans l’eau.
– Ranger l’appareil dans sa boîte de rangement (selon modèle).
Thank you for choosing an appliance from the KRUPS range to help make for success
in food preparation.
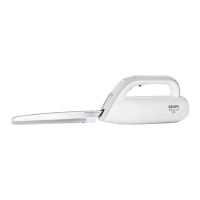
A Blade protection
B Blade rivet
C ON/OFF switch
D Safety catch
E Light
F Blade ejection button
G Motor unit
H Pair of universal blades
Accessories (according to model):
I Pair of special frozen food blades
J Storage box
USE
DESCRIPTION
1. First make sure the appliance is UNPLUGGED and make certain the blades are in
their protection cover (cutting edge downwards), then introduce them gently into
the motor unit (G) and push the blades inside their protection (A) until they lock
(audible click) (fig.3). Next, carefully remove the blade protection cover.
Caution: the blades are extremely sharp. Always be careful when handling them.
2. To cut using the univeral blades (fig.4):
Plug in the appliance. The light (E) will come on. Start by activating the safety
catch (D) under the handle and by pressing the “on-off” switch (C) located on the
handle.
–– Place the blades on the food to be cut and press.
–– Start to cut rmly from the crust or rind going down into the food. The blades
should remain parallel to the surface of the cut. Never try to cut bones.
–– Universal blades specially designed to improve cutting, in particular for food
with a crust, rind or skin (bread, meat, etc.).
 Loading...