Do you have a question about the KT&C K9-a400 and is the answer not in the manual?
Important safety information for installation, use, and servicing of the product.
Warnings related to power, wiring, environment, and voltage for safe operation.
Precautions for handling, cleaning, and user maintenance to prevent damage or injury.
Advisories on unusual noise, humid/dusty environments, and power switch usage.
Precautions regarding magnetic fields, vibrations, and conductive materials.
Guidelines for managing old HDD data and handling detected errors.
Notes on FCC rules, potential interference, and Class A product emissions.
Details all included components like DVR, battery, software, and accessories.
Highlights advanced capabilities such as PTZ control, Ethernet, and multiple video outputs.
Lists suitable locations and use cases for the DVR, emphasizing security needs.
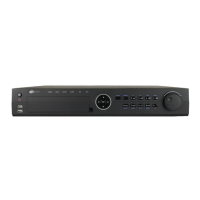
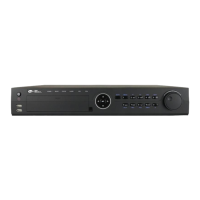
Details buttons, LED indicators, and ports on the front panel of the DVR.
Diagram and labels for the rear connections of the 4-channel DVR model.
Diagram and labels for the rear connections of the 9-channel DVR model.
Explains the purpose and function of each button on the remote control.
Describes the usage of BNC connectors for video signal input and loop-through output.
Details how to connect a monitor using the VGA output port.
Instructions for connecting PTZ cameras and external keyboards via RS-485 interface.
Details the setup for the single alarm output terminal.
Explains the functionality of sensor inputs and the RJ-45 Ethernet port.
Describes the uses of USB ports and the HDMI output for display.
Information on connecting external hard drives via the E-SATA port.
How to open the setup menu using the front panel, mouse, or remote controller.
Explains icons for recording status, motion detection, sensors, and camera titles.
Details the information displayed in the status bar, including date, time, and recording status.
How to use the remote controller to manage the DVR's functions.
Explains the operation of ID, Split, Backup, and Audio buttons on the remote.
Details the functions of Sequence, PTZ, and Search buttons for controlling the DVR.
Guide to setting the remote controller ID for managing multiple DVRs.
Instructions for opening menus using front panel, mouse, or remote.
Lists major menu sections like System, Search, Backup, and Camera.
How to magnify images by dragging the mouse pointer.
Instructions for using remote buttons to zoom in and out of images.
Explains the System Information screen, including Remote ID, version, and health status.
Steps to set the current time, date, and date format.
How to enable daylight saving time and configure automatic time synchronization.
Managing user accounts, administrator IDs, and assigning permissions.
Information on the default password and user account types.
Displays information about connected hard disks, capacity, and formatting options.
Details settings for disk capacity, overwrite recording, and data formatting.
Configures advanced disk modes (Main/Mirror) and automatic data deletion.
How to reset system parameters to default or factory settings.
Procedures for updating firmware and backing up/loading system configurations.
Configures button behavior like auto-key lock and RS-485 settings for PTZ control.
Customizes on-screen elements such as camera titles, status bars, and menu locks.
Controls for camera titles, status bars, display lock, and menu lock settings.
Overview of various split screen layouts for viewing multiple camera feeds.
Setup for 16-split and 13-split display modes, including group options.
Configuration options for 9-split and 6-split display layouts.
Instructions for setting up the 4-split screen display layout.
Configures automatic channel sequencing and display duration for live views.
Details on utilizing the spot output for an additional monitor.
Adjusts video output aspect ratio and selects monitor type (Composite, VGA).
Guide to configuring network settings using DHCP or static IP.
Manual entry for essential network parameters like IP address and DNS.
Sets up email server details, sender, recipients, and password for notifications.
Chooses which events (Alarm, Motion, Video Loss) trigger email alerts.
Sets up the built-in web server for remote access via a web browser.
Guides on configuring Dynamic DNS for stable remote access.
Step-by-step process for registering the DVR's Web Code for a domain name.
Provides crucial information regarding DDNS activation, service availability, and IP refresh.
Sets up dual streaming for optimized network transmission and recording.
Adjusts camera channel, covert mode, brightness, contrast, saturation, and hue.
How to assign custom names to cameras using the on-screen keyboard.
Configures PTZ camera model, ID, and basic settings for control.
Configures reverse direction for PTZ camera's pan and tilt movements.
Sets up automated PTZ camera movement sequences using preset points.
Configures touring number, preset number, and interval for automated PTZ movements.
How to call up the PTZ control menu using mouse or remote.
Controls camera direction and manages preset camera positions for PTZ cameras.
Sets resolution, quality, frame rate, and audio for video recordings.
Details configuration options for recording resolution, frame rate, and audio.
Configures scheduled recording based on day, time, and event type.
Selects recording modes like No Recording, Continuous, Motion, or Sensor.
Copies recording schedules between channels or to all channels.
Sets up external sensors, input types (N/Open, N/Close), and related cameras.
Configures motion detection sensitivity, detection area, and related channels.
Specifies areas within the camera view for motion detection analysis.
Sets actions for detected motion and sensor triggers, including PTZ and relay outputs.
Configures PTZ presets, pop-up windows, and relay outputs for motion/sensor events.
Defines actions for video loss events, such as PTZ movement or alarm triggers.
Introduces the various search modes available, including Calendar, Date/Time, and Event.
How to use the calendar interface to locate recorded data by date.
Explains color coding for dates, hours, and minutes indicating recorded data.
Inputting specific date and time ranges to retrieve recorded video.
Locating recorded data based on event types like motion detection.
Quickly accessing the earliest or latest recorded video segments.
Explains mouse and remote controls for search and playback functions.
Selects audio channels for playback and adjusts volume levels.
Details audio output modes (OFF, CH1-4, Auto) and volume control.
Steps to begin backing up data to USB or E-SATA storage devices.
Using the calendar interface to specify the date for data backup.
Setting the starting hour for the data backup period.
Defining the backup minute and managing the end time for the backup.
Choosing which camera channels to include in the data backup.
Sets options for log files, password protection, and backup file formats.
Initiates backup and checks device capacity before proceeding.
Locating backup files and starting playback using the viewer program.
Explains viewer controls, AVI conversion, and audio playback features.
Download and installation instructions for the KVRmobile app from the Apple App Store.
How to find and start the KVRmobile app on an iPhone.
Steps to add a new remote DVR connection within the KVRmobile app.
Assigning a descriptive name to the remote DVR for easy identification.
Inputting the DVR's model, user ID, and password for secure connection.
Entering the DVR's IP address to establish remote connectivity.
Setting DDNS to 'OFF' for remote access via iPhone.
Starting the real-time video stream from the DVR on the iPhone.
Using the app to select channels, control PTZ, and manage relay outputs.
How to navigate to the search function within the KVRmobile app.
Selecting dates and times to search for recorded video through the app.
Utilizing playback controls like reverse, pause, and play within the app's search results.
Setting alarm output duration and state using the iPhone app.
Performing PTZ camera adjustments and movements directly from the iPhone.
Instructions for downloading and installing the KVRmobile app from the Google Play Store.
How to find and open the KVRmobile app on an Android device.
Steps to add a remote DVR connection in the Android KVRmobile app.
Inputting DVR name, user ID, password, and IP address for remote connection.
Options to modify or remove previously registered DVR connection details.
Selecting a registered DVR from the list to initiate a connection.
Shows real-time video feeds from connected cameras on the Android device.
Options for channel selection, OSD display, and audio playback during live view.
Viewing multiple camera feeds simultaneously in various split screen layouts.
Accessing different functions and modes through the main menu interface.
Details the purpose of each icon in the main menu (Back, Channel, PTZ, Search, etc.).
Entering PTZ mode to control camera movement and functions via the app.
Managing PTZ camera zoom, focus, and touring operations through the app.
How to go to preset mode, save, and move to specific camera positions.
Choosing the desired search mode (e.g., Time Search) within the app.
Setting search parameters and using playback controls for recorded footage on the app.
Managing relay output settings, including duration and state, using the Android app.
Capturing and saving current screen images to the device's SD card.
Displays information such as IP address, Web Code, and firmware version for the active connection.
Safely closing the connection to the DVR using back or close buttons.
Comprehensive technical details including system, video, audio, ports, power, and dimensions.
| Certification | CE, FCC, RoHS |
|---|---|
| Product color | Black |
| Channels quantity | 4 channels |
| Video capturing speed | 120 fps |
| Total storage capacity | 6000 GB |
| Video compression formats | H.264 |
| Operating system installed | Embedded LINUX |
| Analog signal format system | NTSC, PAL |
| Graphical user interface (GUI) | Yes |
| Playback resolutions supported | 960 x 480, 960 x 240, 480 x 240 |
| RS-485 ports | 1 |
| BNC input ports | 4 |
| USB 2.0 ports quantity | 2 |
| Ethernet interface type | Gigabit Ethernet |
| Supported network protocols | TCP-IP / DHCP / PPPoE / DDNS |
| HDD capacity | 3000 GB |
| HDD interface | Serial ATA |
| Power requirements | 100-240 VAC, 50-60Hz |
| Power consumption (typical) | 12.2 W |
| Optical drive type | DVD |
| Operating temperature (T-T) | 0 - 40 °C |
| Operating relative humidity (H-H) | 20 - 80 % |
| Weight | 4100 g |
|---|---|
| Dimensions (WxDxH) | 361 x 338 x 66 mm |