Do you have a question about the Kurgo AUTO ZIP LINE and is the answer not in the manual?
Connect S-hooks to rear passenger seatbelt tabs (SB1/SB2); cam buckle end on driver's side.
Swiftly pull down the driver's side seatbelt strap to lock it in place.
Apply constant pressure to extra webbing to keep the driver's seatbelt locked.
Lock the passenger seatbelt using the same swift pulling motion.
Pull extra zip line webbing to remove all slack once seatbelts are locked.
Feed extra webbing through the metal slide to secure strap tension.
Roll up extra webbing and secure it using the bungee and toggle system.
Test seatbelts by tugging them before attaching the dog; repeat before each trip.
Place the zip line carabiner onto the zip line.
Attach the harness carabiner to your dog's harness.
Loop leash nook onto the zip line carabiner, allowing dog freedom to move.
Attach S-hooks to rear passenger handles, tighten zip line, and secure webbing.
Buckle seatbelt, attach zip line carabiner, and connect harness carabiner.
Attach zip line carabiner to cargo hook, then connect harness carabiner.
Use S-hooks on cargo hooks, tighten zip line, and attach harness carabiner.
Brush off dirt, spot clean with mild soap and water, rinse, and air dry.
The Kurgo Auto Zip Line is a pet restraint system designed to keep your dog safe and secure in the back seat of a vehicle, preventing driver distraction. It is intended to restrain your pet and keep it from moving into the front seat, though it does not guarantee protection from injury in every situation.
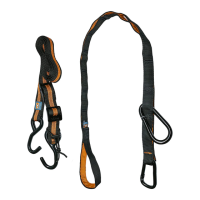
The Auto Zip Line creates a secure tethering point across the back seat of a vehicle, allowing your dog a limited range of motion while remaining safely restrained. It utilizes existing vehicle features such as seatbelt tabs, passenger handles, or cargo hooks to establish a sturdy anchor. The system consists of a main webbing strap with S-hooks, a cam buckle for tension adjustment, metal slides for securing excess webbing, and bungee and toggle systems for tidying up loose straps. Your dog's harness (not included) attaches to the zip line via a harness carabiner, which then connects to a zip line carabiner that slides along the main webbing. This setup allows your dog to sit, stand, or lie down comfortably within a defined area, preventing them from interfering with the driver or moving freely throughout the vehicle. The design prioritizes ease of installation and adjustability to accommodate various vehicle types and dog sizes.
To ensure the longevity and optimal performance of your Kurgo Auto Zip Line, hand washing and air-drying are the recommended cleaning methods.
| Material | Nylon |
|---|---|
| Weight Capacity | Up to 75 lbs |
| Adjustable Length | Yes |
| Product Type | Pet Restraint System |
| Compatibility | Most vehicles with seat belts |
| Installation | Easy installation |
| Usage | Keeps dog safely restrained in the back seat |
| Intended Use | Pet safety during car travel |
| Attachment | Harness or collar |
| Type | Pet restraint system |
| Attachment Method | Seatbelt tether |