EasyManua.ls Logo

KwikGoal AFR-1 User Manual

Default Icon
6 pages
To Next Page IconTo Next Page
Page #1 background imageLoading...
Page #1 background image
NZ117 Rev. 07/17/17
***CAUTION***
All sports equipment must be anchored at all times. Sports equipment not in use must be
disassembled and stored in a safe, secure place. Assembled sports equipment should not be left
unattended. Do not use this equipment during the threat of high winds. Sports equipment should
be checked for safety on a regular basis. Any modifications to this or any Kwik Goal product will
void any and all warranties.
140 Pacific Drive Quakertown, PA 18951
(P) 215- 536-2200 / (P) 800-531-4252 / (F) 215-536-4309 / (F) 800-778-8869
Visit our website @ kwikgoal.com
© 1998, Rev 2017 Kwik Goal Ltd.
ASSEMBLY INSTRUCTIONS FOR 2B1603 AFR-1 REBOUNDER
1. Unpack all parts and check for damage that may have occurred during shipping. If damage has occurred,
notify trucking company immediately. Lay out all parts. Remove all cardboard and packaging immediately.
Wet or damp packaging may damage contents.
2. Read through entire instruction before beginning assembly and installation.
®
Bungee (30)
(Part# 10B3501 pack of 30)
Roll Pin (2)
(Part# TZ200)
Caplug (4)
(Part# VZ235)
Net (1)
(Part# 3B804)
Ground Shoe (2)
(Part#UZ573)
Left Post (1)
(Part#UZ570)
Right Post (1)
(Part#UZ569)
Ground Anchor Peg (1)
(Part# UZ847)
Middle Bar (1)
(Part#UZ571)
78-1/2”
Side Bar (2)
(Part#UZ572)
48”
Question and Answer IconNeed help?

Do you have a question about the KwikGoal AFR-1 and is the answer not in the manual?

KwikGoal AFR-1 Specifications

General IconGeneral
BrandKwikGoal
ModelAFR-1
CategorySports & Outdoors
LanguageEnglish

Summary

Kwik Goal Rebounder Assembly

Initial Post Assembly

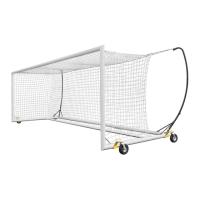
Assemble the left and right posts, incorporating caplugs and roll pins.

Assemble Bars and Weave Net

Connect middle and side bars, then weave the net onto them using top corner tags.

Attach Side Bars to Posts

Insert the assembled side bars into the designated posts for structural integrity.

Attach Net Corners with Bungees

Secure the top corners of the net to the goal frame using bungee cords.

Attach Ground Shoes and Net Clips

Connect ground shoes to posts and attach net clips to the bottom net corners.

Position and Secure Rebounder

Place the rebounder and push ground shoes into the field; use pilot hole peg for hard soil.

Final Bungee Attachment

Evenly space and attach bungees to secure the net along the posts.

Target Patch Placement

Optionally place the target patch at a desired location on the rebounder.

Disassembly and Storage

Reverse assembly steps for disassembly and store the goal safely.

Related product manuals