EasyManua.ls Logo

L.L.Bean Backcountry - User Manual

L.L.Bean Backcountry
2 pages
Print Icon
To Next Page IconTo Next Page
Loading...
Setting Up Your Tent
Follow these steps to set up your tent:
1. Unroll the tent and separate the components.
Spread out the tent body with the floor facing
the ground. Assemble the tent poles. Lay the
gold poles across the tent. (See Figure 1.) Insert
the end tips into the grommets on the tent’s
gold stake-out loops. The poles will arch.
2. Stand up the poles and clip the gated carabiner
in the peak of the roof cloth around the two
poles. Using one of the graphite arched poles,
insert the end tip into a grommet on the grey
stake-out loop closest to the rear of the tent.
Walk the pole around the front of the tent and
insert the opposite end into the grey stake-
out loop closest to the rear of the tent.
Repeat this step with the remaining graphite
pole, wrapping it around the rear of the tent.
Note that the poles crisscross. (See Figure 2.)
3. Attach all remaining plastic clips and gated
carabiners to the tent poles, making sure to
capture both poles with the carabiners. (See
Figure 3.)
Becoming Familiar With Your Tent
Before your first adventure we recommend that you
set up the tent to become familiar with the parts
and set-up procedure. Your tent storage bag will
include:
• One tent
• One pole bag with two gold poles, two graphite
poles, one arched black pole
• One stake bag with stakes
• One rain fly
Selecting a Site
Select a site that is clear of debris and other objects
that could damage the floor of the tent. Check
above the tent for any potentially dangerous tree
limbs.
Backcountry Dome Tent
Fig. 3
For more information regarding the use and setup of this tent, please call our Product Support Team at 800-CAMPLLB.
WARNING: Keep all flame and heat
sources away from this tent fabric.
This tent meets the flammability
requirements of CPAI-84. The fabric
may burn if left in continuous contact
with any flame source. The application
of any foreign substance to the tent
fabric may render the flame resistant
properties ineffective.
WARNING: Do not use fuel-burning
devices inside or near this tent.
Use of such devices in this tent could
cause death or serious injuries to you
or others using this tent due to carbon
monoxide poisoning.
Backcountry Dome
Fig. 1
Fig. 2
Question and Answer IconNeed help?

Do you have a question about the L.L.Bean Backcountry and is the answer not in the manual?

Summary

Becoming Familiar With Your Tent

Selecting a Site

Choose a clear area free of debris and potential hazards for tent setup.

Setting Up Your Tent

Attaching High Wind Guylines

Leave No Trace Principles

Overview

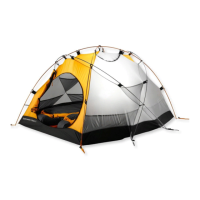
The Backcountry Dome Tent is a portable shelter designed for outdoor use, emphasizing ease of setup and durability. It is intended for adventurers who require a reliable and safe tent for their excursions.

Function Description:

The primary function of the Backcountry Dome Tent is to provide a temporary, weather-resistant shelter for individuals in outdoor environments. It is designed to be set up quickly and efficiently, offering protection from the elements and a comfortable space for rest. The tent's dome structure is engineered for stability, particularly in varying weather conditions, and its design includes features that enhance ventilation and user convenience.

Important Technical Specifications:

The tent package includes:

  • One tent body: This forms the main enclosure of the shelter.
  • One pole bag: Contains two gold poles, two graphite poles, and one arched black pole. These poles are crucial for establishing the tent's structure and shape. The gold poles are used to create the initial arching structure, with their tips inserted into grommets on the tent's gold stake-out loops. The graphite poles are used to create a crisscrossing structure around the rear of the tent, with their tips inserted into grommets on the grey stake-out loops. The arched black pole is specifically used to create the vestibule at the front of the tent, arching over the front and connecting to gold webs on either side.
  • One stake bag: Contains stakes necessary for securing the tent to the ground, ensuring stability and tautness.
  • One rain fly: An external layer designed to provide additional protection against rain and other precipitation. It features hook-and-loop tabs on its underside to secure it to the tent poles and has attachment loops for high wind guylines. The rain fly also has a "Backcountry Dome" logo that should align with the logo on the tent body during setup.

Flammability Requirements:

The tent fabric meets the flammability requirements of CPAI-84. However, it is important to note that the fabric may burn if left in continuous contact with any flame source. The application of any foreign substance to the tent fabric may render its flame-resistant properties ineffective.

Usage Features:

The Backcountry Dome Tent is designed for user-friendly operation, with a clear, step-by-step setup process:

  1. Preparation: Unroll the tent body with the floor facing the ground. Assemble all poles.
  2. Initial Pole Setup: Lay the gold poles across the tent and insert their ends into the grommets on the tent's gold stake-out loops. These poles will arch, forming the initial dome shape.
  3. Structural Pole Setup: Stand up the poles. Clip the gated carabiner at the peak of the roof cloth around both gold poles. Take one graphite arched pole, insert one end into a grommet on a grey stake-out loop closest to the rear of the tent, walk the pole around the front, and insert the other end into the opposite grey stake-out loop closest to the rear. Repeat this with the second graphite pole, ensuring the poles crisscross.
  4. Clip and Carabiner Attachment: Attach all remaining plastic clips and gated carabiners to the tent poles, making sure to capture both poles with the carabiners for enhanced stability.
  5. Staking the Tent: Stake the tent to the ground in the desired location, ensuring the floor is square and taut.
  6. Rain Fly Installation: Locate the hook-and-loop tabs on the underside of the rain fly. Align the "Backcountry Dome" logo on the fly with the logo on the tent. Drape the fly over the tent. Reach under the fly and wrap the hook-and-loop tabs around the tent poles. Connect the grey and gold webs on the tent and fly.
  7. Vestibule Creation: Use the black tent pole. Insert one end into the grommet on the gold web at the front of the tent, arch it over the front, and insert the opposite end into the gold web on the other side. Attach the plastic hooks to this pole. Pull the front and rear of the fly out to form vestibules and stake them smooth and taut.
  8. Adjustment: Walk around the tent and tighten all adjustment webs to ensure a secure and stable setup.

High Wind Guylines:

For high wind conditions, the tent includes guylines with pre-attached tensioners in the stake bag. These guylines should be tied to the attachment loops sewn into the tent fly. To secure them, tie the end of the guyline without the slider to the tent fly loop, pull the loop from the tensioner, insert a stake in the loop, and slide the tensioner along until the line is tight.

Site Selection:

It is recommended to select a site that is clear of debris and other objects that could damage the tent floor. Additionally, check above the tent for any potentially dangerous tree limbs.

Maintenance Features:

While specific maintenance instructions are not detailed in the provided text, the manual implies general care through its warnings and setup guidelines:

  • Flame and Heat Sources: Keep all flame and heat sources away from the tent fabric to prevent burning and maintain its flame-resistant properties.
  • Fuel-Burning Devices: Do not use fuel-burning devices inside or near the tent. This is a critical safety warning to prevent carbon monoxide poisoning, which can lead to death or serious injuries.
  • Foreign Substances: Avoid applying foreign substances to the tent fabric, as this can render the flame-resistant properties ineffective.
  • Proper Storage: The mention of a "tent storage bag" suggests that proper packing and storage are important for the longevity of the tent and its components.

The manual also encourages users to become familiar with the tent's parts and setup procedure before their first adventure, implying that regular practice and understanding of the components contribute to better maintenance and usage. For further information, users are directed to call the Product Support Team, indicating a resource for troubleshooting and potentially maintenance advice. The inclusion of "Leave No Trace Principles of Outdoor Ethics" suggests a broader commitment to responsible outdoor practices, which indirectly contributes to the longevity of the tent by promoting careful use in natural environments.

L.L.Bean Backcountry Specifications

General IconGeneral
BrandL.L.Bean
ModelBackcountry
CategoryTent
LanguageEnglish

Related product manuals