EasyManua.ls Logo

lamber 01FEKS - User Manual

lamber 01FEKS
33 pages
Print Icon
To Next Page IconTo Next Page
Loading...
DICHIARAZIONE DI CONFORMITA' - DECLARATION OF CONFORMITY
DECLARATION DE CONFORMITE' - KONFORMITÄTS ERKLÄRUNG
Noi - The following - Nous soussignés - Die Unterzeichnete Fa:
dichiariamo sotto la nostra esclusiva responsabilità che il prodotto
hereby declares under full responsability that the following product
attestons sous notre entière responsabilité que le produit suivant
erklärt unter eigener Verantwortung, dass folgende Produkte
LAVASTOVIGLIE - LAVE-VAISSELLE - DISHWASHING MACHINE - GESCHIRRSPÜLMASCHINE
mod. 01F
al quale questa dichiarazione si riferisce è conforme alle seguenti norme:
for which this declaration refers to the conformity of the following standards:
auquel se réfère cette déclaration, est conforme aux normes suivantes:
auf welche sich diese Erklärung bezieht, folgendem Standard entsprechen:
- EN 60335-1 (1994) + A11,A1,A12,A13,A14,A15
Sicurezza degli apparecchi elettrici d'uso domestico e similare. Norme generali
Safety of household and similar electrical appliances-General requirements.
- EN 60335-2-58 (1997)
Sicurezza degli apparecchi elettrici d'uso domestico e similare. Parte 2':Norme particolari lavastoviglie uso
collettivo.
Safety of household and similar electrical appliances-Part 2':Particular requirements for commercial electric
dishwashing machines.
- EN 292-2 (1992) Part 1' - PART 2'
Sicurezza del macchinario-Concetti fondamentali-Principi generali progettazione-Specifiche e principi tecnici.
Safety of machinery-Basic concepts-General principles for design-Tecnical principles an specification
- EN 61770- (2000)
Apparecchi elettrici connessi alla rete idrica. Disposizioni per evitare il ritorno d’acqua per effetto sifone e il
guasto dei complessi di raccordo
Electric appliances connected to the water mains. Avoidance of backsiphonage and failure of hose-sets
in base a quanto previsto dalle Direttive:
selon ce qui est prévu par les Directives:
on the basis of what is foreseen by the Directives:
aufgrund der vorgesehenen Richtilinien:
73/23/CEE, 89/392/CEE, 91/368CEE,92/31CEE, 93/44CEE, 93/68CEE
Decliniamo ogni responsabilità per sinistri a persone o a cose derivanti da manomissioni da parte di terzi o da carenze di manutenzione o riparazione.
Nous déclinons toute responsabilité pour sinistres à personnes ou à objets qui derivent de l'intervention de la part de tiers non specialistes ou de
carences de manutention ou reparation.
We decline any responsability for injuries or damage derived from machine misuse, abuse by others or improper machine maintenance or repairs.
Wir Iehnen jegliche Verantwortung für Schäden an Personen oder Dingen ab, die auf fehlerhaftes Eingreifen Dritter oder auf mängelhafte Wartung oder
Reparation zurückzuführen.
li 01/01/07
(data/date/Datum)
Question and Answer IconNeed help?

Do you have a question about the lamber 01FEKS and is the answer not in the manual?

Overview

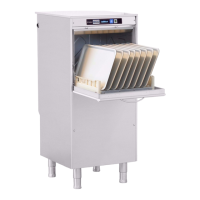
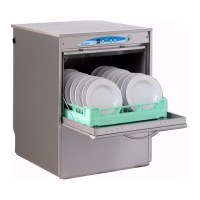
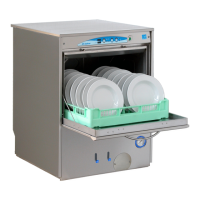
This document describes a commercial dishwasher, model 01F, designed for professional use.

Function Description

The device is a commercial dishwasher capable of washing up to 30 baskets per hour. It is designed to provide optimal washing results, ensuring hygiene and sanitation. The machine is equipped with various features to facilitate its operation, maintenance, and regeneration processes.

Important Technical Specifications

  • Dimensions (W x H x D): 600x1370x650 mm
  • Basket Size: 50x50 cm
  • Number of Plates per Basket: 12-18
  • Clearance: 400 mm
  • Voltage: 400 V3N~50Hz
  • Washing Tank Element: 2000 W
  • Rinse Tank Element: 6000 W
  • Total Rating: 6000 W
  • Maximum Current Intensity: 12 A
  • Tank Capacity: 42 L
  • Boiler Capacity: 6 L
  • Rinse Aid Dispenser: 0.15 g/L
  • Cycle Water Consumption: 2.4 L
  • Hour Water Consumption: 240 L
  • Water Pressure: 2-4 bar (200-400 kPa)
  • Water Hardness: 7.2-12.5 °French (for machines without water softener)
  • Water Hardness (with incorporated water softener): 10-12 °C, 3-4 bar (300-400 kPa)
  • Water Inlet: 3/4" G
  • Water Drain: 32 mm - 1"1/4 G
  • Net Weight: 81 kg
  • Gross Weight: 85 kg
  • Packing Dimensions: 630x70x1390 mm
  • Noise: <55 dB(A)
  • Protection Degree: IP21 (not to be washed with direct high pressure jet water)

Usage Features

Control Panel

The control panel includes:

  • Main Switch (A): Turns the machine on/off.
  • Cycle Pushbutton (B): Starts the washing cycle.
  • Main Switch Lamp (C): Green light indicating the machine is on and the tank is filling.
  • Cycle Lamp (D): Flashes slowly when regeneration is needed, flashes quickly when salt needs to be added, and lights up steadily during a washing cycle.
  • Temperature Lamp (E): Indicates when washing water is at the ideal temperature.
  • Drain Pump Lamp (H): Lights up when the drain pump is active (optional feature).
  • Wash Time Selection: A rotary knob allows selection of washing periods (1:120 seconds, 2:180 seconds, 3:240 seconds). The default is 180 seconds.
  • Water Softener (Optional): If equipped, this feature helps manage water hardness.

Operation Before Washing

  1. Ensure the water cock is open.
  2. Verify that filters and overflow are in their housings.
  3. Check that the wash arm and rinse arm can pivot freely.
  4. Ensure brightener and washing powder dispenser containers are loaded.
  5. Open the door and add approximately 120g of non-lathering detergent (powder) into the tank, possibly over the pump filter. Add about 85g every 10 cycles. If an automatic dosing device is present, check the detergent level.
  6. Place dishes in the basket, removing all solid waste and fat. Do not overload baskets; ensure water can reach all parts of the dishes.
  7. Turn on the machine using the wall switch and then the main switch (A) on the control panel. The green light (C) will illuminate, and the tank will fill with water. The cycle lamp (D) will flash when the tank is full.
  8. Place the basket into the machine and close the door.
  9. Ensure the temperature lamp (E) is on, indicating the washing water is at the ideal temperature.
  10. Select the desired washing period using the rotary knob.
  11. Push the cycle pushbutton (B). The cycle lamp (D) will light up steadily, and the cycle will begin, including washing, a 4-second stop, and an 18-second rinse with clean water at 85-90°C.
  12. At the end of the cycle, the cycle lamp (D) will flash.
  13. The rinse cycle only starts when the water temperature is 85-90°C (thermocontrol system).
  14. Opening the door interrupts the cycle.
  15. To stop a cycle, push the cycle pushbutton (B) again. To restart, push it again.

Dishes Positioning

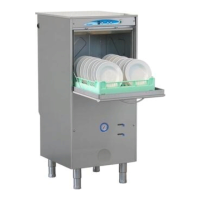
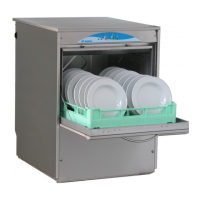
Place dishes in the plastic basket with the concave side facing upwards. Mixed cutlery should be placed vertically in the container, not crammed, with handles towards the bottom.

Cleansing Agents

Use highly alkaline and chlorine-active antifoam products specifically designed for industrial dishwashing machines from reliable manufacturers.

  • Mean concentration of powder cleansing agents: 1.5-2.5 g/L.
  • Mean concentration of liquid cleansing agents: 2-4 g/L.
  • To prevent scales and corrosions, add cleansing agent above the water level near the sucking pump filter for immediate dilution.

Rinsing Additives

Add a surfactant (Brightener) to ensure perfect rinsing, quick drying, and to prevent calcareous sediments. The machine is equipped with a rinse aid dispenser. Mean concentration used is 0.15 g/L.

Regenerating (for machines with Water softener)

If the machine has a water softener, resins can be regenerated.

  1. When regeneration is needed, the cycle lamp (D) blinks slowly.
  2. To perform regeneration, lift the overflow out of the tank and close the door.
  3. Push the cycle pushbutton (B) for three seconds until the cycle lamp (D) lights up steadily.
  4. After 20 minutes, the cycle lamp (D) will turn off, indicating regeneration is complete.
  5. Regeneration is implicitly signaled after 45 washing cycles.
  6. The regeneration programming can be modified based on water hardness (refer to the installer section).

Salt Control

When salt needs to be added, the cycle lamp (D) blinks quickly. This operation is programmed every 10 regeneration cycles.

  1. Unscrew the plug of the salt container at the bottom of the tank and add 1 kg of coarse salt tablets. Clean the gasket and screw the plug.
  2. After adding salt, perform the regeneration operation as described above.
  3. Attention: Lack of salt damages the machine due to limestone and causes defective washing. These damages are not covered by the warranty.

Drain Pump Instruction (only for machines with drain pump)

The drain pump starts automatically during the washing cycle to discharge excess water from the rinsing cycle. To completely discharge the tank at the end of the day:

  1. Open the dishwasher door.
  2. Remove the overflow pipe from the tank.
  3. Push the drain pump button (R) for 3 seconds (the drain pump lamp (H) will light up).
  4. The discharge will stop automatically after 5 minutes, and the control lamp will stop flashing.
  5. Reinstall the overflow and shut the door.

Maintenance Features

Daily Maintenance

  • Disconnect the machine with the pushbutton "A".
  • Lift the overflow pipe and let the water drain out of the tank.
  • Wash thoroughly the tank and the filter housings to remove all impurities.
  • Take the filters out and clean them under running water.
  • Reassemble the overflow pipe and the filters in their housings.
  • Check and clean the washing and the rinsing jets.
  • Clean the outer surface of the machine using a wet sponge; do not use water jets because, besides being dangerous, they could damage the electrical parts; do not use abrasive detergents.
  • When the machine is to remain idle for a long time, drain all the water from the boiler and from the teleopump. Also leave the door open.
  • Never wash the external part of the machine with a water jet.

Descaling

When hard water is used, calcareous sediments can form. Descale dishes periodically by soaking them in suitable solutions suggested by your cleansing agent supplier. To avoid damage, do not increase the quantities or operations beyond what is necessary.

Sanitation

To guarantee complete hygienic conditions, it is advisable to sanitize the machine every 30 days. Your cleansing agent supplier can suggest suitable products, generally an active chlorine powder (100-200 ppm). Do not increase quantities or operations beyond what is necessary.

Useful Hints of Stainless Steel Maintenance

Stainless steel is susceptible to corrosion if not maintained properly. To prevent this:

  • Use only cleaning products specifically designed for stainless steel.
  • Avoid using abrasive or chlorine-based substances (e.g., sodium hypochlorite, hydrochloric acid).
  • Clean surfaces with a damp cloth; use soap and water or neutral detergents.
  • Rinse thoroughly after cleaning.
  • Rust: water supply pipes, inevitably convey particles of rust dissolved in the water, especially in new installations or when taps are opened after a period of inactivity. These iron deposits must not be allowed to remain on the stainless steel since they produce rust by contamination. Use suitable products to remove any rust marks from companies that produce detergents for industrial use. After application, thoroughly rinse with clean water, neutralizing the action of the detergent with an alkaline detergent normally used to clean such appliances or with another specific product.
  • Do not use metal mats to clean the stainless steel.

Electrical Connection

  • Before connecting, ensure the mains voltage matches the voltage specified on the machine's data plate.
  • A main switch must be installed between the mains and the machine, with a minimum contact distance of 3 mm and disconnection on all poles according to EN 60204 (VDE 113).
  • Fuses on the main switch must be 16 A.
  • The mains must be wired to handle the current drawn by the machine.
  • The system must have a proper ground lead according to existing norms.
  • The electric cable must be of type H07RN-F.
  • Refer to the cross-section area table for cable selection:
    • 0.75 mm²: < 6 A
    • 1 mm²: 6 ÷ 10 A
    • 1.5 mm²: 10 ÷ 16 A
    • 2.5 mm²: 16 ÷ 25 A
  • The equipment must be connected to an effective ground installation. The manufacturer declines responsibility for damages caused by lack of an effective ground installation.

Water Connections

  • Comply with national or regional regulations.
  • Water temperature: 55°C (for cold water supply, productivity reduces).
  • Dynamic pressure: 2-4 bar (200-400 kPa).
  • For machines with incorporated water softener: temperature 10-12°C, dynamic pressure 3-4 bar (300-400 kPa).
  • Warning: If water pressure exceeds 3 bar, install the supplied pressure reducer "A" into the solenoid valve.
  • If dynamic pressure is lower than specified, install a booster pump.
  • Hardness: between 7.2 and 12.5 °French. If higher, install a water softener.
  • Do not tamper with the thermostat calibration.
  • A stopcock with 3/4" Gas threaded fitting should be near the machine. The machine comes with a flexible pipe and filter for connection.

Water Drain

  • The drain can be accessed by removing the front panel.
  • The drain should be placed on the floor, with a minimum diameter of 1"1/4 (42 mm), equipped with a siphon, and an adequate slope.
  • If an existing installation is present, the drain can be connected via the supplied 32 mm flexible pipe and elbow.
  • Ensure no throttlings along the drain pipe.

Setting of Regeneration Cycles

  • By default, regeneration is planned every 45 washing cycles.
  • When regeneration is needed, the "D" lamp blinks slowly.
  • The regeneration programming can be modified based on water hardness using dip-switches on the electronic board.
  • Regeneration Setting Programming:
    1. With the machine stopped, check the position of the dip-switches on the electronic board and memorize it.
    2. Then set the dip-switch according to the following table, according to the number of washing cycles you wish to set to start the regeneration operation signaling.
    3. Open the door of the machine.
    4. Press the START button.
    5. Keep the START button pressed and turn the machine ON using the "A" switch.
    6. Wait for the lighting of the cycle "2" lamp.
    7. Turn the machine OFF using the "A" switch.
    8. Reset the dip-switches according to the original position of the washing period programming.

lamber 01FEKS Specifications

General IconGeneral
Brandlamber
Model01FEKS
CategoryDishwasher
LanguageEnglish

Related product manuals