MELA 6282 LANE MORTISEPLUS INSTRUCTIONS 04/17
51mm diameter
drill through door
25mm diameter
drill inside only
BACKSET 60mm
THIS HOLE IS TO BE DRILLED ON
THE INSIDE OF THE DOOR ONLY -
STOP DRILLING WHEN YOU HAVE
REACHED THE MORTISE CUTOUT
TOP -
UNLOCK POSITION
BOTTOM -
LOCK POSITION
RETIGHTEN ALLEN
KEY SCREW TO THE
BOTTOM POSITION
WHEN FINISHED
PUSH LATCH IN AND
SWIVEL TO DESIRED
POSITION
INSERT AND FIX
LATCH TO DOOR
STEP 1 - MORTISE CUT OUT
1. Decide upon desired installation height for mortise lock
2. Mark fixing screw holes using the attached template alligning it in the centre of
the door
3. Mark 9 x 19mm diameter holes as per attached template
4. Drill 2 x 2mm diameter fixing holes top & bottom as per attached template
5. Drill 9 x 19mm diameter holes as per attached template
6. Smooth out edges of 19mm holes with a chisel so that the mortise lock can slide
into the mortised cavity with out requiring any level of force
7. Insert the lock and trace around the faceplate - this will need to be chiseled out to
accommodate for the faceplate. It should be chiseled to a depth of approx 2-3mm
8. Ensure mortise can be placed inside the mortised cavity and face plate cut out is a
snug fit
STEP 2 - PRODUCT HANDING
1. Loosen allen key screw with allen key provided & move it in the up position
2. Push latch inside lock housing and turn around 180 degrees so that flat side is
facing to the inside
3. Release latch back out of the housing
4. Re-tighten allen key screw in the bottom position
5. Test by pushing latch in and out of the housing with your fingers
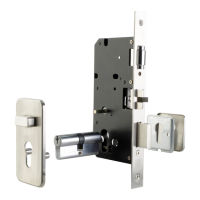
STEP 3 - LOCK & PLATE INSTALLATION
1. Place provided template on door with the fold line on the egde of the door
2. Mark the spot for the 54mm diameter hole - THIS HOLE TO BE DRILLED ALL THE
WAY THROUGH THE DOOR
3. Mark the spot for the 25mm diameter hole -
THIS HOLE IS TO BE DRILLED ON THE INSIDE OF THE DOOR ONLY -
STOP DRILLING WHEN YOU REACH THE MORTISE CUT OUT
4. Insert the mortise lock into the mortise cut out and fix with the 2 screws provided
into the the 2 x 2mm holes that were previously drilled
5. Insert the eurocylinder and secure with long screw provided
6. Insert the small spindle into the square spindle hole that is visible through the 25mm
face hole
7. Place the inside plate with the turn on the inside of the door - PLEASE NOTE -
IF THE LATCH IS IN THE LOCKED POSITION, INSTALL WITH THE TURN
FACING HORIZONTALLY. IF THE LATCH IS INSIDE THE MORTISE LOCK
CASING, INSTALL WITH THE TURN IN THE VERTICAL POSITION
8. Place the outside plate around the eurocylinder on the outside of the door and
secure with the two screws provided
9. Place the escutcheon plate over the screws and snap into place
INSTRUCTIONS