Do you have a question about the lap 2617S-PIR and is the answer not in the manual?
Adjusts the duration the light stays on after motion detection.
Controls the range of the motion sensor detection.
Sets the ambient light threshold for sensor activation.
Overview of building regulation changes affecting domestic electrical installations in England and Wales.
Details the old and new UK wiring cable colour standards for electrical installations.
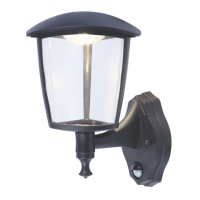
The LAP Wall Light With Sensor (2617S-PIR), product code 2945R, is an outdoor wall-mounted luminaire equipped with a motion sensor. It is designed for alternating power supply voltage connections of 220-240V / 50Hz and utilizes an LED 9W bulb. The light is weatherproof with an IP44 rating, ensuring it is rain and splash-proof when properly mounted. This Class I product must be connected to earth for safety.
The wall light features an adjustable PIR (Passive Infrared) sensor that allows users to customize its operation based on their needs. The sensor has three main adjustable parameters:
TIME (Duration Time): This knob controls how long the light remains on after motion is detected and no further movement is sensed. The duration can be set from a minimum of 10 seconds to a maximum of 4 minutes. Rotating the TIME knob from (+) to (-) will reduce the duration. If the PIR sensor triggers the light, any subsequent detection will restart the timed period from the beginning.
SENSITIVITY (Detection Range): This parameter adjusts the range at which the sensor detects motion, up to 7 meters. Turning the knob clockwise increases the range, while turning it counter-clockwise reduces it. The sensor's sensitivity is influenced by the assembly height and ambient temperature. Users can adjust the SENS knob to compensate for changes in sensitivity due to environmental temperature; higher sensitivity is generally needed in lower ambient temperatures.
LUX (Daylight/Darkness Control): The Lux control module incorporates a photocell that differentiates between daylight and darkness. The (+) position ensures the light is turned on by the PIR sensor both during the day and at night. The (-) position ensures the light is turned on by the PIR sensor only at night. This allows users to set the unit to operate at their desired ambient light level. If the light is not activating at night due to external light sources (e.g., streetlights, bright house lights) or if it's too light outside during the day, the control should be turned towards (+).
Installation should only be performed by a qualified electrician familiar with associated risks and regulations. The product is not suitable for single-handed installation and requires an assistant. Before installation, ensure the power supply is switched off. The mounting process involves:
The manual highlights important changes to UK Building Regulations (as of January 1, 2005) and IEE Wiring Regulations (BS 7671) regarding electrical installations and cable colours. Users are advised to be aware of these regulations and consult a qualified electrician if in doubt. The new wiring colours (Brown for Live, Blue for Neutral, Green/Yellow for Earth) are mandatory for new installations after March 31, 2006. Special precautions, including a warning notice, are required when adding new cable of the new type to an existing old-type installation.
| Brand | lap |
|---|---|
| Model | 2617S-PIR |
| Category | Outdoor Light |
| Language | English |