EasyManua.ls Logo

Laser PJT-DVDHD-906 - User Manual

Laser PJT-DVDHD-906
17 pages
Print Icon
To Next Page IconTo Next Page
Loading...
Laser Bluetooth DVD Projector
-PJT-DVD01-BLK
Instruction Manual
Laser Bluetooth DVD Projector
PJT-DVDHD-906
Question and Answer IconNeed help?

Do you have a question about the Laser PJT-DVDHD-906 and is the answer not in the manual?

Summary

Installing Your Projector

Front Desktop Installation

Placing the projector on a table in front of the screen for quick setup and portability.

Front Ceiling Installation

Mounting the projector upside-down from the ceiling in front of the screen.

Rear Desktop Installation

Placing the projector on a table behind the screen, requiring a special rear projection screen.

Rear Ceiling Installation

Mounting the projector upside-down from the ceiling behind the screen.

Mounting Your Projector to the Ceiling

Adjusting Projector Image

Vertical Adjustment

Instructions and diagrams for adjusting the vertical dimension and display angle of the image.

Focus and Keystone Adjustment

Guide on adjusting focus for sharpness and keystone correction for image distortion.

Remote Control Operations

Remote Control Battery Installation

Projector Diagram and Connections

Projector Component Identification

Diagram labeling all external ports, buttons, and indicators on the projector unit.

Connecting External Devices

Power Adapter Installation

Steps to connect the power adapter to the projector and the mains outlet.

HDMI Device Connection

Guide for connecting devices via HDMI cable and selecting the appropriate input source.

Audio and Video Connections

AV Connection

Instructions for connecting devices using AV cables and selecting the AV input mode.

VGA Connection

Steps for connecting computers or other devices via VGA cable and selecting VGA input.

Audio Output and Media Input

Connect Audio Output

How to connect external audio devices like amplifiers or speakers via audio output.

USB and Micro SD Card Connection

Instructions for connecting USB drives and Micro SD cards for media playback.

Media Playback

TF Card and USB Playback

Guide for playing media files from TF cards and USB devices via the Media Player mode.

DVD Playback

Instructions on inserting a disc and playing DVDs or CDs through the built-in player.

Wireless Features and Setup

Bluetooth Audio Output

Steps to pair the projector with Bluetooth speakers or audio devices for sound output.

General Setup Options

Configuration settings for Clock, Timers (Off, On, Sleep), and Auto Sleep function.

Screen Casting

Product Specifications

Troubleshooting Common Issues

No Image or No Signal Displayed

Checks for power light, lens cover, cable connections, and correct input source.

Lamp Switches Off; Overheating

Instructions for cooling, checking vents, and cleaning the air filter.

Image Wider at Top;Bottom

Explains keystone effect and how to correct it using the projector's function.

Spots on Screen; Faded Brightness

Recommendations to clean the lens and adjust picture settings or ambient light.

Warranty Information

Overview

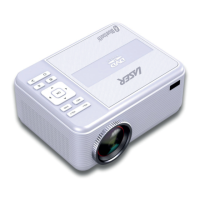
The Laser Bluetooth DVD Projector (PJT-DVDHD-906) is a versatile entertainment device designed for projecting video and audio content from various sources onto a screen. It offers a range of features for flexible setup, media playback, and sound output, making it suitable for both quick, portable use and more permanent installations.

Function Description

The core function of the PJT-DVDHD-906 is to project images and videos. It supports multiple input sources, including HDMI, VGA, AV, USB, and Micro SD cards, allowing users to connect a wide array of devices such as DVD players, laptops, gaming consoles, and media players. A built-in DVD player further enhances its utility, enabling direct playback of DVDs and CDs without the need for an external player.

A key feature of this projector is its Bluetooth capability, which allows it to output audio wirelessly to a connected Bluetooth speaker or audio device. This provides flexibility in sound setup, enabling users to enhance their audio experience with external speakers without physical connections.

The projector offers various projection modes to accommodate different viewing environments:

  • Front Desktop: The projector is placed on a table in front of the screen, a common setup for quick and portable use.
  • Front Ceiling: The projector is mounted upside-down from the ceiling in front of the screen, requiring a projector mount (not included).
  • Rear Desktop: The projector is placed on a table behind the screen, requiring a special rear projection screen (not included).
  • Rear Ceiling: The projector is mounted upside-down from the ceiling behind the screen, also requiring a projector mount and a special rear projection screen (not included).

For media playback, the projector includes a media player function that supports files from USB devices and Micro SD cards. Users can browse and play music, photos, and movies directly from these storage devices. The integrated DVD player handles DVD and CD discs, offering controls for playback, chapter selection, and audio channels.

The device also incorporates a casting feature, allowing users to mirror the screen of their Android or iOS devices onto the projector. This is achieved by connecting both the projector and the mobile device to the same Wi-Fi network, then selecting either Miracast (for Android) or iOS Cast (for iOS) on the projector's main menu.

Usage Features

Setting up the projector involves a few straightforward steps. The lens cover must be removed before use and replaced when the unit is not in use to protect the lens. Power is supplied via an included adapter, which connects to the DC input port and a mains outlet.

Connecting external devices is facilitated by multiple input ports:

  • HDMI: Two HDMI ports (HDMI 1 and HDMI 2) allow connection to high-definition sources like Blu-ray players, laptops, and gaming consoles. Users select the HDMI mode via the SOURCE button.
  • AV: An AV input supports standard definition video and stereo audio from devices such as older DVD players or VCRs.
  • VGA: A VGA port enables connection to computers and laptops for displaying presentations or desktop content.
  • USB and Micro SD: These ports are used for the built-in media player, allowing direct playback of files from USB drives and Micro SD cards.
  • Audio Output: An auxiliary output (AUX OUT/LINE OUT/EARPHONES) allows connection to external amplifiers or headphones for enhanced audio.

Image adjustment features are crucial for optimizing the projected display:

  • Vertical Adjustment: The projector can be tilted to adjust the vertical dimension of the image. An "ANGLE ADJ. knob" is available for fine-tuning the display angle.
  • Focus Adjustment: A "FOCUS ADJ. KNOB" is used to sharpen the image, ensuring pixels are clearly visible. Optimal focus is achieved by observing the image near the center of the screen.
  • Keystone Correction: A "TRAPEZOIDAL ADJ. KNOB" helps correct keystone distortion, which occurs when the projector is not perpendicular to the screen, restoring the image to a rectangular or square shape. For best results, it is recommended to position the projector as close to the center of the screen as possible to reduce image distortion.

The projector is controlled via an included remote control, which provides comprehensive functions for power, volume, source selection, menu navigation, playback controls (play, pause, stop, fast forward, rewind, next/previous track), and specific DVD functions like title menu, DVD menu, and subtitle selection. On-device buttons also offer basic controls for volume, play/pause, stop, navigation, source, menu, return, and power.

General setup options include:

  • Clock: Setting the current day, month, year, hour, and minutes.
  • Timers: Configuring "Off Timer" and "On Timer" for scheduled operation.
  • Sleep Timer: Setting the projector to automatically turn off after a specified duration (e.g., 10min, 20min, up to 240min).
  • Auto Sleep: Selecting an auto sleep function (e.g., Never, 4 hour, 6 hour, 8 hour).

Maintenance Features

The manual emphasizes several precautions to ensure the longevity and safe operation of the projector:

  • Ventilation: It is crucial not to cover or block any ventilation openings. When placing the device on a shelf, a minimum of 5 cm (2 inches) free space around the entire device is recommended to prevent overheating.
  • Cleaning: The device should be cleaned with a slightly damp cloth. For spots on the screen, using a vacuum cleaner to clean the lens is suggested.
  • Power Adapter Care: Users should exercise caution with the power adapter, avoiding stepping on or pinching it, especially near plugs and the cable's exit point. Heavy items should not be placed on the power adapter.
  • Environmental Conditions: The projector should not be used near water, in wet or moist areas (like bathrooms or kitchens), or where condensation may occur. It should also be kept away from heat sources, strong magnetic fields, and naked flames.
  • Storage: If unused for an extended period, the device should be unplugged.
  • Troubleshooting: The manual provides a troubleshooting guide for common issues. For example, if there is no image, users should check the power light, ensure the lens cover is removed, verify cable connections, and confirm the correct source input. If the projector overheats and switches off, users are advised to let it cool, check for blocked vents, clean the air filter, and then restart.
  • Battery Replacement: The remote control requires 2x AAA batteries. When replacing them, users must ensure correct polarity, avoid mixing new and old batteries, and not expose batteries to excessive heat.

The PJT-DVDHD-906 is designed for user-friendly operation and maintenance, with clear instructions for setup, usage, and basic troubleshooting to ensure a consistent and enjoyable projection experience.

Laser PJT-DVDHD-906 Specifications

General IconGeneral
Light Source TypeLED
Brightness OutputLED bulb output 3800 Lumens White light output 85 Ansi lumens
Color Temperature6000K - 8000K
Display Native Resolution1280 x 720
HDMI Input Supported Video Resolution1080p, 1080i, 720p, 576i, 480p, and 480i
Projection Size30-100 inch
Power ConsumptionOperating 48W; Standby 0.8W
Power Input Connect Included AdapterDC 12V, 4A
Included Adapter Connect DC input of unitInput AC 100-240V, 50/60Hz Output DC12V, 4A
Signal PortAV / VGA / HDMI
USB PortSupport USB device up to 32GB Support format mpeg1, mpeg2, mpeg4, mp3, jpeg
MICRO SDSupport MICRO SD card up to 32GB Support format mpeg1, mpeg2, mpeg4, mp3, jpeg
Weight and Dimensions IconWeight and Dimensions
Weight0.9 KG
Dimension203 x 160 x 94 mm

Related product manuals