EasyManua.ls Logo

Laura Ashley Rosalind - User Manual

Laura Ashley Rosalind
8 pages
Print Icon
To Next Page IconTo Next Page
Loading...
page 1/8
The Rosalind Wardrobe
THIS PRODUCT IS SUPPLIED AS A CUSTOMER SELF ASSEMBLY PRODUCT. Please follow the
step by step instructions carefully to assist you in assembling this product correctly. Please note that, as
a self assembly product, this item cannot be returned once assembled or part assembled.
PLEASE NOTE: MUST BE ASSEMBLED BY TWO PERSONS
Step 1
. BEFORE DISPOSING OF ANY PACKAGING
,
check that you have the correct fittings &
parts supplied as listed below.
Box 1
1 x Assembling instruction
2 x Sides
2 x Back Panels
2 x Doors
1 x Back centre rail
Box with fittings 1/2
6 x Hinges
12 x Screw 3x20 for hinges
Box with fittings 2/2
6 x Plate for hinges
12 x Screw-in dowel
4 x Shelf support
2 x Handle
2 x Screw 3x16 for hanging
rail support
2 x Hanging rail support
page 2/8
Box 2
1 x Top cornice
1 x Top panel
1 x Hanging rail
1 x Shelf
1 x Bottom panel
2 x Screw for handle
56 x Screw 3x16 for back panel
4 x Screw for allen key 6,4x50
1 x Allen key
7 x Bolt M6x60
4 x Magnetic catches
Tools required
Hammer
Male screwdriver
Question and Answer IconNeed help?

Do you have a question about the Laura Ashley Rosalind and is the answer not in the manual?

Summary

Wardrobe Assembly Preparation

Step 1: Verify Parts and Fittings

Check that you have the correct fittings and parts supplied before assembly.

Wardrobe Base and Side Assembly

Step 2: Attach Hinges to Sides

Locate hinge bolts through hinges into predrilled holes in both sides and tighten.

Step 3: Insert Screw-in Dowels

Locate screw-in dowels into predrilled holes in both sides and tighten.

Step 4: Attach Magnetic Catches

Locate magnetic catches into predrilled holes in both top and bottom panels.

Step 5: Connect Panels with Cam Screws

Locate panels on one side, tighten cam screws, and repeat for the second side.

Wardrobe Structure and Back Panels

Step 6: Attach Back Centre Support Rail

Attach the wardrobe back centre support rail.

Step 7: Attach Top Cornice

Place the cornice on top of the wardrobe and attach assembly bolts with an allen key.

Step 8: Secure Back Panels

Locate back panels and tighten 3x16 screws, ensuring wardrobe is lifted onto its legs.

Door and Shelf Installation

Step 9: Attach Hinges to Doors

Locate hinges into predrilled holes in both doors and tighten the screws.

Step 10: Mount Doors on Brackets

Ensure hinges slide onto brackets and the pin locates fully.

Step 11: Attach Handles

Attach the handles to the wardrobe doors.

Step 12: Install Shelf

Locate shelf supports into predrilled holes and place the shelf.

Step 13: Install Hanging Rail

Locate hanging rail supports and put the rail into the wardrobe.

Overview

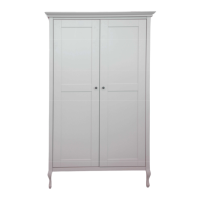
This document provides assembly instructions for "The Rosalind Wardrobe," a self-assembly product designed for home use. The manual emphasizes that the product requires assembly by two persons to prevent injury or breakage and cannot be returned once assembled or partially assembled.

Function Description:

The Rosalind Wardrobe is a piece of furniture designed for storing clothes and other personal items. It features two doors, a hanging rail for garments, and a shelf for folded items. The wardrobe is intended to be a functional and aesthetic addition to a bedroom or dressing area.

Important Technical Specifications (based on parts list):

Box 1 (Wardrobe Components):

  • Assembly Instructions: 1
  • Sides: 2
  • Back Panels: 2
  • Doors: 2
  • Back Centre Rail: 1

Box 1 (Fittings 1/2):

  • Hinges: 6
  • Screw 3x20 for Hinges: 12

Box 1 (Fittings 2/2):

  • Plate for Hinges: 6
  • Screw-in Dowel: 12
  • Shelf Support: 4
  • Handle: 2
  • Screw 3x16 for Hanging Rail Support: 2
  • Hanging Rail Support: 2

Box 2 (Wardrobe Components):

  • Top Cornice: 1
  • Top Panel: 1
  • Hanging Rail: 1
  • Shelf: 1
  • Bottom Panel: 1

Box 2 (Fittings):

  • Screw for Handle: 2
  • Screw 3x16 for Back Panel: 56
  • Screw for Allen Key 6.4x50: 4
  • Allen Key: 1
  • Bolt M6x60: 7
  • Magnetic Catches: 4

Tools Required (not supplied):

  • Hammer
  • Male Screwdriver (likely a Phillips head screwdriver)

Usage Features:

The wardrobe is designed for storing clothes. The hanging rail allows for hanging garments, while the shelf provides space for folded items. The two doors open to reveal the interior, and handles are provided for easy access. Magnetic catches ensure the doors remain closed when not in use. The top cornice adds a decorative finish to the unit.

Maintenance Features:

The manual does not explicitly detail maintenance features. However, as a self-assembly product, it is implied that proper assembly will contribute to its longevity. The hinges are adjustable, allowing for fine-tuning of the door alignment after the wardrobe is in its final position. This adjustability can help maintain proper door function over time. The use of screws and bolts suggests that components can be tightened if they become loose over time, which is a common maintenance task for assembled furniture.

Assembly Process Overview:

The assembly process is broken down into 13 steps, requiring careful attention to detail and the use of specific fittings for each stage.

  • Step 1: Pre-assembly Check: Before discarding packaging, verify that all listed fittings and parts are present.
  • Step 2: Hinge Installation (Sides): Attach hinges to the pre-drilled holes in both side panels using bolts and tighten. The manual provides a visual guide for correct hinge lock position.
  • Step 3: Dowel Installation (Sides): Insert screw-in dowels into the pre-drilled holes in both side panels and tighten.
  • Step 4: Magnetic Catch Installation: Locate and install magnetic catches into the pre-drilled holes in both the top and bottom panels.
  • Step 5: Panel Assembly (Sides, Top, Bottom): Attach the top and bottom panels to one side panel, tightening the cam screws. This step explicitly states that it "NEEDS TWO PERSONS" for locating the second side and tightening its cam screws, highlighting the importance of assistance for structural integrity.
  • Step 6: Back Centre Rail Attachment: Secure the back centre support rail to the wardrobe structure.
  • Step 7: Cornice Attachment: Once the centre support is attached, place the wardrobe on its back. Position the cornice on top of the wardrobe and secure it with 7 assembly bolts using the provided Allen key.
  • Step 8: Standing the Wardrobe & Back Panel Installation: Carefully lift the wardrobe onto its legs, ensuring it is not rolled to prevent damage. A critical warning states: "DO NOT ATTEMPT TO STAND WARDROBE WITH ONE PERSON. THIS COULD RESULT IN INJURY OR BREAKAGE." Once upright, locate and tighten the back panels using 3x16 screws.
  • Step 9: Hinge Installation (Doors): Attach the hinges to the pre-drilled holes in both doors and tighten the screws.
  • Step 10: Door Attachment: Slide the door hinges onto the brackets on the wardrobe frame, ensuring the hinge pin fully locates. Hinges can be adjusted once the wardrobe is in its final position.
  • Step 11: Handle Attachment: Attach the handles to the doors.
  • Step 12: Shelf Installation: Locate the shelf supports into the pre-drilled holes on both interior sides of the wardrobe, then place the shelf onto these supports.
  • Step 13: Hanging Rail Installation: Locate the hanging rail supports into the pre-drilled holes on both interior sides of the wardrobe, then insert the hanging rail.

The manual concludes with contact information for Laura Ashley Customer Services in case of missing fittings.

Laura Ashley Rosalind Specifications

General IconGeneral
BrandLaura Ashley
ModelRosalind
CategoryIndoor Furnishing
LanguageEnglish

Related product manuals