EasyManua.ls Logo

le-idea IDEA10 - User Manual

le-idea IDEA10
2 pages
Print Icon
To Next Page IconTo Next Page
Loading...
Quick Start Guide
Thank you for purchasing the IDEA10 aircraft. Please read all instructions carefully.
1) Download the APP. The free APP allows the aircraft to communicate with your device.
This pairing also enables Photos, Videos and Selfie/Follow mode in addition to other
advanced features. To download: scan QR code below using your device camera or a
QR reader.
2) This aircraft emits its own WiFi band. Once aircraft is powered on (step 5) you will
need to connect your device to the WiFi before using the APP. Search and connect to
(WiFi-1080P-GPS-xxx). If you are not familiar with this type of connection, refer to your
specific device manual or the Flight Guide.
3) The physical controller is the safest way to control this aircraft. The APP has
advanced functions, but a shorter range. It is advisable to use the APP for functions
such as: initiate selfie/follow mode, take pictures or to begin recording video. FPV and
VR modes are also available. Please refer to the Flight Guide for in depth APP guide.
4) Unfold the arms of the aircraft and carefully insert a fully charged battery into the
battery compartment until snug and fit. Battery should be fully charged before each
use. It will take about 120 minutes to fully complete a charge cycle.
5) POWER AIRCRAFT: Place it on flat level surface with no overhead obstructions or
magnetic fields (power lines etc.) Press the power button on the top of your aircraft
until all 4 LED’s (2 Red 2 White) begin to flash.
6) After inserting appropriate batteries into the remote control, turn it on by sliding
the power switch to the right. The remote control should sound a “beep” and display 4
blue LED lights. Flip left joystick up and then down to pair remote with aircraft.
7) CALIBRATION Part 1: Press GPS button on the remote you will hear a “beep”. While
drone is on a level surface, slowly spin it counter-clockwise until RED LED lights stop
blinking.. While drone is still in hand, flip nose down (camera facing down) and slowly
turn the aircraft counter-clockwise until WHITE LED lights stop blinking. You will hear
distinct “beeps” during this process. It is important to keep aircraft level during this
process. Wait about 30 seconds. If all 4 LED lights are on (2 White 2 Red) this confirms
successful calibration. If not, power down aircraft and remote and restart the process
again.
Question and Answer IconNeed help?

Do you have a question about the le-idea IDEA10 and is the answer not in the manual?

Summary

Initial Setup and Connection

Download and Install the APP

Download the free APP for aircraft communication, enabling advanced features like Photos, Videos, and Selfie/Follow mode.

Aircraft WiFi Connection

Connect your device to the aircraft's WiFi band (e.g., WiFi-1080P-GPS-xxx) after powering on the aircraft.

Controller vs. APP Usage

Use the physical controller for safety and range; use the APP for advanced functions like selfie mode, photos, and video recording.

Battery Installation and Charging

Insert a fully charged battery into the aircraft compartment. A full charge takes about 120 minutes.

Powering On the Aircraft

Place aircraft on a flat surface and press the power button until all 4 LEDs (2 Red, 2 White) flash.

Remote Control Power and Pairing

Turn on the remote, listen for a beep, check 4 blue LEDs, then flip the left joystick up and down to pair.

Flight Calibration and Operation

Aircraft Calibration Procedure

Perform Gyro calibration by spinning aircraft counter-clockwise, then flipping nose down and spinning again until LEDs stop blinking.

Gyro Calibration (Part 2)

Complete Gyro (accelerometer) calibration by pulling both joysticks inwards for 3-5 seconds before each flight.

Emergency Stop Function

Press and hold the STOP button for 3 seconds to immediately turn off engines in an emergency.

Starting Aircraft Engines

After GPS connection and calibration, pull left and right joysticks in opposite directions to start rotor spinning.

One Key Take Off

Press the launch button after engines are active to self-launch the aircraft to waist height.

One Key Landing

Control the aircraft to a landing spot and press the land button for a simple, soft landing and engine shutdown.

One Key Return to Home

Use the 'Home' button to return the drone to its launch point, then manually land it.

Overview

This document serves as a Quick Start Guide for the IDEA10 aircraft, a drone manufactured by Guangzhou le Idea Technology Limited Company. It provides essential instructions for setting up, calibrating, and operating the drone, along with information on its associated mobile application and remote control.

Function Description:

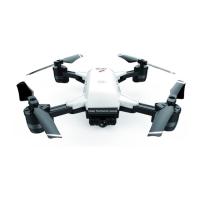
The IDEA10 aircraft is a drone designed for aerial photography, videography, and general flight. It features GPS capabilities, allowing for advanced functions like selfie/follow mode and precise positioning. The drone can be controlled via a physical remote control, which offers a safer and more robust control experience, or through a dedicated mobile application for advanced features and FPV (First Person View) and VR (Virtual Reality) modes. The aircraft is equipped with a camera for capturing photos and recording videos. Its design includes foldable arms for portability and a battery compartment for easy insertion of a rechargeable battery.

Important Technical Specifications:

  • Connectivity: The aircraft emits its own WiFi band (WiFi-1080P-GPS-xxx) for communication with a mobile device.
  • Battery: Requires a fully charged battery for operation. A full charge cycle takes approximately 120 minutes.
  • LED Indicators: The aircraft uses a combination of Red and White LED lights to indicate status during power-on, calibration, and GPS connection. The remote control uses blue LED lights.
  • Control Range: The physical controller offers a longer range compared to the mobile application.
  • GPS: Integrated GPS for enhanced flight stability, positioning, and advanced features.

Usage Features:

  • APP Download: A free mobile application is available for download by scanning a QR code (IOS, Google Play, 360). This APP enables photos, videos, selfie/follow mode, FPV, and VR modes.
  • WiFi Connection: Users must connect their mobile device to the drone's WiFi network (WiFi-1080P-GPS-xxx) after the aircraft is powered on.
  • Powering On Aircraft: Place the aircraft on a flat, level surface free from obstructions or magnetic fields. Press the power button until all 4 LEDs (2 Red, 2 White) begin to flash.
  • Remote Control Power On & Pairing: Insert batteries into the remote control, then slide the power switch to the right. The remote will beep and display 4 blue LED lights. Flip the left joystick up and then down to pair with the aircraft.
  • Calibration (Part 1 - GPS/Compass):
    1. Press the GPS button on the remote (a "beep" will sound).
    2. While the drone is on a level surface, slowly spin it counter-clockwise until the RED LED lights stop blinking.
    3. While still holding the drone, flip its nose down (camera facing down) and slowly turn it counter-clockwise until the WHITE LED lights stop blinking.
    4. Distinct "beeps" will be heard during this process. It is crucial to keep the aircraft level.
    5. Wait approximately 30 seconds. Successful calibration is confirmed when all 4 LED lights (2 White, 2 Red) are on. If not, power down and restart the process.
  • Calibration (Part 2 - Gyro/Accelerometer): Pull both the Left and Right Joysticks inwards and hold for 3-5 seconds. This step should be performed before every flight for best performance.
  • Engine Start: After completing calibration and allowing a few minutes for GPS connection (all 4 aircraft LEDs on), pull both the left and right joysticks in opposite directions (as indicated in the manual's diagram) to start the rotor blades spinning.
  • One Key Take Off: Once engines are activated and rotor blades are spinning, press the dedicated launch button. The aircraft will self-launch to approximately waist height, allowing the user to take control.
  • One Key Land: Control the aircraft to a desired landing spot, then press the dedicated land command button. The aircraft will land softly and shut off its engines.
  • One Key Return: Press the "Home" button to make the drone return to its launch spot. Users will need to manually guide it down and press the one key landing button to complete the flight.
  • Emergency Stop: A safety feature on the controller. Press and hold the STOP button for 3 seconds to immediately turn off the engines. This should only be used in emergencies, as it can cause serious damage.

Maintenance Features:

  • Battery Charging: Ensure the battery is fully charged before each use. The charging process takes about 120 minutes.
  • Pre-Flight Checks: Always ensure the aircraft is placed on a flat, level surface away from overhead obstructions or magnetic fields before powering on. Perform both parts of the calibration process, especially the Gyro calibration, before every flight for optimal performance.
  • Flight Manual Reference: The guide emphasizes the importance of referring to the full flight manual for complete details and in-depth APP guidance, especially for advanced functions and troubleshooting.
  • Support: For additional support, users can visit the provided website: http://www.le-idearc.com/contact-us_d3.

le-idea IDEA10 Specifications

General IconGeneral
Brandle-idea
ModelIDEA10
CategoryToy
LanguageEnglish