Do you have a question about the LEAKSHOOTER LKS1000-V.2 and is the answer not in the manual?
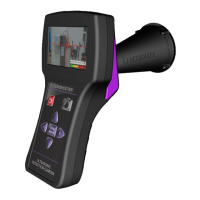
Details the function of each button on the device's keyboard for operation.
Describes the elements displayed on the device's color screen, including real-time data.
Identifies and explains the purpose of connectors located on the bottom of the device.
Details the connector on the top of the device, typically for external probes.
Lists all components and accessories provided in the LEAKSHOOTER LKS 1000 carrying case.
Explains how to charge the device's battery, charging time, and storage recommendations.
Provides instructions for switching the LEAKSHOOTER LKS1000-V.2 device on and off.
Details the procedure for locating leaks using the scanning method with the device's cone.
Explains how to use the manual gain mode for leak detection in specific environments.
Describes how to use the flexible sensor for detecting leaks in small or hard-to-reach areas.
Illustrates screen indicators for no leak, near small leak, and face to small leak conditions.
Shows screen indicators for near and face to important leak conditions.
Guidance on adjusting headphone volume during measurements and safety precautions.
Explains how to navigate and access the device's main menu and sub-menus.
Details on detection frequency, screen brightness, and camera settings.
Information on managing stored photos and camera activation for battery saving.
Details on configuring battery level, date/time, USB link, auto power off, and language.
Step-by-step guide on how to capture and store images of detected leaks.
Instructions for deleting individual photos or all photos from the device memory.
Describes using the device with an optional probe for analyzing bearings and steam traps.
Guide on connecting the LEAKSHOOTER LKS1000-V.2 to a PC using USB for data transfer.
Information on accessing and managing photo files (BMP, TXT) downloaded from the device.
Step-by-step instructions for enabling and using the USB link for data transfer.
Details on the progress and completion of the USB connection and data access.
| Brand | LEAKSHOOTER |
|---|---|
| Model | LKS1000-V.2 |
| Category | Measuring Instruments |
| Language | English |