Do you have a question about the Leckey Mygo Stander and is the answer not in the manual?
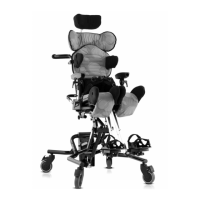
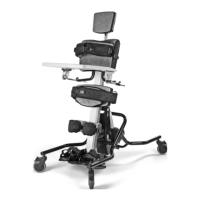
The Mygo Stander assists children unable to stand independently in supported weight-bearing programs.
Suitable for ages 4-14, various disabilities, prone/supine/upright, and knee contractures up to 25 degrees.
Classified as Class I Medical Device under EU/UK regs, conforming to assistive product standards.
Report serious incidents to manufacturer and competent authority as per device regulations.
Avoid slopes >5 degrees; check drives, lock casters outwards before user placement.
Avoid touching moving joints/pivots not locked; minimize adjustments with user in product.
Use appropriate equipment for transfers; secure pelvic band first, then harnesses. Remove if distressed.
Exercise caution during assembly/adjustment to avoid pinching fingers on joints, pivots, buckles, or latches.
Ensure harnesses/components secure; verify operation of linear drives, gas struts, and motor drives.
Before moving powered stander, disconnect battery charging connection.
Clean with non-abrasive cleaners/moist cloths; avoid running water on upholstery.
Do not use power washers/hoses; electric lift systems are not water-sealed.
Electronic components are not user-serviceable; use Leckey-authorised personnel only.
Dispose of frame and electrical components separately at community waste sites.
Allow product 2 hours to acclimatise to room temperature before initial use.
Warranty applies per specified conditions and intended purposes, following manufacturer recommendations.
Product requires prescription by a competent person; maintain records of setups, reissues, and inspections.
Parents/carers must be trained by a competent person on specific manual sections for safe use.
Always read instructions, avoid unattended use, use approved components, and report issues promptly.
Ensure positional adjustments are secure before user placement; secure pelvic band first, then straps.
Includes knee pad security, mobility limitations, collision avoidance, and choking hazard warnings.
Keep away from heat/flames; do not place hot items on tray; store in dry conditions.
Lists precautions for spinal deformities, contractures, movement patterns, pressure injury risk, and medical instability.
Unpack all parts, check order, and follow instructions for attaching vertical tubes and actuator with bolts.
Instructions for attaching chest support and utilizing the supplied multi-tool for adjustments.
Configure tray brackets, attach receiver by loosening hip pad knob, adjust height, and secure tray.
Insert attachment bolt with retention plate, place rubber lid, and fasten using four screws.
Place sandal, thread bolt, add washers, and knob; loosen/retighten knob to position.
Insert Allen bolt into chest support, place shoulder support, and secure with two further Allen bolts.
Attach headrest clamp to support, slide stem into bracket. Feed knee strap webbing through D ring and clip.
Place raisers on footplate, secure sandal. Slide hip belt bracket into hip pad slots and secure.
Slide hip lateral bracket into hip pad slots and secure. Attach posterior support receiver similarly.
Attach pommel receiver to hip pad bracket. Insert chest lateral bracket and mouldings into chest pad.
Slide cushions onto lateral, feed buckle through hole, wrap Velcro straps, and attach to panel.
Instructions for attaching pelvic band in prone and supine positions, securing straps through hip pad bars.
Wrap and secure knee support covers with snap fasteners. Place hip pad cover, secure bottom and top flaps.
Wrap chest pad cover and secure with fasteners. Slide shoulder support cover over wings and secure.
Place cushion on head support, secure central fastener, bring lower flap under, and secure side fasteners.
Setup by trained person; maintain records. Loosen knobs to adjust hip pad height and retighten.
Adjust chest/shoulder height, knee support height, depth, and lateral position using knobs and bolts.
Attach extended knee brackets. Adjust swinging footplate angle for contracture, ideally with two persons.
Adjust footplate angle in prone/upright and supine positions after assessing user posture and supporting knees.
Secure feet in sandals with Velcro straps. Set secondary footplate angle for plantar/dorsiflexion.
Loosen hip pad bolts, adjust width to desired setting, and retighten.
Adjust width, height, and angle of standard, complex, and flipaway chest lateral supports.
Loosen Allen bolt screw on shoulder support, move laterals to required angle, and retighten.
Loosen hand knobs for headrest height, depth, and angle adjustment; retighten securely.
Loosen receiver bolt, slide bars into receivers for depth, and tighten. Attach and adjust pommel similarly.
Adjust tray depth, angle, and height using knobs and handles on receivers and hip pad.
Parents/carers must be trained on adjustments and safety checks by a competent person. Maintain records.
Perform daily inspection, consider preparation, lock castors outwards, release straps before transfers.
Use safety lock and handle to adjust frame angle from 0° to 80°. Ensure safety pin is locked.
Attach knee straps by inserting clip into buckle. Position and attach pelvic band in prone and supine.
Unclip side buckle to open harness. Reverse to secure straps firmly. Ensure buckles are fully engaged.
Guidelines for cleaning upholstery, fabrics, and metal/plastic components using appropriate methods.
Perform daily visual checks: knobs/bolts secure, upholstery intact, wheels move freely/lock, Velcro firm.
Inspect annually or upon reissue by competent person. Checks include parts security, wheels, structure, and plastics.
Assess needs for re-issue, conduct technical inspection, and follow disinfection procedures.
Servicing must be performed by trained, competent persons. Contact Leckey Service Centre or distributors.
Provides detailed technical specifications, symbols, and product/accessory codes for ordering.
| Product Type | Stander |
|---|---|
| Category | Baby & Toddler Furniture |
| Base Width | 60 cm |
| Adjustability | Height adjustable |
| Materials | Steel and plastic |
| Safety Features | Harness |
| Wheel Options | Lockable wheels |
| Color Options | Various color options available |