Do you have a question about the LEGO 76139 and is the answer not in the manual?
Guidance on routing cables neatly between LEGO studs to avoid damage.
Instructions for correctly inserting connectors into expansion board ports.
Proper method for connecting cables to strip lights to prevent damage.
Ensuring correct connection of micro cables to micro expansion board ports.
How to correctly position and install bit lights under LEGO bricks and plates.
Procedure for disassembling the right headlight section of the Batmobile.
Gather and thread the bit light cables through the space behind the headlights.
Ensure sufficient cable slack for the wheel to turn freely.
Repeat the process for installing lights in the left headlight section.
Thread cables through the middle section towards the rear of the vehicle.
Remove the front grill sections to access the area for the light effect.
Thread the rotating bit light cable through the bottom space behind the grill.
Connect the rotating bit light cable to a spare port on the 12-Port Expansion Board.
Disassemble one of the gun sections to install the bit light.
Thread the gun bit light cable down the space underneath the gun barrel.
Connect the right machine gun bit light cable to Channel 3 on the Gun Effects Board.
Remove specific sections from the back of the vehicle and cabin.
Disconnect the AA Battery Pack from the 12-Port Expansion Board.
Pull the 50cm connecting cable to the rear trunk and connect to an 8-Port Expansion Board.
Connect the 8-Port Expansion Board to the IN port on the NC Push Board.
Disconnect specific sections from both sides of the vehicle's cabin.
Connect the installed cabin bit lights to the 6-Port Expansion Board.
Connect a 15cm connecting cable to the white strip light.
Disconnect specific sections from the rear of the vehicle for tail light installation.
Disassemble the right tail light section to prepare for bit light installation.
Swap the black round plate with a provided one with an open stud.
Repeat steps 32 and 33 for the left tail light section.
Connect a 5cm cable to the IN port on the Flicker Effects Board.
Remove the top technic wheel and plates from the jet section.
Reconnect all sections surrounding the back of the vehicle.
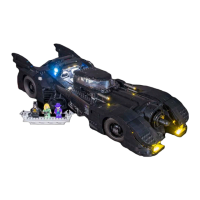
| Product Name | 1989 Batmobile |
|---|---|
| Set Number | 76139 |
| Pieces | 3306 |
| Minifigures | 3 |
| Age Range | 16+ |
| Release Year | 2019 |
| Theme | DC Comics |