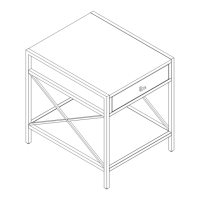
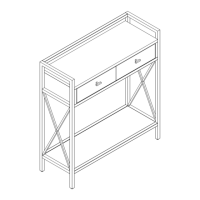
The Leick Home Claudette End Table, model #9206, is a piece of furniture designed for assembly by the user. It functions as a compact table, likely intended for placement at the end of a sofa or beside a bed, offering a surface for items and storage.
Technical Specifications and Components:
The table's construction involves a combination of metal and wood components, indicated by the "metal parts" and "metal tubes" mentioned in the assembly instructions. The hardware list provides a detailed breakdown of the components:
- Structural Components:
- Side Frames (A): Two units, forming the primary vertical supports of the table.
- Top Frame (B): One unit, forming the upper surface of the table.
- Adjustable Shelf (C): One unit, providing an additional storage surface within the table's structure.
- Fasteners:
- Long Bolts (D): Six units, used for securing larger structural connections, specifically the top assembly's side and back panels to the side frame.
- Short Bolts (E): Eight units, used for various connections, including the top assembly's front and back bottom edges, and the shelf to the side frame.
- Flat Washers (F): Fourteen units, used in conjunction with bolts to distribute pressure and prevent damage to the material.
- Screws (J): Two units, specifically for fastening the shelf to the side frame's metal tabs.
- Machine Screw (I): One unit, dedicated to attaching the drawer pull.
- Accessories:
- Allen Wrench (G): One unit, provided for tightening the bolts.
- Door Pull (H): One unit, for the drawer.
Usage Features:
The Claudette End Table is designed for practical use in a living space. Key features include:
- Storage: It incorporates an "adjustable shelf" (C) and a drawer, providing versatile storage options for various items. The drawer is equipped with a "door pull" (H) for easy access.
- Stability: The design includes "levelers at the bottom of legs," allowing users to adjust the table to ensure stability on uneven surfaces, preventing wobbling.
- Compact Design: As an "end table," it is likely designed to be space-efficient, fitting into smaller areas while still offering functionality.
Assembly Process (User Features):
The table is shipped unassembled and requires the user to follow a step-by-step assembly process. The instructions are detailed and include visual aids.
- Step 1: Initial Frame Assembly:
- The process begins by laying one side frame (A) on a soft surface.
- The top assembly (B) is then placed on it, ensuring metal parts fit into the side frame's tubes.
- Connections are made using two short bolts (E) and washers (F) for the top assembly's bottom edges.
- Three long bolts (D) and washers (F) are used to fasten the top assembly's side and back panels to the side frame.
- Step 2: Shelf Installation:
- The adjustable shelf (C) is placed, ensuring its metal tubes fit into the side frame's assembly tubes.
- It is secured with two short bolts (E) and two washers (F).
- Step 3: Completing the Frame and Shelf:
- The second side frame is inserted into the top assembly (B) and shelf (C).
- All tubes must be properly inserted, and four short bolts (E) are used to fasten the bottom of the top assembly and shelf.
- Three long bolts (D) and washers (F) secure the top assembly to the left side frame.
- The shelf is further fastened with two screws (J) through the side frame's metal tabs.
- Step 4: Final Adjustments and Drawer Pull Installation:
- The table is placed upright, with a safety recommendation to flip it from the drawer side to prevent unintended opening.
- Levelers at the bottom of the legs are adjusted for stability.
- The drawer pull (H) is attached to the inner face of the drawer front using one machine screw (I), with a note to ensure proper alignment before tightening.
Maintenance Features:
While specific maintenance instructions are not provided in the manual, the design implies standard furniture care:
- Cleaning: The materials (likely wood and metal) would typically require dusting and occasional cleaning with appropriate furniture cleaners.
- Tightening Fasteners: Over time, bolts and screws in assembled furniture can loosen. The inclusion of an Allen wrench (G) suggests that users may need to periodically re-tighten the bolts to maintain the table's structural integrity.
Important Notes for the User:
- Hardware Location: A crucial instruction highlights that "A packet with complete set of hardware can be found by pulling the red ribbon that's easily visible upon opening the box." This ensures users can easily locate all necessary components.
- Customer Support: Leick Home emphasizes customer support, providing contact information (800-558-8700, cs@todaysdesignhouse.com, todaysdesignhouse.com) for "comments or concerns," indicating a commitment to user satisfaction and assistance with assembly or product issues.
- Safety during Assembly: The instruction to "Place the table upright. For your safety upon doing this process, flip it from the drawer side to keep from sudden and unintended opening" demonstrates a consideration for user safety during the assembly process.
In summary, the Leick Home Claudette End Table is a user-assembled furniture piece designed to provide a functional surface and storage through an adjustable shelf and a drawer. Its construction involves a mix of metal and wood components, secured with various bolts, screws, and washers. The assembly process is detailed with visual aids, and the final product offers stability through adjustable levelers. The manufacturer also provides clear guidance on hardware location and readily available customer support.