IT IS IMPORTANT TO READ AND UNDERSTAND ALL OF THE INSTRUCTIONS AND SAFEGUARDS PRIOR TO USE
1. Always ensure that the appliance is properly assembled and safely set up before use.
2. CAUTION: This appliance is not recommended for use near or by children or persons with certain disabilities. Set up and
store the appliance out of reach of children. When not in use, store device in a secure and dry place out of reach of children.
3. The appliance is designed for domestic use and not for commercial purposes.
4. DO NOT use the appliance on bones, deep frozen food, hard items or non-food items.
5. Use the appliance with the supplied accessories only. WARNING: The use of attachments not recommended or sold by the
manufacturer may cause injury, damage to personal property, and may void your warranty.
6. WARNING: Do not use while under the inuence of alcohol or drugs (prescription or non-prescription) as these may
impair user’s ability to properly assemble or safely operate the appliance.
7. The manufacturer declines any responsibility in the case of improper use of this product. Improper use of this product
voids the warranty.
8. Avoid contacting moving parts. Wait until all parts have come to a complete stop before removing any part of the appliance.
9. Thoroughly hand-wash all parts in warm soapy water prior to use. DO NOT SOAK. NOT DISHWASHER SAFE
(discoloration may occur).
10. Tie back loose hair and clothing. Remove neckties, rings, watches, bracelets or other jewelry before operating the
appliance.
11. Use on a level, stable surface to prevent tipping. Never move the appliance while in use.
12. Never operate mixer without tank cover in place
13.
SAVE THESE INSTRUCTIONS
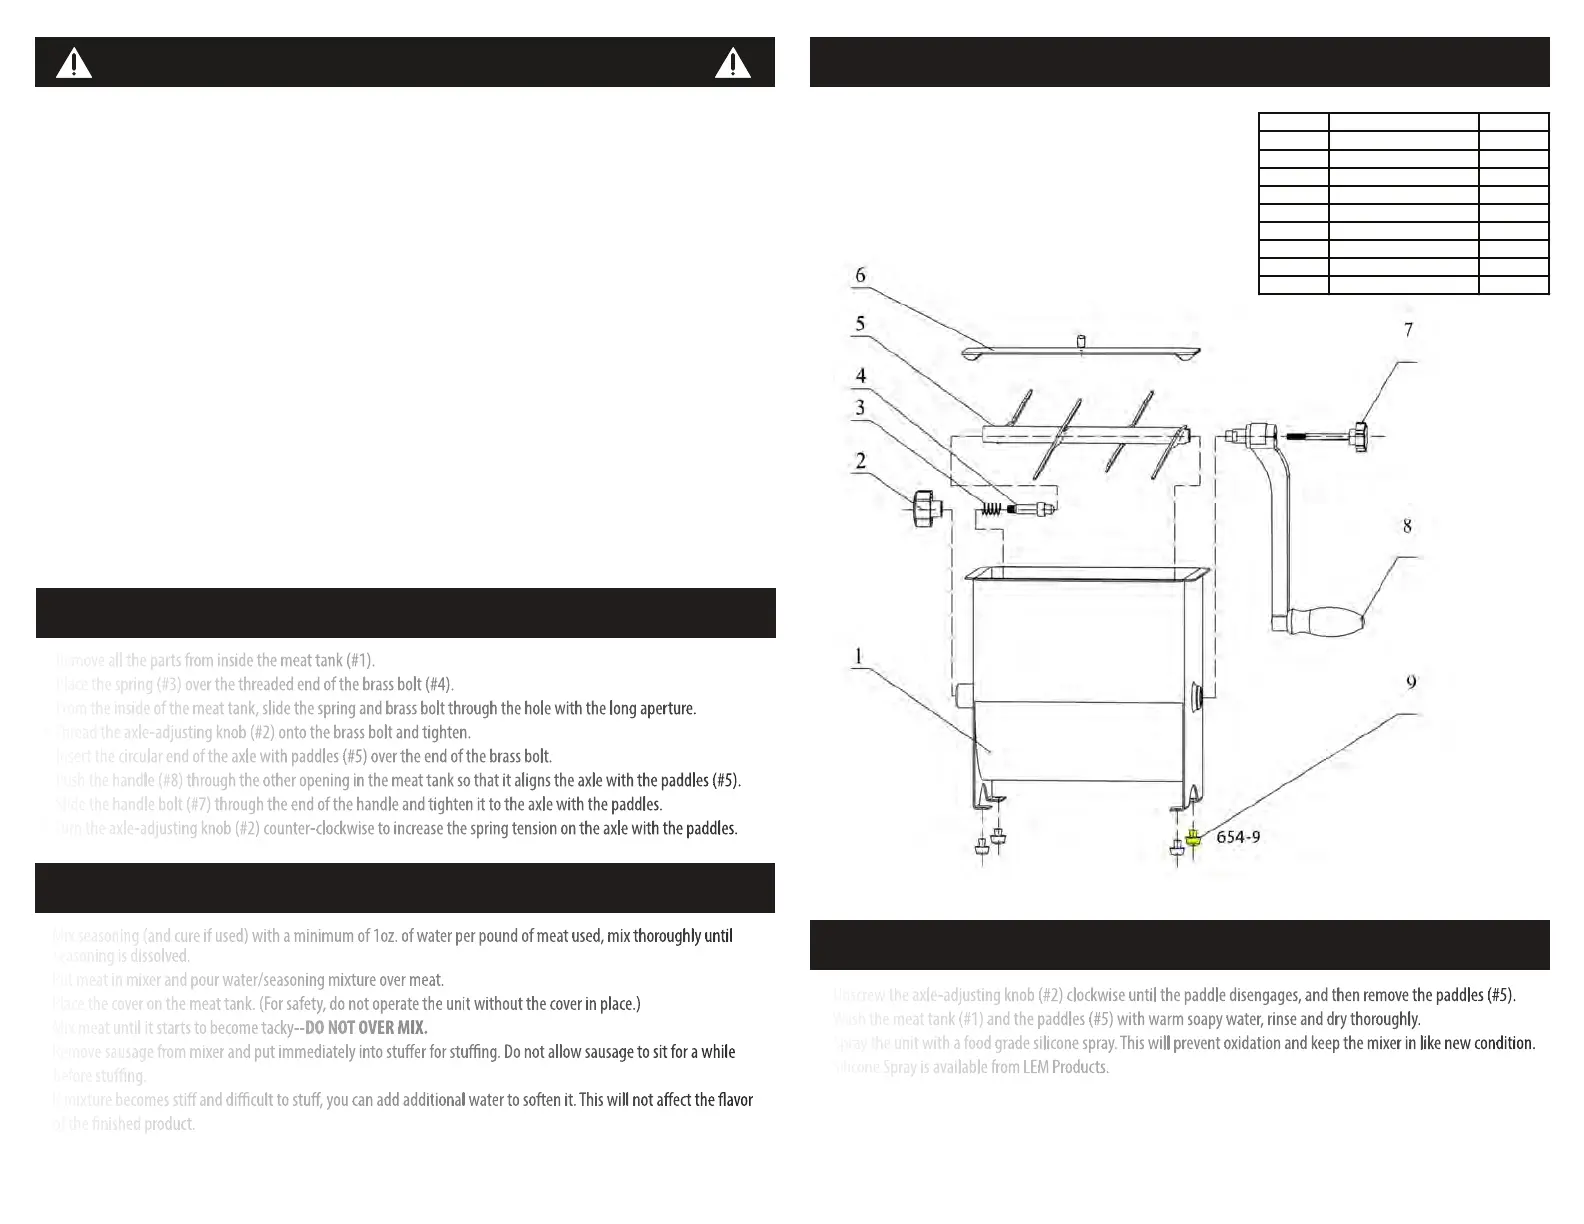
1. Remove all the parts from inside the meat tank (#1).
2. Place the spring (#3) over the threaded end of the brass bolt (#4).
3. From the inside of the meat tank, slide the spring and brass bolt through the hole with the long aperture.
4. Thread the axle-adjusting knob (#2) onto the brass bolt and tighten.
5. Insert the circular end of the axle with paddles (#5) over the end of the brass bolt.
6. Push the handle (#8) through the other opening in the meat tank so that it aligns the axle with the paddles (#5).
7. Slide the handle bolt (#7) through the end of the handle and tighten it to the axle with the paddles.
8. Turn the axle-adjusting knob (#2) counter-clockwise to increase the spring tension on the axle with the paddles.
· Mix seasoning (and cure if used) with a minimum of 1oz. of water per pound of meat used, mix thoroughly until
seasoning is dissolved.
· Put meat in mixer and pour water/seasoning mixture over meat.
· Place the cover on the meat tank. (For safety, do not operate the unit without the cover in place.)
· Mix meat until it starts to become tacky--DO NOT OVER MIX.
· Remove sausage from mixer and put immediately into stuer for stung. Do not allow sausage to sit for a while
before stung.
· If mixture becomes sti and dicult to stu, you can add additional water to soften it. This will not aect the avor
of the nished product.
1. Unscrew the axle-adjusting knob (#2) clockwise until the paddle disengages, and then remove the paddles (#5).
2. Wash the meat tank (#1) and the paddles (#5) with warm soapy water, rinse and dry thoroughly.
3. Spray the unit with a food grade silicone spray. This will prevent oxidation and keep the mixer in like new condition.
Silicone Spray is available from LEM Products.
Part # Description Quantity
LEM Products • West Chester, OH 45011 • 1-877-536-7763 • lemproducts.com
LEM Products • West Chester, OH 45011 • 1-877-536-7763 • lemproducts.com
2 3
GENERAL WARNINGS AND SAFETY INFORMATION
PARTS LIST
AFTER USE
ASSEMBLY
MIXING MEAT

 Loading...