The Lenovo ideacentre 510S Desktop PC is a compact and versatile computing solution designed for everyday use. This user guide provides a comprehensive overview of the device's front and rear components, along with detailed instructions for replacing various internal parts, ensuring users can maintain and troubleshoot their system effectively.
Function Description
The ideacentre 510S serves as a central hub for various computing tasks, from productivity and internet browsing to multimedia consumption. Its design prioritizes accessibility and ease of use, making it suitable for both home and office environments. The desktop PC is equipped with a range of ports and connectors to facilitate connectivity with peripherals, external displays, and network resources.
Usage Features
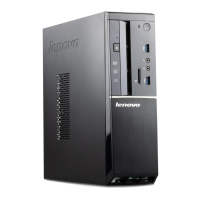
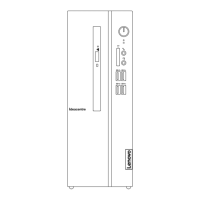
The front panel of the ideacentre 510S offers convenient access to frequently used ports and controls:
- Power button (1): Located prominently, this button allows users to power the computer on or off.
- Hard disk drive indicator (2): A small LED light that indicates when the hard disk drive is active, providing visual feedback on system activity.
- Memory card reader (3) (selected models only): For quick and easy transfer of data from memory cards, such as those used in digital cameras or smartphones.
- Microphone connector (4): A dedicated port for connecting an external microphone for voice chat, recording, or online meetings.
- Combo audio jack (5): A versatile port that supports both headphones and microphones, ideal for connecting headsets for communication or immersive audio experiences.
- USB 3.0 connectors (6, 7) (4 total): High-speed USB ports for connecting various peripherals like external hard drives, flash drives, keyboards, and mice, offering faster data transfer rates compared to older USB standards.
- Optical Drive (8) (selected models only): Allows for reading and writing of CDs and DVDs, useful for installing software, watching movies, or backing up data.
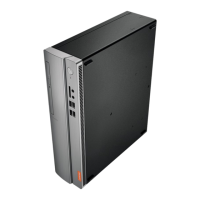
The rear panel provides a comprehensive set of connectors for more permanent peripheral connections and network access:
- Audio connector (1): For connecting external speakers or a sound system.
- Wi-Fi antenna (2) (selected models only): Enhances wireless network connectivity, ensuring stable internet access. Users are advised not to open the Wi-Fi antenna cover.
- HDMI-out connector (3): A digital video and audio output for connecting to high-definition displays, TVs, or projectors.
- DisplayPort® connector (4): Another digital video output option, often used for connecting to high-resolution monitors.
- On-board VGA connector (5): An analog video output for connecting to older monitors or projectors. If the model has two VGA connectors, users should ensure they use the one on the graphics adapter for optimal performance.
- Serial connector (6): A legacy port that might be used for connecting older peripherals or industrial equipment.
- USB 2.0 connectors (7) (2 total): Standard USB ports for connecting a wide range of peripherals.
- USB 3.0 connectors (8) (2 total): Additional high-speed USB ports for enhanced connectivity.
- Ethernet connector (9): An RJ-45 port for wired network connection, providing stable and fast internet access.
- Expansion card slots (10): Allows for the installation of additional expansion cards, such as dedicated graphics cards or network cards, to enhance the computer's capabilities.
- Power connector (11): The input for the power cable, supplying electricity to the desktop PC.
Maintenance Features
The user guide emphasizes safety and provides clear instructions for replacing various Customer Replaceable Units (CRUs), enabling users to perform basic maintenance and upgrades themselves. Before any disassembly, users are reminded to:
- Turn off the power to the system and all peripherals.
- Unplug all power and signal cables from the computer.
- Place the system on a flat, stable surface.
The CRUs covered in the manual include:
- Computer cover (1): The initial step for accessing internal components, involving the removal of a screw and sliding the cover off.
- Front bezel (2): Detaching the front panel to access components behind it.
- Card reader module (3): Instructions for replacing the memory card reader.
- Optical drive (4): Steps for removing and installing the optical drive.
- Hard disk drive (5): Detailed instructions for replacing both 3.5" and 2.5" hard disk drives, including the necessary screws and mounting procedures.
- Solid state drive (6): Guidance for replacing M.2 SSDs of different lengths (2242 and 2280), showing how to secure them to the motherboard.
- PCI express adapter (7): Instructions for removing and installing expansion cards in the PCI express slots.
- Power supply (8): Steps for replacing the power supply unit, which provides power to all internal components.
- Memory module (9): Visual guides for correctly inserting and removing RAM modules from their slots.
- Coin-cell battery (10): Instructions for replacing the CMOS battery, which maintains BIOS settings and the system clock.
The manual also highlights important safety information, advising users to consult the "Important safety information" in the "Safety, Warranty, Environment, Recycling Information Guide" and "Important Product Information Guide" included with the computer. These guides can also be obtained online from the Lenovo website.
A crucial attention note warns users not to block any air vents on the computer, as this can lead to thermal problems and potentially damage the device. This emphasizes the importance of proper ventilation for the longevity and performance of the ideacentre 510S.