This document is a user guide for the Lenovo Y520 (Y520-15IKBM) laptop, providing essential information for its operation, maintenance, and troubleshooting. It covers various aspects of the computer, from its physical layout and component functions to software configuration and common problem-solving.
The guide begins with important notes, emphasizing the need to read the Lenovo Safety and General Information Guide first. It highlights that the latest compliance and environmental information is available on Lenovo's compliance and ecodeclaration websites. It also clarifies that some instructions might assume Windows® 10, and operations could differ slightly with other operating systems. The guide notes that features described are common to most models, but some might not be available on a specific computer, or the computer might have features not covered in the guide. Illustrations are stated to be representative and may differ from the actual product. For regulatory notices, users are directed to "Guides & Manuals" on the Lenovo support website.
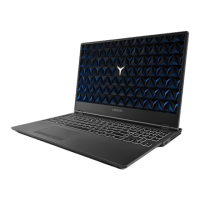
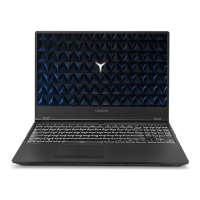
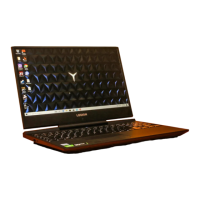
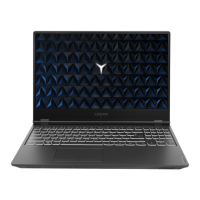
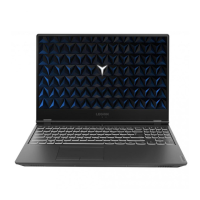
The physical layout of the Lenovo Y520 is detailed through "Top view," "Left-side view," "Right-side view," and "Bottom view" sections.
Top View:
The top view illustrates the main components visible when the laptop is open.
- Integrated camera: Used for video communication and taking photos.
- Built-in microphone: Captures sound for video conferencing, voice narration, or audio recording.
- Wireless LAN antennas: Connect to a wireless LAN adapter for sending and receiving wireless radio signals.
- Computer display: Provides visual output. Users are cautioned not to open the display panel beyond 135 degrees and to avoid leaving objects between the display and keyboard to prevent damage.
- Speakers: Provide audio output.
- Power button: Used to turn the computer on.
- Numeric keypad: A separate section of the keyboard for numeric input, enabled or disabled by the Num Lock key.
- Touchpad: Functions as a conventional mouse. Users slide a fingertip to move the pointer. The left/right sides correspond to conventional mouse buttons. The touchpad can be enabled/disabled by pressing Fn + F6.
Keyboard Functions:
The guide elaborates on function key combinations (Fn + F1 through Fn + F12, and Fn + B, P, C, S, arrow keys, and Space). These keys allow instant changes to operational features:
- Fn + F1: Mutes/unmutes sound.
- Fn + F2: Decreases volume.
- Fn + F3: Increases volume.
- Fn + F4: Enables/disables the microphone.
- Fn + F5: Refreshes the desktop or active window.
- Fn + F6: Enables/disables the touchpad.
- Fn + F7: Enables/disables Airplane mode.
- Fn + F8: Enables/disables the integrated camera.
- Fn + F9: Locks the screen.
- Fn + F10: Toggles display between the computer and an external device.
- Fn + F11: Decreases display brightness.
- Fn + F12: Increases display brightness.
- Fn + B: Activates the break function.
- Fn + P: Activates the pause function.
- Fn + C: Enables/disables scroll lock.
- Fn + S: Activates the system request.
- Fn + Up arrow: Activates the PgUp key function.
- Fn + Down arrow: Activates the PgDn key function.
- Fn + Left arrow: Activates the home key function.
- Fn + Right arrow: Activates the end key function.
- Fn + Space (on select models): Adjusts keyboard backlight (off → dim → bright → off).
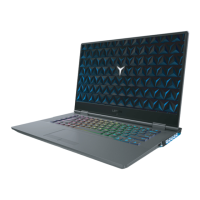
Left-Side View:
- Kensington mini security slot: For attaching a Kensington MiniSaver™ Mobile (or compatible) lock. Users are advised to choose a lock utilizing the Cleat™ locking mechanism, as T-Bar™ locks are incompatible.
- AC power adapter jack: Connects to the AC power adapter.
- Power status indicator:
- On (solid white): Computer is powered on.
- Blinking: Computer is in sleep mode.
- Off: Computer is powered off.
- RJ-45 port: Connects to an Ethernet network. Instructions are provided for inserting a network cable by gently pressing down the RJ-45 cover. Users are advised to consult their Internet Service Provider (ISP) for software configuration details.
- USB port: Connects to USB devices. The computer has three USB ports. Windows typically installs drivers automatically upon first connection, but some devices may require prior driver installation. Users are reminded to safely remove USB storage devices via the Windows notification area before disconnecting. If a USB device uses a power cord, it should be connected to a power source first.
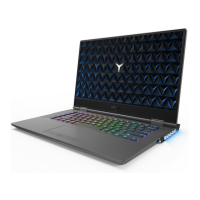
Right-Side View:
- Battery status indicator:
- On (solid white) / Charging: Battery has >80% charge.
- On (solid white) / Discharging: Battery has >20% charge.
- On (solid amber) / Discharging: Battery has 5-20% charge.
- Blinking slowly (white) / Charging: Battery has 20-80% charge; light stops blinking at 80%, but charging continues.
- Blinking slowly (amber) / Charging: Battery has 5-20% charge; blinking color changes to white at 20%.
- Blinking quickly (amber) / Charging/Discharging: Battery has <5% charge.
- Type-C port: Connects to Type-C devices.
- DisplayPort mini connector: Connects to external display devices.
- USB ports: Connect to USB devices.
- HDMI port: Connects to devices with HDMI input (e.g., TV, external display).
Bottom View:
- Ventilation slots: Dissipate internal heat. Users are advised to ensure these slots are not blocked to prevent overheating.
- Louvers: Allow air to enter the computer for cooling.
Starting to Use Windows 10:
The guide covers initial setup and basic Windows 10 operations.
- Configuring the operating system for the first time: This includes accepting the end-user license agreement, configuring internet connection, registering the OS, and creating a user account.
- Operating system interface: Windows 10 features a start menu, accessible by pressing the Windows key or selecting "Start" on the desktop. Key elements include the Get Started app, Settings button, Power button, Start button, Search box, and Task view button.
- Settings: Allows basic tasks and searching for more settings. Accessed via the start menu.
- Personalize the start menu: Users can add favorite apps to the start menu by right-clicking an app in the apps list and selecting "Pin to Start," or by dragging apps.
- Putting the computer to sleep or shutting it down:
- Sleep mode: For short breaks, the computer can be put to sleep by closing the display lid, pressing the Power button, or selecting "Power → Sleep" from the start menu. Users are warned to wait for the power indicator light to blink before moving the computer to prevent hard disk damage. To wake, press any keyboard key or the Power button.
- Shutting down: For longer periods, the computer can be shut down by selecting "Power → Shut down" from the start menu, or by right-clicking the Start button and choosing "Shut down or sign out → Shut down."
- Task and desktop management:
- Task view: Opened by clicking the Task view button on the taskbar or pressing Windows key + Tab.
- Virtual desktop management: Windows 10 supports creating, managing, and switching virtual desktops. New desktops can be created via Task view ("New desktop") or by pressing Windows key + Ctrl + D. Switching between desktops is done via Task view or by pressing Windows key + Ctrl + Left/Right arrow.
- Connecting to a wireless network:
- Enabling wireless connection: Press Fn + F7 to disable airplane mode, then click the network icon on the taskbar.
- Connecting to a wireless network: After enabling wireless, the computer scans for networks. Users click a network name and then "Connect." Some networks require a security key or passphrase from the network administrator or ISP.
- Get Started app: Explains new Windows 10 features, found on the start menu or by pressing F1.
Recovery System:
- Reset this PC: A built-in recovery tool to restore the operating system to its original state while preserving data and customizations.
- Keep my files: Reinstalls factory default configuration, preserves personal files, and deletes apps/settings.
- Remove everything: Reinstalls factory default configuration, removes all user data and applications, preparing the computer for recycling or transfer.
- Using Reset this PC: Can be launched via the Novo Menu (System Recovery → Troubleshoot → Reset this PC) or Windows PC settings (Update & security → Recovery → Reset this PC → Start).
Troubleshooting:
This section addresses common issues.
- Finding information:
- Safety precautions: Refer to Lenovo Safety and General Information Guide.
- Lenovo support website: http://support.lenovo.com.
- Warranty information: Look up serial number on the support website.
- Lenovo preinstalled operating system and software:
- Preinstalled OS: Lenovo computers come with preinstalled OS for user convenience.
- Preinstalled software: Software from Lenovo or other vendors, often trial versions requiring purchase after expiration. Users should read license agreements.
- Identifying preinstalled Windows: Check the sales package for "Windows" or "WIN" next to "OS."
- BIOS setup utility:
- Function: ROM-based software for setting boot devices, security, hardware mode, and preferences.
- Starting: Shut down, then press the Novo button and select "BIOS Setup."
- Changing boot mode (on select models): Two modes are UEFI First and Legacy Support. Change via BIOS setup utility boot menu. Legacy Support is needed for installing legacy Windows OS.
- Getting help: Refer to "Chapter 3. Getting help and service" in the Lenovo Safety and General Information Guide.
Troubleshooting Specific Problems:
- Display problems:
- Blank screen on startup: Check AC adapter connection, power status (Power button for confirmation). If issues persist, service the computer.
- White cursor on blank screen: Restore backed-up files or factory contents using "Reset this PC." If issue persists, service the computer.
- Screen goes blank during use: Screen saver or power management may be enabled. Touch touchpad, press any key, or press Power button to exit.
- Screen is blank (during operation): If using AC adapter or battery, and battery status indicator is on, press Fn + F12 to brighten. If power indicator is blinking, press Power button to resume sleep mode. If problem persists, refer to "The screen is unreadable or distorted."
- Screen is unreadable or distorted: Ensure display device driver is installed, screen resolution and color quality are set correctly, and monitor type is correct.
- Incorrect characters on screen: Check if OS or programs are installed/configured correctly. If so, service the computer.
- BIOS password problems:
- Forgot user password: Ask system administrator to clear.
- Forgot hard disk drive password: Lenovo authorized servicer cannot reset or recover data; hard disk drive replacement required (proof of purchase, fee).
- Forgot administrator password: Lenovo authorized servicer cannot reset; system board replacement required (proof of purchase, fee).
- Sleep problems:
- Critical low-battery error/immediate shutdown: Battery is low; connect AC power adapter.
- Enters sleep mode after POST: Ensure battery pack is charged and operating temperature is within range. If issues persist, service the computer.
- Does not return from sleep mode/computer doesn't work: Connect AC power adapter, press any key or Power button. If still unresponsive, press and hold Power button for 4+ seconds to reset (unsaved data may be lost). If still not reset, remove AC power adapter.
- Sound problems:
- No sound from speaker: Ensure Mute function is off, combo audio jack is not used, and speakers are selected as playback device.
- Battery pack problems:
- Shuts down before indicator shows empty, or operates after indicator shows empty: Discharge and recharge battery pack.
- Does not operate with fully charged battery pack: Surge protector might be active. Turn off for one minute to reset, then turn on.
- Hard disk drive problem:
- Hard disk drive does not work: Ensure hard disk drive is included in the Boot menu in BIOS setup utility.
- Other problems:
- Computer does not respond: Press and hold Power button for 4+ seconds. If still unresponsive, remove AC power adapter. Computer might lock in sleep mode during communication; disable sleep timer when on network.
- Computer does not start from desired device: Check Boot menu in BIOS setup utility to ensure desired device is enabled and included. While off, press Novo button to select boot device.
- Connected external device does not work: Do not connect/disconnect external device cables (other than USB) while power is on to avoid damage. For high-power external devices (e.g., USB optical disk drive), use an external power adapter to ensure recognition and prevent system shutdown.
The guide concludes with a "Trademarks" section, listing Lenovo, Microsoft, and Windows as trademarks of their respective corporations.