Do you have a question about the Lenoxx Sound CD-149 and is the answer not in the manual?
Covers warnings about electricity, water, heat, ventilation, and proper use.
Details safety for damage, servicing, cleaning, and object entry.
Explains operation using DC (batteries) or AC (mains) power.
Step-by-step instructions to play music from a CD.
Steps to record audio from radio, microphone, and CD.
Solutions for power, sound, and reception issues.
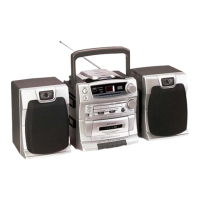
This document outlines the operating instructions for the Lenoxx Sound CD-149 Compact Disc Player, an AM/FM Stereo Cassette Recorder with Detachable Speakers. It details the device's functions, usage, and maintenance to ensure optimal performance and longevity.
The CD-149 is a versatile audio system designed to play all music compact discs, receive AM/FM stereo broadcasts, and record from various sources onto cassette tapes. Its core functions include a fully programmable CD player with repeat capabilities, an AM/FM stereo tuner, and a cassette recorder. The device features a detachable speaker system, allowing for flexible placement and enhanced stereo separation. For convenience, it includes a built-in condenser microphone for recording and a bass boost switch to enhance low-frequency sounds. Power is supplied via a 2-way system, operating on either AC power or 8 "D" size batteries, making it suitable for both home and portable use. LED indicators for FM stereo and power/battery status provide clear operational feedback.
To play a CD, first ensure the power is on and the function switch is set to CD. Press the CD Door Open Button, insert a CD with the label side facing up, and close the door. The display will show the total number of tracks. Press the CD Play/Pause Button to start playback. The track number will appear on the display, and the Play/Prog Indicator will light up. Volume can be adjusted with the Volume Control, and the Bass Boost Switch can be engaged for enhanced bass. To pause, press the Play/Pause Button again; the track number will flash. Pressing it once more resumes playback. To stop, press the CD Stop Button.
Removing a disc requires stopping playback first. Press the CD Stop Button, then the Open Button, gently remove the disc, and close the door. Always store discs in their original cases to prevent scratches and dirt. When handling discs, avoid touching the playing surface. Do not place discs near heat sources or in dusty areas. Clean discs by wiping from the center outward with a soft cloth, avoiding circular motions or harsh cleaners.
The CD player offers several playback modes. Skipping Tracks allows you to navigate to any desired track. Pressing the CD Forward Skip/Search button once or repeatedly selects the next track(s). Pressing the CD Backward Skip/Search button twice or more rapidly selects previous tracks. This function also works in pause mode. Holding either skip/search button allows for high-speed searching within a track.
Repeat Play offers two options:
Random Play shuffles the playback order of all songs on a disc. Press the Random Button in either stop or normal play mode. The display will show moving symbols. Press the Forward Skip/Search button to skip to the next random song. Press the Random Button again to resume normal play.
Programmed Memory Play allows you to program up to 16 tracks to play in a specific order. This must be done in STOP mode. Press the Prog/Repeat Button; the display will show "P1" and the Play/Prog Lamp will flash. Use the Skip/Search Buttons to select the desired track, then press Prog/Repeat again. Repeat this process for all desired tracks. Once programming is complete, press the CD Play/Pause Button to start playback. The programmed memory is cleared if the CD door is opened or power is turned off.
To listen to the radio, ensure speakers are connected and the power is on. Slide the Function Switch to the Radio position. Select the desired band (AM, FM, or FM STEREO) with the Band Switch. Tune to a station using the Tuning Control, adjusting for the strongest, clearest sound. For FM, extend the FM Telescoping Antenna fully and rotate the set or antenna for optimal reception. Adjust the Volume Control and use the Bass Boost Switch if desired. To turn off the radio, slide the Function Switch to Tape and then press the Power Switch. If FM stereo reception is weak or noisy, try adjusting the antenna or switching to FM (mono).
The cassette recorder allows for playback and recording. To play a cassette, open the Cassette Door by pressing the Cassette Stop/Eject Button. Insert the cassette with the exposed tape facing downwards and the full reel on the left. Ensure the tape is not slack; if so, tighten it with a pencil. Close the door. Set the Function Switch to TAPE and ensure the Power Switch is ON. Press the Cassette Play Button. The tape will play until it reaches the end and automatically stops. Adjust volume and bass boost as needed. To stop manually, press the Cassette Stop/Eject Button. To remove the tape, press the Stop/Eject Button again. To play the other side, remove, flip, and re-insert the cassette.
The CD-149 features Automatic Level Control (ALC), which automatically adjusts recording levels, eliminating the need to manually adjust the Volume Control during recording.
Follow the radio playback instructions. Load a blank cassette with the full reel on the left. Locate the desired starting point on the tape using Rewind or Fast Forward. Tune to the desired station. Press the Cassette Record Button and Cassette Play Button simultaneously. Both buttons should remain depressed. Recording will automatically stop at the end of the tape. To stop manually, press the Cassette Stop/Eject Button. To play the recorded tape, slide the Function Switch to TAPE, then Rewind and Play.
Load a blank cassette. Set the Function Switch to TAPE and Power Switch to ON. Press the Cassette Record Button and Cassette Play Button simultaneously. Your voice will be recorded when speaking in front of the set. Recording automatically stops at the end of the tape. To stop manually, press the Cassette Stop/Eject Button. To play the recording, press Rewind and Play.
Load a cassette and a CD. Set the Function Switch to CD and Power Switch to ON. Press the Cassette Pause Button, then the Cassette Record and Play Buttons for record stand-by. Start the CD playing. Press (and release) the Cassette Pause Button when ready to record. The CD music will now be recorded onto the cassette. Recording stops automatically at the end of the tape or manually by pressing the Cassette Stop/Eject Button. To listen, slide the Function Switch to TAPE, then Rewind and Play.
Simply record any new song over an existing one; the old recording will be automatically erased.
Use well-known brands of normal bias cassette tapes. C-120 (120 minutes) cassettes are not recommended due to their thinness. This set is not designed for CrO2, Fe-Cr, or METAL tapes for optimal sound quality, though they can be used.
Record Lever Interlock: Cassette tapes have tabs that, when in place, allow recording. To protect a tape side from accidental erasure, break off the corresponding tab with a screwdriver. Music tapes purchased from stores typically have these tabs removed. If you need to re-record on a protected tape, cover the tab holes with plastic tape. If the Record Button does not stay down, check for missing tabs or if the tape has reached its end.
Cleaning the Tape Heads: Regular cleaning of tape heads, capstan, and pinch roller is crucial to prevent muffled, distorted sound and tape jams. Use a special head-cleaning cassette or a cotton swab moistened with commercially sold head/pinch roller cleaner or alcohol. Allow 10 seconds for drying.
Protect the device from excessive heat. When storing for long periods, remove batteries and unplug the AC cord. Do not leave tape buttons depressed when not in use to prevent damage to the pinch roller. Ensure the full reel is on the left side when inserting tapes.
CD Player Cleaning: Use a chamois soft cloth slightly moistened with water to clean the housing. Note that the CD player and cassette decks have self-lubricating bearings and should not be oiled or greased. If the CD player does not function after being moved from a cold to a warm environment, condensation may have formed on the laser lens; it will dissipate over time.
| Brand | Lenoxx Sound |
|---|---|
| Model | CD-149 |
| Category | CD Player |
| Programmable Memory | 20 Tracks |
| Frequency Response | 20 Hz - 20 kHz |
| Playable Media | CD |
| Power Source | AC adapter or batteries |
| Features | LCD display, repeat |
| Power Supply | AC |
| Output | Stereo audio |