/HYHOWKHÀRRUER[
• Temporarily store low voltage divider in box.
• Attach protective cover using the screws provided. DO NOT over torque.
• Use the elevation screws and the bullseye level on the protective
cover to level the box.
NOTE:7KHWRSRIWKHÀRRUER[VKRXOGH[WHQGDERYHWKHOHYHORIWKH
SRXUHGFRQFUHWHWRDFFRPPRGDWHDGGLWLRQDOÀRRULQJ7KHÀRRUER[
FDQEHFXWÀXVKDIWHUÀRRULQJLVLQVWDOOHG
• 6ORWVFDQEHXVHGWRVHFXUHÀRRUER[WRUHEDU
• Pour concrete and let it cure.
6HFXUHWKHÀRRUER[
3RVLWLRQWKHÀRRUER[DQGFRQQHFWFRQGXLW
• Use the reducers if necessary. Plug the unused conduit ports.
NOTE: A "Y" adapter is sold separately to split power conduit. Use reducer.
2
3
,QVWDOODWLRQ
1
&RQFUHWH)ORRU%R[6\VWHP
Cat. Nos. FBBOX, FBLEV, FBC1X, FBC1F, FBC1S, FBC2F
:$51,1*72$92,'),5(6+2&.25'($7+
78512))32:(5 AT CIRCUIT BREAKER OR FUSE AND TEST THAT THE POWER IS OFF BEFORE WIRING!
• WHEN THE BOX IS USED IN APPLICATIONS WITH BOTH LINE AND LOW VOLTAGE, DO NOT APPLY POWER UNTIL DEVICES ARE TERMINATED AND
DIVIDER IS IN PLACE. ,03257$17$/:$<65287(/2:92/7$*(:,5,1*7+528*+&21'8,73257/$%(/(''$7$
• DO NOT ADJUST THE LEVELING RING TOO HIGH TO CREATE A GAP BETWEEN THE BOTTOM OF THE LEVELING RING AND THE TOP RIM OF THE FLOOR BOX.
• Install and/or use in accordance with appropriate electrical codes and regulations.
•
Leviton Reducers (FBRDT, FBRPW), Leveling Ring (FBLEV), Low Voltage Divider (FBDIV), Y Adapter (FBYAD) and all cover plate kits are meant for use with Leviton FBBOX only.
• Leviton FBBOX should only be installed by an electrician.
• Use this device with FRSSHURUFRSSHUFODGZLUHRQO\.
WARNINGS AND CAUTIONS
PK-A3232-10-00-0B
&RQFUHWH)ORRU%R[.LW&RQWHQWV&DW1R)%%2;
&RYHU3ODWH.LWV
(1*/,6+INSTALLATION INSTRUCTIONS
Protective Cover
(with bullseye level)
Low Voltage Divider
Cat. No. FBDIV
*also sold separately
Box Elevation Screws (4)
For Data Port:
Cat. No. FBRDT
*also sold separately
Reducers
2 to 1.25 in (2)
2 to 1.5 in (2)
plugs (2)
For Power Port:
Cat. No. FBRPW
*also sold separately
Reducers
1.25 to 1 in (2)
1.25 to .75 in (2)
plugs (2)
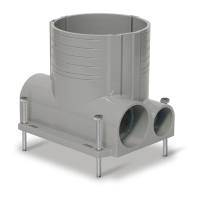
Floor Box
Leveling Ring
&DW1R)%/(9
3
Y adapter
1
Mounting
Bracket
Ground
Connector
Mounting
Bracket
Leveling
Screws
Cat. No. FBC1X Cat. No. FBC2F
1
1
3
2
2
3
2
6
7
8
8
<$GDSWHU
&DW1R)%<$'
8
7
6
Srews
provided
Cat. No. FBC1F
Cat. No. FBC1S