12 AllevaBody User Manual Lifepro
10
mins
RED
NIR
Level
Pulse
100%
Null
Timer
Mode
Level
Pulse
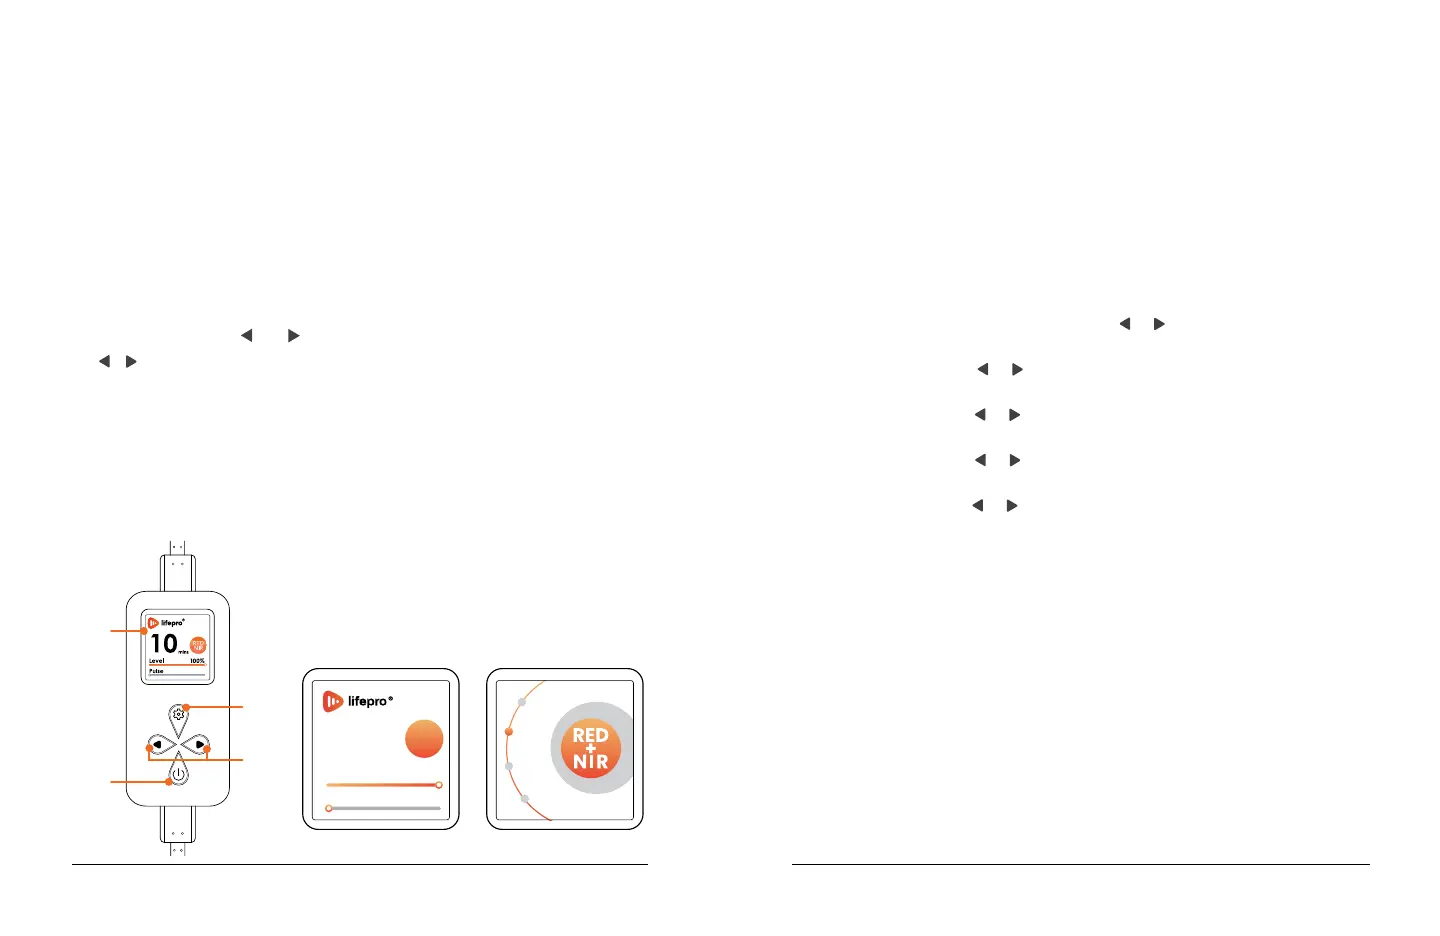
Settings MenuHome Screen
USING THE REMOTE CONTROL
1. On/Off Button: When connected to power, the remote control will turn
on and the home screen will show the default program. Press to turn
on the red light mat and begin the treatment session (either using the
default settings or after adjusting the settings). Press a second time
to pause the session and a third time to resume the session. Press and
hold to turn off the remote control and mat.
2. Display Window: Shows the selected working time, mode, brightness
level, and pulse frequency.
3. Settings Button: Press to enter the settings menu and toggle through
the settings options, timer, mode, brightness level, and pulse (the
frequency for pulsed-light therapy). An orange dot indicates the
selection. Use the
and buttons to adjust the selected option.
4.
/ ( Increase / Decrease ) Buttons: Press to adjust the selected
setting. For time, set the number of minutes, from 1–30 minutes in
increments of 1. For mode, toggle through the three modes, RED&NIR
(660 nm + 850 nm), RED (660 nm), and NIR (850 nm). For brightness
level, set the brightness from 1–100%, in increments of 1%. For
pulse, set the frequency from 1–1000 Hz in increments of 1 Hz; press
and hold for 3 seconds for increments of 10Hz; press and hold for
5 seconds for increments of 100Hz. “Null” indicates a pulse of 0 Hz
(pulsed-light therapy is off).
NOTE: On start-up, the home screen shows
the default program: 10-minute working time,
RED&NIR mode, 100% brightness, “Null” (0 Hz)
pulse frequency.
2
1
3
4
Wellness Recovery Collection 13
USING YOUR ALLEVABODY
1. Set up the AllevaBody following the instructions in the EASYSTART
SETUP GUIDE on page 8.
2. Climb into the AllevaBody as you would a sleeping bag and close the
zipper. Your head will be at the top, outside of the AllevaBody wrap.
3. The remote control will turn on automatically when connected to power.
The default treatment program will be set automatically to RED&NIR
mode, at brightness level 100%, for 10 minutes. Pulse frequency is set
to “Null” (off) by default.
4. Press the Settings button to toggle through the settings, time,
mode, brightness level, and pulse frequency if desired. An orange dot
indicates the selection. Then press the
or button to adjust your
desired setting(s):
a. Timer: Press the
or button to adjust the time from 1–30
minutes in increments of 1 minute. The default time is 10 minutes.
b. Mode: Press the
or button to toggle between the 3 modes,
RED&NIR, RED, and NIR. RED&NIR is selected by default.
c. Level: Press the
or button to adjust the brightness level from
1–100% in increments of 1%. 100% is selected by default.
d. Pulse: Press the
or button to adjust the pulse frequency from
1–1000 Hz in increments of 1 Hz. “Null” (Pulsed-light therapy off) is
selected by default.
5. Press the On/Off button a second time to begin the session; the timer
will begin counting down automatically. The settings can be adjusted at
any time during the session.
6. Press the On/Off button to pause the session at any time. Press it
again to resume the paused session.
7. The AllevaBody will automatically shut down after the set working time
ends. Press and hold the On/Off button to end the session before the
working time completes. Always power off and unplug the device after
each use.
8. Allow the red light mats to completely cool before rolling, storing, or
cleaning.
 Loading...