Recovery + Fitness Collection 11
LAY OUT THE TREADMILL PARTS AND HARDWARE
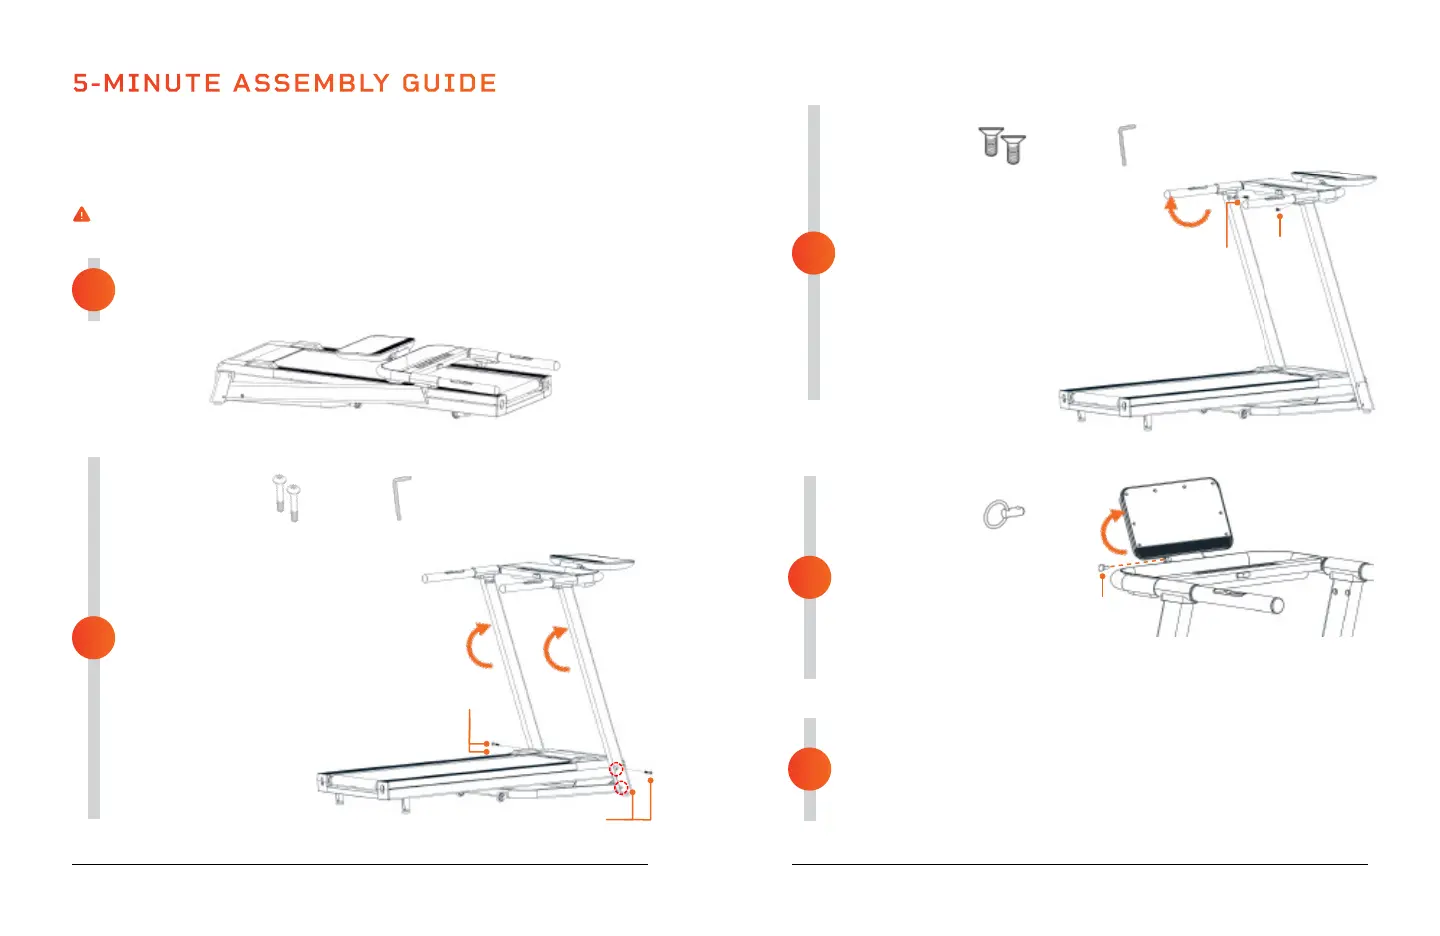
1. Place the folded body of the treadmill on the floor.
2. Place the hardware and tools on the floor nearby.
ASSEMBLY NOTES
• Assemble the Pacer on flat, clean floor.
• Make sure you have at least a 6-by-6-foot space to complete the
assembly. Ensure the space is free of obstructions.
Assembly requires two people; the treadmill is heavy and bulky.
5-MINUTE ASSEMBLY GUIDE
2
1
10 Pacer User Manual Lifepro Recovery + Fitness Collection 11
SECURE THE HANDRAIL FRAME
You will need:
1. Tilt the handrail frame up so the
handrails are parallel to the floor.
2. Insert a M8x35mm screw into the
screw hole on the INSIDE of one
of the upright posts.
3. Use the 5mm hex key to tighten
the screw.
4. Follow steps 2-3 to secure the
handrails to the second
upright post.
3
5
4
ASSEMBLE THE UPRIGHT POSTS
You will need:
1. Lift the treadmill frame up.
2. Insert a M8x35mm screw into
the screw hole on the OUTSIDE
of the frame to secure the first
upright post.
3. Tighten the screw with the 6mm
hex key.
4. Use the 6mm hex key to tighten
the pre-installed screw below
the one you just inserted.
5. Follow steps 2-4
to secure the
second upright post.
LUBRICATE THE TREADMILL BELT
Before using the Pacer for the first time, you must lubricate the
treadmill belt.
1. Follow the steps in LUBRICATING THE TREADMILL BELT on
page 32.
SECURE THE DISPLAY
You will need:
1. Tilt the display monitor
upwards.
2. Insert the locking pin
into the left side of the
joint below the display
to secure it in place.
M8x35mm
Screw
M8x35mm
Screw
M8x35mm Screw (2) 6mm Hex Key
5mm Hex Key
M8x12
Screw
M8x12mm Screw (2)
M8x12
Screw
Locking pin
Locking pin
 Loading...