Do you have a question about the Lifetime 80339 and is the answer not in the manual?
| Brand | Lifetime |
|---|---|
| Model | 80339 |
| Category | Outdoor Cart |
| Language | English |
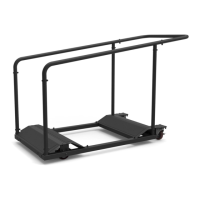
Insert the ends of the two Side Frames (EBB & EBF) into the front and rear Braces (EAZ). Align the holes.
Secure the Wheel Brackets (EBJ) to the Side Frames. Do not overtighten.
Slide the Front Wheels (AMU) down inside the Side Frames.
Secure the Front Wheels to the Side Frames. Do not overtighten.
Secure the Rear Wheels (EAS) to the brackets on the back of the Side Frames. Do not overtighten.
Slide a Rear Vertical Support Tube (EBE) over the Side Frame and align the holes.
Secure the Tube to the Side Frame. Do not overtighten. Repeat for second tube.
Slide a Front Vertical Support Tube (EAY) over the Side Frame and align the holes.
Secure the Tube to the Side Frame. Do not overtighten. Repeat for second tube.
Slide a Horizontal Support Tube (EBG) over the Vertical Tubes and align the holes.
Secure the Horizontal Tube to the Vertical Tubes. Do not overtighten. Repeat for second tube.
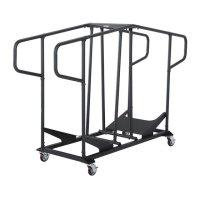
Slide the Handle (EBA) over the Horizontal Tubes and align the holes.
Secure the Handle to the Tubes. Do not overtighten.
Secure the Rear Panel (EBD) to the Side Frames. Tighten only by hand at this time.
Secure the Rear Panel (EBD) to the Side Frame brackets. Tighten only by hand at this time.
Flip the Cart on its side and secure the Rear Panel to the rear Brace. Tighten only by hand.
Set the Front Panel (EAX) over the Frame. Tighten only by hand at this time.
Secure the Front Panel to the Brackets. Tighten only by hand at this time.
Secure the Front Panel to front Brace. Tighten only by hand at this time.
Secure the Second Front Panel to the Side Frames. Tighten only by hand at this time.
Secure the Front Panel to front Bracket. Tighten all hardware.