6
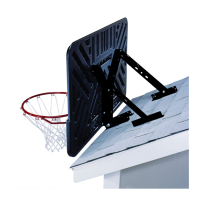
STEP 3
NOTE: Refer to the instructions included with the Backboard to complete this step.
a. Assemble the Rim and attach it to the Backboard according to the instructions included with the Backboard.
b. Follow the instructions included with the Backboard to secure the Brackets.
s&/27!,,-/5.4).'#/.4).5%/.0!'%
s&/22//&-/5.4).'452.4/0!'%
s&/20/,%-/5.4).'452.4/0!'%
SCHRITT 3
ÉTAPE 3
PASO 3
s0!2!-/.4!*%!5.!0!2%$#/.4).Á%!,!0«').!
s0!2!-/.4!*%!,4%#(/6!9!!,!0«').!
s0!2!-/.4!*%!5.0/34%6!9!!,!0«').!
NOTA: Consulte las instrucciones que acompañan al Tablero para completar este paso.
a. Arme el Aro y asegúrelo al tablero siguiendo las instrucciones que acompañan al Tablero.
b. Siga las instrucciones que acompañan al Tablero para fijar los Soportes.
s&Ã2$)%-/.4!'%!.$%27!.$")44%!5&3%)4%
&/24&!(2%.
s&Ã2$)%-/.4!'%!-$!#(")44%!5&3%)4%
&/24&!(2%.
s&Ã2$)%-/.4!'%!.%).%--!34")44%!5&
3%)4%&/24&!(2%.
ANMERKUNG: Für die Durchführung dieses Schritts nehmen Sie bitte auf die dem Zielbrett beigepackte Anleitung
Bezug.
a. Bauen Sie den Korbrand zusammen und befestigen Sie diesen am Zielbrett gemäß der dem Zielbrett beiliegenden Anleitung.
b. Befolgen Sie die dem Zielbrett beiliegende Anleitung, um die Träger zu sichern.
s0/52,).34!,,!4)/.352-52#/.4).5%:%.0!'%
s0/52,).34!,,!4)/.!54/)46/)2,!0!'%
s0/52,).34!,,!4)/.!50/4%!56/)2,!0!'%
NOTE: Se référer aux instructions accompagnant le panneau pour compléter cette étape.
a. Assembler l’anneau et l’attacher au panneau selon les instructions accompagnant le panneau.
b. Suivre les instructions accompagnant le panneau pour fixer les supports.
15
12
•
•
•
ステップ3