Quick Start Guide
Remove microphone
from charger. Press
the mute button to
unmute, hold near
your mouth and
begin speaking.
Remove microphone
from charger and press
the mute button to
begin speaking.
USING THE FLEXMIKE
PAIRING MICROPHONES TO TOPCAT
CHARGE MICROPHONES NIGHTLY
USING THE SHAREMIKE
ALIGN WITH
COLLARBONE
TALK (BLUE)
MUTE (WHITE)
TALK (BLUE)
MUTE (WHITE)
POWER/MUTE BUTTON
ADJUST
VOLUME
NORMAL OPERATION
CHARGING IN PROGRESS
CHARGING COMPLETE
POWER/MUTE
BUTTON
ADJUST
VOLUME
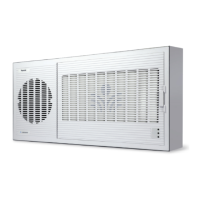
FIRST, ENSURE THE SYSTEM IS POWERED ON
When powered on, the white LED on the Topcat speaker panel will glow.
STATUS LIGHT
STATUS LIGHT
POWER STATUS
LIGHT
Place the microphones
into the cradle charger. The
power status light will glow
red when it is charging.
When charging is complete,
the power status light will
glow green.
It takes about 5-6 hours to
fully charge the microphone
battery.
Your system is shipped with microphones and base units pre-paired for quick and easy use.
If you ever need to pair new components, follow this pairing process:
FLEXMIKE
SHAREMIKE
IR TRANSMITTER
BACK FRONT
MIC 2
POWER
MIC 1
MIC 2
MIC 1
POWER
From a powered o state, point the IR
transmitter lens toward the base unit
(for Sharemike, the transmitter lens is
located on the back of the microphone).
POINT MICROPHONES AT TOPCAT
1
Press and hold the power button for
5 seconds until the Mic 1 and Mic 2 lights
start flashing, then release the button
and let the pairing process finish.
PRESS AND HOLD POWER BUTTON
2
The status light on Topcat will light
up indicating the pairing process is
complete. The Mic 1 or Mic 2 light on
the microphone will stay illuminated.
CONFIRM STATUS
3
Instructional Audio System