EasyManua.ls Logo

Liko Sabina User Manual

Liko Sabina
37 pages
To Next Page IconTo Next Page
Page #1 background imageLoading...
Page #1 background image
www.liko.com
36
Sabina™
Cable for Charging
Laddningskabel
Assembly Instruction
Monteringsanvisning
3SE630237-06
2012-09-11
© Copyright Liko AB
www.liko.com
NOTE
- Never charge batteries in a wet area.
- The lift cannot be charged with the emergency stop engaged.
- When charging, a yellow indicator light on the control box will illuminate. The yellow light turns off when the battery is fully
charged. If the light has not turned off after 8 hours of charging, the battery may need to be replaced. Stop charging and
replace the battery.
- Make sure the spare part is mounted according to the assembly instruction.
- Check all functions related to the changed spare part.
-
Repairs and maintenance may only be performed by personnel authorized by Liko/Hill-Rom and using original Liko spare parts.
Prod. No. 20090026 EU
20090027 UK
20090028 US
20090050 AU/NZ
Contains: Qty:
Charging cable 1
Fits:
Golvo 7000ES / 7007ES / 7007 LowBase
Golvo 8000 / 8008 / 8008 LowBase
Uno 100 EM/EE
Uno 102 EM/EE/ES
Sabina EM/EE
Sabina II EM/EE
Viking XL
Viking L
Viking M
The lift cannot be used when the charger cable is plugged into an electrical outlet.
Lift equipped with Liko Diagnostic System™
5.248
Question and Answer IconNeed help?

Do you have a question about the Liko Sabina and is the answer not in the manual?

Liko Sabina Specifications

General IconGeneral
BrandLiko
ModelSabina
CategoryLifting Systems
LanguageEnglish

Summary

Charging Cable Assembly

Extension Cable US Assembly

HandControl Hook Assembly

Screw M12x105 Assembly

Pivotpoint Actuator Sa II Assembly

Sabina Liftarm Assembly

Locking Handles Assembly

Star Wheel M8 Assembly

Locking Rail & Star Wheel M6 Assembly

Bolt Connection Assembly

Plastic Cover Assembly

Pressure Spring Assembly

Mast Sabina II Assembly

Hook Assembly

Leg Support II Assembly

Leg Support Cover Assembly

Sabina Hook Retrofit Kit II Assembly

Center Assembly Set

Periodic Inspection

1 General inspection

Inspect for scratches, dents, deformities, or unusual surface wear on the lift.

2 Type/model identification decal

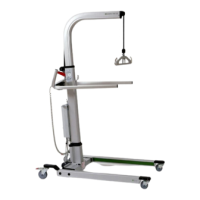
Verify presence of mast decal with model type and serial number.

3 Castor wheels

Roll lift to check castor free movement and verify fastener tightness.

4 Castor brakes

Lock brakes to ensure wheels do not turn and housing does not swivel.

5 Base opening and closing linkage

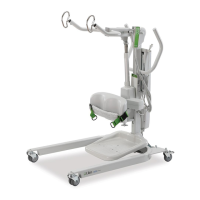
Check pin bolt security, linkage arms, and ball coupling hardware.

6 Base frame castor play & levelling

Check wheel play and levelling on a level floor surface.

7 Foot tray

Inspect plastic foot tray cover for cracks and secure fit.

8 Locking handles

Loosen and retighten locking handles, check threads for damage.

9 Lift arm hardware & covers

Check screw tightness and inspect plastic covers for damage.

10 SlingBar

Verify correct sling hooks and latches are mounted and tightened.

11 Adjustable lower-leg support

Verify locking knobs are tight and inspect plastic backing.

12 Mast actuator

Check actuator fasteners, tubes, fixture, piston rod, and noise level.

13 Battery & electrical cable installations

Inspect battery charge and all electrical cords in control box receptacles.

14 Functions on the hand control

Verify all hand control functions operate correctly with emergency stop out.

15 Emergency Stop function

Test emergency stop button functionality and release mechanism.

16 Electrical emergency-lowering device functions

Verify electrical emergency-lowering device functions with emergency stop out.

17 Charger function

Check charger indicator lights during charging and maintenance.

18 Load Test

Perform load test up/down and base in/out, listen for noises/vibrations.

19 Documentation

Ensure instructions/instruction guide or Quick Reference Guide are available.

Preventative Maintenance

1 Surface treatment

Clean lift with water or ethanol; touch up painted surfaces.

2 Front castor cleaning

Remove, clean, and tighten front castor wheels and housings.

3 Rear castor cleaning

Remove, clean, and re-assemble rear castor wheels and check brakes.

4 Pin bolt lubrication

Lubricate pin bolts and holes after checking thread dimension.

5A Electric base linkarm lubrication

Lubricate link arms and center pin annually; adjust link arms every 3 years.

5B Mechanical base, mounting plate inspection

Inspect mounting plate teeth, linkage arms, and turnable plate welding.

6 Lift arm

Inspect lift arm hardware, plastic shells for wear, and check screw tightness.

7 Battery

Inspect battery contacts and perform capacity test; recommended replacement every 3rd year.

Product Changes

2013 Product Changes

Details on obsolescence of Sabina II EM and specific parts.

2012 Product Changes

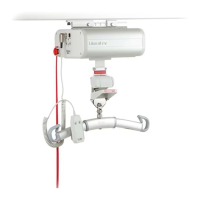
Introduction of new Hook II on sling bars.

2011 Product Changes

Introduction of new Knee support and Hook on sling bars.

2010 Product Changes

Document update according to ISO10535: 2006.

2008 Product Changes

No specific changes listed for 2008.

2006 Product Changes

Changes include batterybox variants and new pivot points arm.

2005 Product Changes

Introduction of new locking handles.

2003 Product Changes

Various changes including screws, packaging, locking nuts, and decals.

2002 Product Changes

Changes include handcontrol coating and component additions/discontinuations.

2001 Product Changes

Notes on 'Last Sabina in old style' and 'First Sabina II'.

Related product manuals