Always read instructions carefully before use.
Instructions for Setup:
Models MV7400 and MV7300©
Insert the Tank Connector into the pour spout in the lid of the
evacuator.
Turn the Control Valve to the “Off” position (handle will be 90
degrees form hose).
Operate the evacuator according to the evacuator instructions.
Model MV7201©
Locate the large, right angle vacuum/pressure port tting on
the lid of the evacuator (see g. 2 above).
If necessary, remove the evacuation hose from the port by
pulling back on the blue sleeve to release the hose.
Remove the Tank Connector from the MVA7205 Brake Bleed-
ing Kit and insert the hose into the vacuum/pressure port.
Turn the Control. Valve to the “Off” position (handle will be 90
degrees from hose).
Operate the evacuator according to the evacuator instructions.
Page
Section
- MV16
- 1B
Form 822678
April 2013
BRAKE BLEEDING KIT/KIT DE PURGE DE FREIN/
JUEGO DE PURGA DE FRENOS
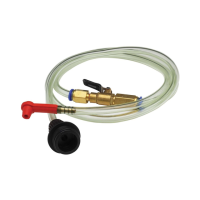
Model/Modèle/Modelo MVA7205
Tank Connector
Rubber Connector
Control Valve
Brake Bleeding Adapter
Directions
Bleeding Brakes with the Fluid Evacuator
Using the Fluid Evacuator and the Brake Bleeding Accessories
Kit provides a simple, clean and quick method for bleeding air
from brake systems. The creation of vacuum in the reservoir
tank of the Fluid Evacuator causes brake uid to be drawn into
the reservoir tank. Usually one or two applications are suf-
cient at each wheel to ensure that all air is evacuated.
The following brake bleeding procedure is recommended:
1. Ensure master cylinder reservoir is full of the specied uid
and new, clean uid is available to top off the reservoir dur-
ing bleeding procedure. Ensure all bleeder ttings are clean
at the start of the bleeding procedure.
NOTE: Keep master cylinder full.
2. Bleed system in the following order:
A. Master cylinder (if equipped). See the Bench Bleeding
Procedure below if a new or rebuilt master cylinder is
being installed.
B. Bleeder screw on combination valve (if equipped).
C. Wheel cylinders and calipers in succession beginning
with the wheel closest to the master cylinder and work-
ing to the farthest one.
3. Place wrench on the nut of the bleeder screw.
4. Connect the brake bleeding adapter onto the bleeder
screw.
5. Open the ow control valve by turning it to the “OPEN”
position.
6. Open the bleeder ‘screw slightly, only enough to cause uid
to ow into the bleeder hose and continue into the Fluid
Evacuator (usually 1/4 to 1/2 turn).
Evacuator Vacuum/
Pressure Port
Control Valve
Bleeder
MVA7205
Figure 1
Figure 2©
© Indicates change
To order call 1-800-548-1191 or visit www.partdeal.com - info@partdeal.com