1. Presentation
2. Versions
3. Technical data
4. Instructions for use
5. Symbols
6. Safety advice
7. Cleaning and disinfection
8. Transport and storage
9. Maintenance
10. Guarantee
1. Presentation
Medical device meant to measure and adjust the vacuum level during medical or surgical suction. It connects to a wall vacuum
supply. The suction controller should be used with a collection jar and a suction hose.
2. Versions
The RVTM3 Suction Controller is available in the following versions:
- Maximum vacuum levels: 0-250, 0-600, 0-1000 mbar/hPa and 0-400, 0-760 mmHg.
- Inlet fitting: Compliant with NF S 90-116 - BS 5682- DIN 13260 - US Ohmeda Diamond - NORDIC – UNI.
- Direct connection or rail mounted (Hose + crimped hose holder + rail clamp).
- Outlet: nipple or nipple + safety jar.
3. Technical data
- Compliant with ISO 10079-3: 2009.
- Unit: millibar (mbar), hectoPascal (hPa) and millimetre of mercury (mmHg): 10 mbar = 10hPa = 7.5 mmHg.
- Accuracy of measures: 1.6 % of full scale of the vacuum gauge.
- Vacuum gauge adjustable through 90° (from - 45° to + 45°).
- Free rotation of regulation knob at its end-of-travel position (no possible blocking).
- Safety jar adjustable through 90° (from - 45° to + 45°).
- Antibacterial filter: 99.97% efficiency for 0.3 µm particles.
- Unit serial number: laser engraved on the device body.
- 0-250 mbar version has a safety valve.
- Metal connection nipple, fitted directly into the body of the suction controller.
- Maximum flow rate: 110 l/min (for a pump with a flow rate of 160 l/min).
- Calibrated leak of 3 I/min (in use) to allow a dynamic control of the depression
- Operating temperature: 23°C.
4. Instructions for use
- The suction controller must be used exclusively by people who have been trained.
- Influence of the vacuum supply: caution, check the maximum vacuum level of the vacuum supply. The maximum vacuum level of the
suction controller should not exceed the maximum value of the supply.
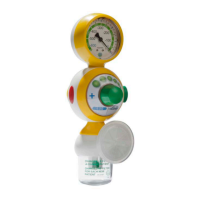
Suction controller
- Make sure the device is undamaged and that the connector complies with the supply connection.
- Make sure the regulation knob is closed.
- Turn the device OFF (red part of the push button visible).
- Connect the device to the wall vacuum outlet.
- Connect the suction controller’s outlet (nipple or safety jar) to the collection jar (Ø 9 mm) using a min. 6.3 diameter suction hose.
- To start suction, press the red button to make green pushbutton visible).
- Turn the front regulation knob anti-clockwise and adjust the vacuum level by closing the patient suction system.
For a temporary stop, use the ON/OFF pushbutton. Vacuum level comes back to its initial value when suction is back on.
For a long-term stop, turn off the regulation knob and the ON/OFF pushbutton (suction system will purge).
Safety jar
- Setting up: by clipping under suction controller:
Align the mark found on the cover of the safety jar
with that found on the skirt attached to the body of the suction controller, then
turn the jar ninety degrees clockwise.
- Removing: turn the safety jar to the left,
align the mark found on the cover of the safety jar
with that found on the skirt attached to the body of the suction controller, then
pull the jar downwards.
Filter
- Setting up: push until click-lock.
- Removing: pull while operating a rotational movement.
- Throw the filter away in compliance with standard procedures.
Why an antibacterial filter?
Aerosol that may be produced during suction might
contaminate suction controllers, fittings, wall
outlets, pipelines and vacuum pumps. Moreover,
without any flow or filter, bacteria might circulate
freely in the patient circuit.
 Loading...