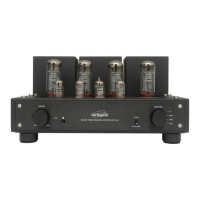
The Line Magnetic LM-211IA is an integrated vacuum tube amplifier designed for high-fidelity audio reproduction. It utilizes a Push-Pull EL34 configuration, delivering 2x32W of power. The amplifier's construction emphasizes quality, featuring hand-made point-to-point wiring and carefully selected electronic and mechanical components.
Function Description
The LM-211IA serves as the central hub for your audio system, amplifying signals from various sources and driving loudspeakers. Its front panel features a prominent Volume knob to adjust the output level, increasing it by turning to the right and decreasing by turning to the left.
An Operation/Mute indicator provides visual feedback on the amplifier's status. When operating, it glows orange. During the initial 30-second time delay after powering on, it will twinkle. If the amplifier is muted (which can be done via the remote control), the indicator will also twinkle.
The amplifier includes an IR remote sensor to receive commands from the included LM-02 remote control. For proper functionality, it's crucial to ensure no obstacles block the line of sight between the remote and the sensor.
A key feature of the LM-211IA is its Triode / Ultralinear switch, allowing users to select between two distinct operation states. The Triode mode offers a different sonic characteristic, which can be chosen if the full power of the Ultralinear mode is not required.
The Selector knob enables source selection from four available inputs: CD, LINE 1, LINE 2, and LINE 3.
On the rear panel, the amplifier provides Signal Inputs (RCA plugs) for connecting "line level" analog audio sources. These inputs are typically color-coded: red for the RIGHT channel and white for the LEFT channel. The amplifier is equipped with Right Output and Left Output terminals for connecting speakers. These terminals are clearly marked with "+" and "-" to ensure correct polarity. It's essential to match the speaker's impedance (between 4 and 8 ohms) to the corresponding terminals on the amplifier.
A Power Socket with main fuse is located on the rear, just below the power cord socket. This fuse is a safety feature and should only be replaced with the same type and value. The side panel houses the main POWER: ON/OFF switch to turn the amplifier on or off.
The top view of the amplifier reveals the Bias adjustment controls for the EL34 power tubes (V1 to V4). There are two sets of bias adjustment screws, one for V1 and V2, and another for V3 and V4. Two Bias Current switches allow monitoring of the bias level for individual tubes on the Ampere meter. When a switch is down, it shows the bias level for V1 (or V3); when up, it shows the bias level for V2 (or V4). The Ampere meter itself monitors the current of the power tubes.
Usage Features
Before initial operation, it is crucial to remove any protective foam pieces used for transport, especially around the tubes, to prevent risks. The amplifier should be placed on a stable, level surface, at least 15 cm away from surrounding walls to ensure adequate ventilation and prevent overheating.
When connecting the amplifier, always ensure the device is unplugged from the mains. Connect speaker cables first, then source cables, and finally the power cord to an electrical outlet. The input voltage level of the amplifier is 230VAC ±5% (50Hz), and it's vital to confirm that your local voltage matches this requirement to avoid damage.
The startup procedure involves setting the volume to zero, switching the amplifier ON, waiting for the orange LED to stabilize after a 30-second blinking period, selecting the desired source, and then gradually adjusting the volume.
The LM-211IA features a SoftStart and time-delay circuit (30 seconds) to protect the tubes and internal components during power-up. It's recommended to wait at least two minutes before re-switching on the amplifier after turning it off to protect the tubes.
The included LM-02 remote control allows for convenient adjustment of the volume (increase with "+" button, decrease with "-" button) and muting the system. When replacing batteries in the remote, use two 1.5V AAA batteries, ensuring correct polarity. Do not mix new and old batteries, and use high-quality batteries to prevent electrolyte leakage.
Maintenance Features
Regular maintenance ensures optimal performance and longevity of the amplifier.
The bias adjustment for the EL34 tubes is a critical maintenance task, though not required for the first use. After turning on the amplifier and waiting for about ten minutes, users can adjust the bias for tubes V1 to V4 using a small screwdriver and the Bias Current switches. The Ampere meter on the front panel helps in ensuring all four tubes (V1, V2, V3, V4) have the same bias level, indicated by the needle falling within the specified area on the diagram. This ensures optimal sound reproduction. When performing bias adjustments, extreme caution is advised as the tubes become very hot.
For cleaning, always unplug the unit and allow it to cool down completely to dissipate any generated heat. Use a soft, dry cloth to clean the amplifier. If using a chemically treated cloth, refer to safety precautions. For stubborn marks, a soft cloth with neutral detergent followed by a dry cloth can be used.
In case of tube replacement, the manual provides a list of basic tubes (12AX7, 12AU7, EL34) and their common replacements (e.g., 12AX7EH, ECC83 for 12AX7; 12AU7EH, ECC82 for 12AU7; 6CA7 for EL34).
Troubleshooting guidelines are provided for common issues such as the power LED being off (check power cord, main fuse), power LED on but no sound (check volume, sound source, input connections), sound distortion (high input signal level), noise output (grounding issues, faulty components), poor stereo image (wrongly connected cables), and remote control issues (external interference, low batteries, blocked IR sensor). For any problems not resolvable through these steps, contacting a local dealer or qualified service technician is recommended. The use of original parts is emphasized for optimal results, and the manufacturer disclaims liability for issues arising from the replacement of original parts with non-original ones.